I used to walk past abandoned trucks out in the woods, so I wanted to capture something of that.
The M9 Armored Combat Earthmover looks super cyberpunk to me, probably because it dates back to the 1980s, still in use. My inner Gibson fan wanted to include some kind of rusting, surplus military equipment in this rural cyberpunk comic, possibly a hovercraft. But I figure this fits the superfund site backstory nicely, since it’s supposedly rated for protection against chemical and biological agents.
Also, like most military vehicles, the M9 has a cult fan following, making it pretty easy to find photos from a variety of angles, along with photos of model kits, which in this format are just as good.
I have a (headcannon-only, at the moment) idea that these machines were upgraded a third time to house AI pilots on a similar level, perhaps a bit smarter, than the bodyguard. And that they might have been left with the chassis when the work was paused, then delayed and delayed, until they finally gave up on remediating the site. One possible resolution for the story might involve the bodyguard making friends with one, who is able to contact a human tech (a former site volunteer) who lives nearby and maintains the abandoned AIs as best he can. He might end up serving as a mediator between the robot and the outside world.
You probably shouldn't tap the trees in a superfund site for sap, but that feels like a fairly cyberpunk sort of resignation/indifference to circumstances. I know some folks who do sapping IRL and they say animals often try to get into it – cows in particular are very clever with disconnecting hoses and such to get access to the delicious sugar water. They didn’t have any stories about deer but I bet it’s happened.
I've almost run through the backlog of art for this silly rural cyberpunk webcomic. I'm hoping to make a few more, but the schedule might get a little unreliable for a bit after page 25. If want to read the rest of it you can find it here: https://jacobcoffinwrites.wordpress.com/president-deer-adventures/
If you’d like to read the related-but-mutually-non-canonical short story version, you can find it here: https://en.scrappycapydistro.info/harbour it’s in the first edition, on page 3!
I appreciate that a significant portion of the 40k universe's problems aren't actually humanity's fault.
Thanks, I'll definitely include that kind of dock/railings, still figuring out how to add greenery. I might shuffle the buildings around to make some room for a park
Hi, I just wanted to say thanks for all your help on my previous question planning art of a more flood-compatible city! I've tried to include everyone's suggestions from last time, plus everything from here, and discussions on reddit and discord.
I don't plan to clutter up the community with any drafts after this one, but I was hoping to get one more pass with my current sketch since its based mostly on your ideas. Is there anything you'd like to see added or changed in a depiction of a city that's built to flood? Thanks again!
This is really cool! I really appreciate the history and the way they changed things around them, along with changes in the way they're perceived. I also think the distinction between the sort of black box device and the focal thing, directly used and serviced by people, is worth considering.
I'm optimistic that solarpunk as a genre might be able to help with the aesthetic appreciation of modern windmills at least. They show up frequently in solarpunk art (though almost more often in the form of altaeros temporary windmill blimps):


I even included one in a scene of a ship at sea:

Its cool to think that the aesthetics of an optimistic genre/movement could help sway the culture in a way that helps support windmills. I also really like the author's suggestions for education possibilities, helping people engage with them, feel a sense of ownership or pride in them, if they are so hard to ignore.
So this is a question that's been in the back of my mind for awhile while seeing celebrations of dams being removed, no worries if you don't want to be the one to answer it.
I think I understand the extent of the damage caused by the implementation of dams, but I guess my impression had been that that damage was done, and there wasn't much of a timeline on fixing it. Like, after eighty years or so, are there fish still trying to get past it?
At the same time, we're struggling (failing?) globally to get away from fossil fuels quickly enough to avoid the worst of climate collapse. It seems like hydro is one of the more reliable green power sources, and is compatible with old grid infrastructure that counts on fairly consistent power so there's less than has to be overhauled in order to just keep using hydro for awhile longer.
So at first glance, it seems like new solar and wind etc production would be better prioritized in replacing oil, coal, natural gas. Prioritizing replacing hydro feels like letting the perfect be the enemy of the good.
I haven't seen that discussion anywhere, so I genuinely expect I'm wrong about that, but I'm wondering why.
Nice! I'll check that out!
Thanks, that makes sense on both topics, they're definitely going on the list!
That's a good list, thank you! I have a couple questions you might be able to answer:
Could you elaborate on the relays? I don't know anything about them yet (in their intended use or alternatives). Though I am reading up on them.
I know there's a some benefit in running 12v appliances (intended for campers) with solar panel setups because you don't have to convert from DC to AC then back to DC at the appliance. Would that work for just using a car's AC unit to cool a room, or are they built too specific to a car or not efficient enough to justify the work?
Thank you!!
That reminds me - inside the rubber squeegee part is a long thin strip of good quality spring steel. Lockpicking folks like it for making tools, diy gun folks sometimes use them to make the extractor. I honestly don't know what to use the rest of the wiper for.
This is a great list with a bunch of stuff I wouldn't have thought of - the transmission reuse is a cool idea!
I think some LED headlights are goood for growing plants. I remember some local news panic piece from years ago about how criminals were stealing headlights for their grow ops. A quick search online confirmed they work fine (probably not worth stealing though) and this post I think suggested a couple other car parts alternative uses I'll have to go back and get later: https://www.rollitup.org/t/is-it-possible-to-convert-a-headlamp-into-a-grow-light.496815/
Thanks again!
That's a great example, thank you!
Hi, I've had some good discussions here in the past, so I thought I'd reach out with an idea for a resource I'd like to try to put together for solarpunk writers and artists.
I was talking with A.E. Marling about a story he's working on, and one of the things he was looking for was uses for old cars.
I think the obvious answer you'll get from solarpunks (aside for limited use where it makes sense) is to melt them down for your society's steel manufacturing needs - electric arc furnace smelters running off a green grid, recycling, are about as close to zero emission steel as you're likely to get, and the metal is already refined so I think you could get pretty tight control over the quality on the output.
But I think reuse offers some much more interesting opportunities. I'm only just starting to learn about fixing cars, but I've already been struck by the fact that at least some parts in cars can go into other things. For example, it looks like certain old alternators can be used to generate a wide range of amperage and voltage, suitable for different needs, including welding: https://diysolarforum.com/threads/diy-low-cost-generator-from-vehicle-alternator-alternating-generator.1843/ so perhaps one could be hooked by belts (adjusting speed) to a waterwheel or something?
I feel like a solarpunk society with a really strong library economy might start cataloguing parts of more complicated machines (even salvaged from machines like cars).
And looking for parts commonalities and alternative uses strikes me as a really cool step towards building an open-source manufacturing sphere. Perhaps starting with a database of hardware/parts so they could be identified and repurposed, and alternatives identified.
So the actual proposal:
I'd like to try and put together a list of common car parts which can be reasonably used in other (more solarpunk) contexts. This doesn't have to be specific down to the model number or include a how-to guide, (though I recognize that some reuses might only be possible with a specific model) just something solarpunk writers could casually drop into a description of a room or workshop, or an artist could put in the background of a scene. Something that shows that this isn't a scratch-built future, but that they're repurposing stuff where they can. Think of all the weird ways postapoclyptic movies dress the sets with misused items from the present - we could offer something like that to solarpunk, but grounded in at least some practicality. If you have any suggestions, I'd love to hear them.
Thanks!
edit: I've built out a list and it's located over here: https://slrpnk.net/post/13032570
Oh, one more to consider: Reckoning Press is more climate fiction than explicitly solarpunk, but it was one of the things that got me to give solarpunk a chance.
Ecotopia is a fun one because it hits all the notes but predates the genre.
Murder in the Tool Library is a favorite of mine because the setting is awesome and aspirational while feeling real and human, and because the murder mystery plot is a change from the usual ecofiction.
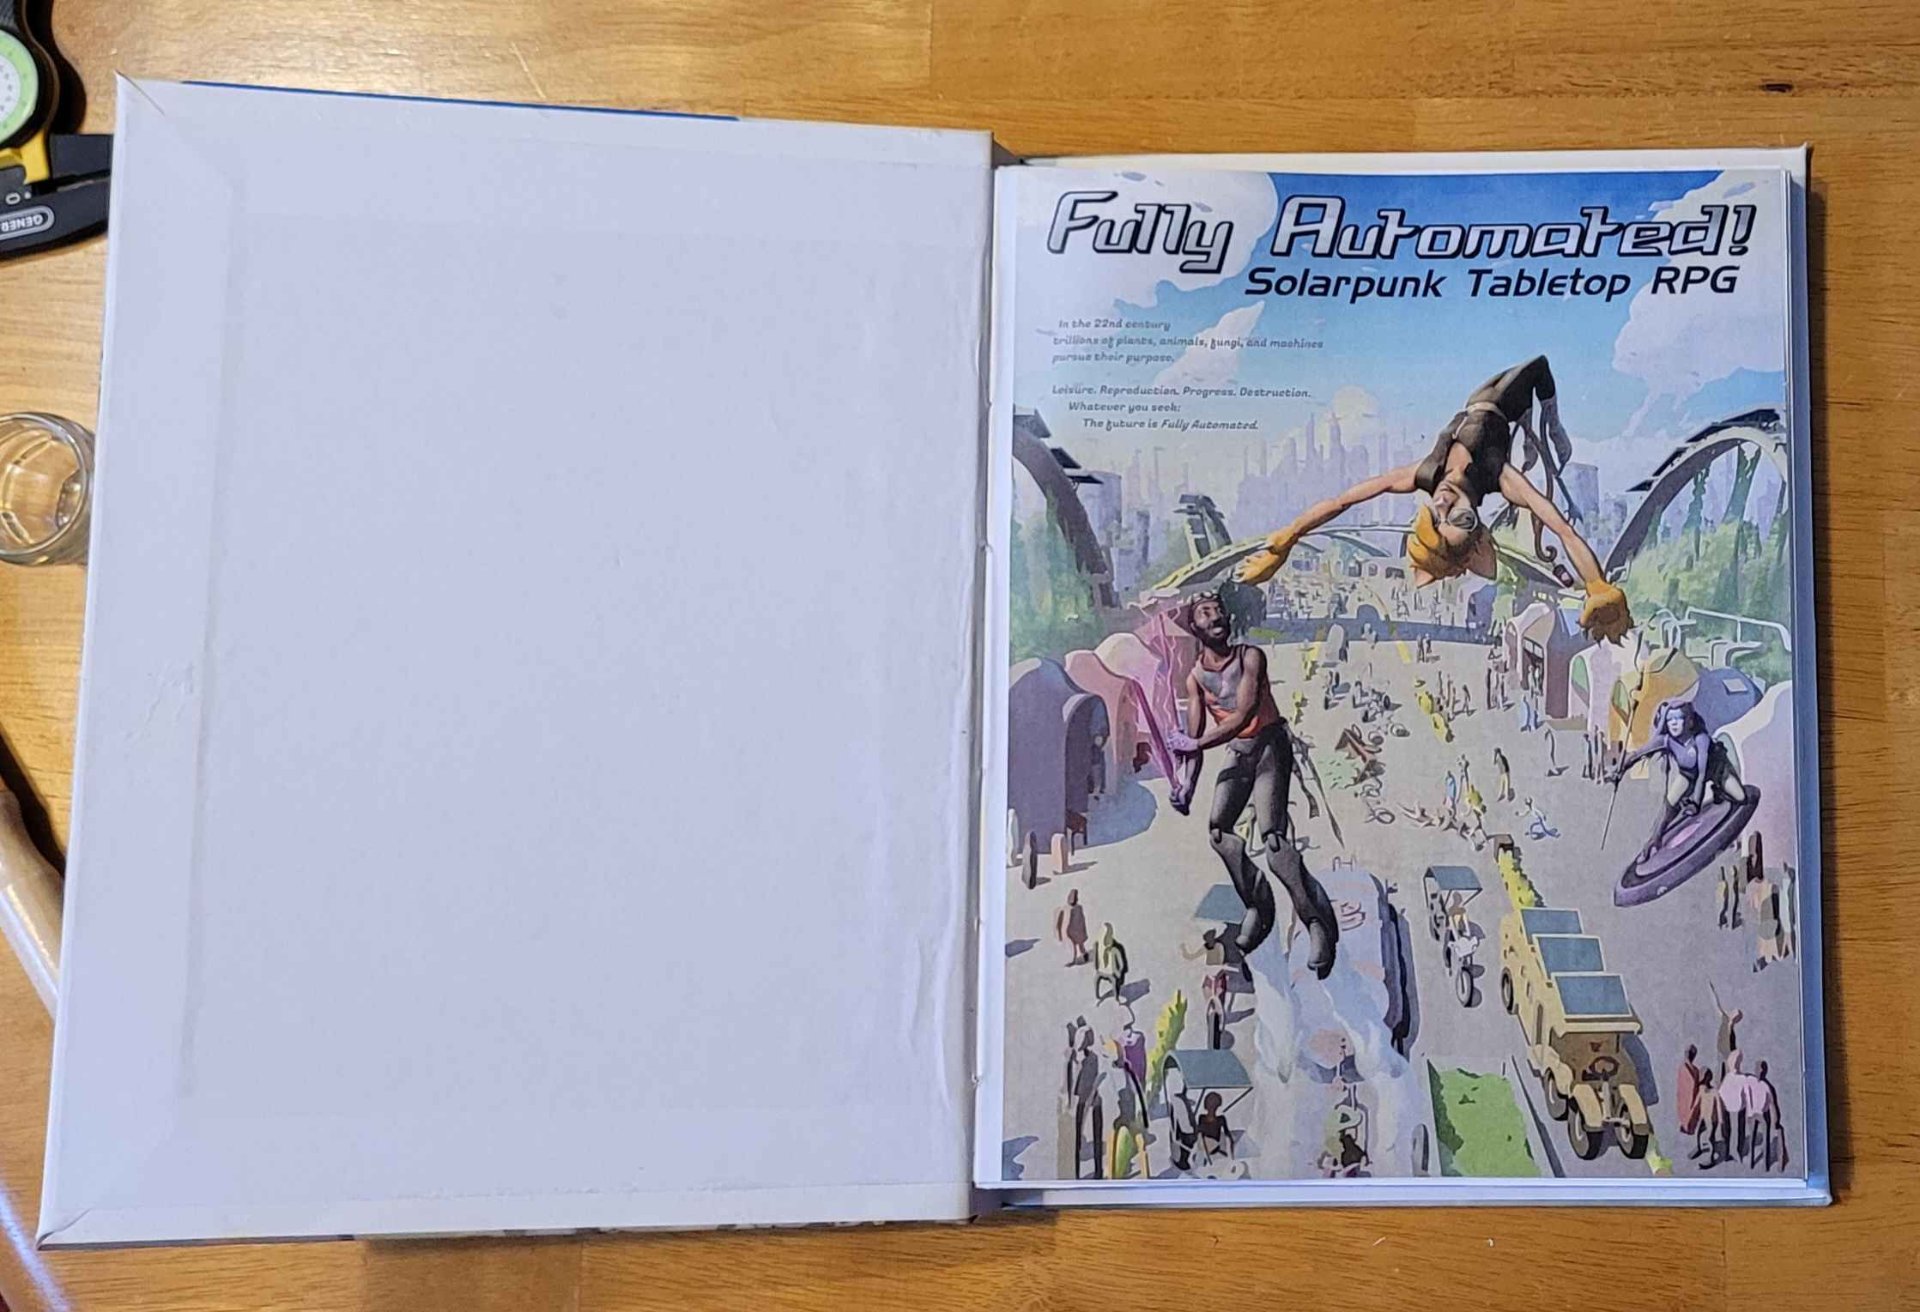
The solarpunk TTRPG Fully Automated! is free (libre and gratis) and has several sections devoted to its setting and worldbuilding that helped me understand a bunch of solarpunk concepts by seeing them in practice and to start thinking much bigger with my own fiction. It also has some good advice on creating engaging plots in an aspirational solarpunk setting where a lot of the usual problems have been solved.
That's interesting, even going with modern tech, it's a neat answer to preserving darkness. Military-grade passive night vision with the analogue tubes are ridiculously expensive but you wouldn't need them just for walking around - simple infrared spotlight goggles are way cheaper, and probably lighter, especially if you remove extra binocular features. They could also be assisted by infrared streetlights if those wouldn't mess up other animals. Downsides: I don't think walking while wearing them would be fun, your depth perception and field of view takes a hit with most designs, and slow update of the screen can be disorienting. They're also more complicated to make than flashlights.
That's an interesting idea - instead of carrying a flashlight you might carry an RFID transponder. They'd need to not be linked to any personal records (such as purchase) to protect anonymity and prevent tracking. And a personal flashlight might still be useful.
I'm not sure I love the idea of lights flicking on, identifying where I am to someone waiting in the dark. Maybe it would turn on lights for a block length on the street or something? I'm also wondering if the reduced on-off cycling would wear out lights faster and, if so, how replacing them more often stacks up to more energy spent running them all the time.
Still it's an interesting compromise position on the light pollution situation.
The question of how to make migrations as pleasant as possible and rebuild as much of the physically embodied culture that was left behind as possible is one that is very relevant right now, so I would love to see you make a postcard of a migrant town, if you don’t already have one. If you can show how even migration can be a place of solarpunk joy, then suddenly the people of New Orleans do have a realistic joyful future despite the bleak prospect of evacuation.
This is a heavy topic with some pretty high stakes but it's going on my list. You're right that it's something worth rendering, it's art we might need, though TBH I hope someone better qualified than me gets to it first.
If you'd like to discuss how these places and experiences should be represented sometime, I'd definitely be interested. I know I'm usually unqualified to make these scenes (aspirational fiction requires so much more knowledge to do well and solarpunk scenes often involve a terrifying mix of civil engineering, history, cultural knowledge, plant knowledge, city planning, accessibility outreach, vehicle infrastructure, and more) but I'm profoundly unqualified to say much of anything about the experiences of refugees and migrants. That'll be something to work towards through research and conversation, and perhaps to carefully reference in small scenes in prose fiction etc at first. References to Little New Orleanses and similar neighborhoods seem like a good place to start, with more detail in time.
Thanks for talking about this stuff with me. I really appreciate it!
That's something I've been wondering about - I live in a place with lots of ledge to anchor foundations to (or to get in the way of basements, depending on your situation and budget). I know skyscrapers drive in huge piles for support which I think aims for that supportive material underground? I know from researching bunkers that in other places the ground is kinda moving steadily, which can roll or twist unprepared or poorly designed structures. I've seen that New Orleans for example has some skyscrapers but just having them doesn't necessarily mean building them is a good long term plan and that the ground will support those kind of structures.
This is so cool! Thank you - this definitely gives me a place to start
I don't disagree - I don't tend to have much sympathy for folks who build in flood planes and end up getting wet, but then again, I'm blessed to live in a region largely free from hurricanes, tornadoes, earthquakes, wildfires, volcanos, and floods. I suppose much of the United States wouldn't pass my ''so don't build there, idiot'' test. The folks who do obviously look at those risks differently than I do, consider their needs, their love of a place, a lack of available housing, opportunities, etc, and probably dozens of other factors when making that decision. I definitely understand loving a place and wanting to preserve it.
I think we've also seen the way culture fragments and changes and is lost when its place vanishes. I don't know that a New Orleans diaspora would be able to preserve or rebuild everything that makes the city special to the people who live there now, and I'm not comfortable just kind of telling them to deal with it, even if it seems inevitable to me now.
I'm not sure what degree of realism I'm aiming for in this art, even after a doing this series for a year. My outlook on our near term future, (when I let myself think about it) is quite bleak. The postcards are kind of an attempt to focus on the potential for something better, to talk about possible options, and to emphasize the aspects of solarpunk I love and to introduce people to them. I want the scenes to feel aspirational and attainable. And in a place (country/national discourse) where a large swath of the population is fearfully/enthusiasticly examining any leftist media for glimmers of top-down, authoritarian conspiracies, I'm aware that pointing out ways things are going to get bad looks to them like a celebration of the end of their comforts etc. And that that can drive people away from solarpunk and from possible solutions. So I don't know, I guess from a messaging standpoint, at the moment, I'd rather emphasize adapting to changing conditions and reconsidering our current ways of doing things in order to talk about those impending problems and what we'll do in response. I've done some other scenes of deconstruction and rewilding but I try to keep them mostly to cultureless mcmansion suburbs rather than working class cities. I'm not really comfortable shrugging and saying it's pointless to try to preserve what we can of something parts of the audience care about.
I want to emphasize that I'm talking about the tone of this particular postcard art series, and trying to find my own goals for it, and that I don't think you're being unrealistic, exactly. I'll keep the difficulties of the preservation aspect in mind.
I've seen raised houses but not many versions of bigger city buildings - if you find any I'd love to reference more examples in the art!
I've seen a few examples of parking garage conversions. I think all are top-down professional things so they don't have the same range of materials or casual attitude towards building load as this one, but some look a bit similar.

https://www.axios.com/2019/10/30/the-future-of-parking-garages
There's also this interesting one that goes less dense on the interior space in favor of more common areas, almost like tiny yards to go with the tiny houses: https://www.axios.com/2019/10/30/the-future-of-parking-garages
I've been thinking about trying to depict some of the ideas from this conversation: https://slrpnk.net/post/12735795, using a sort of flat, diagram-like style similar to this old photobash:
Though a bit more complex. The obvious answer is 'don't build cities in swamps' but we already have a bunch of them, and though I don't live there I recognize that they have a lot of unique cultural and historical value and are peoples' homes, so I'm interested in what a solarpunk-adapted version of these would look like.
At the same time, I know basically nothing about New Orleans or similar areas, have no background in civil engineering, and no qualifications to make this except for the capability to do so using an old version of GIMP. So I'd absolutely love to identify issues, places to make improvements, and things that are missing now rather than once I've spent days chopping up images and finessing them into something coherent.
So what'd I get wrong? What's unworkable, out of scale, or dangerous? What style of buildings or cultural touchstones would you like to see? What kind of plants are missing?
This is basically my most traditional bookbinding project. I used regular fabric cloth for the…
This is basically my most traditional bookbinding project. I used regular fabric cloth for the cover, and followed the traditional steps. The interesting (to me) change is the use of a CO2 laser cutter to mark the fabric. Here's the steps to making it:
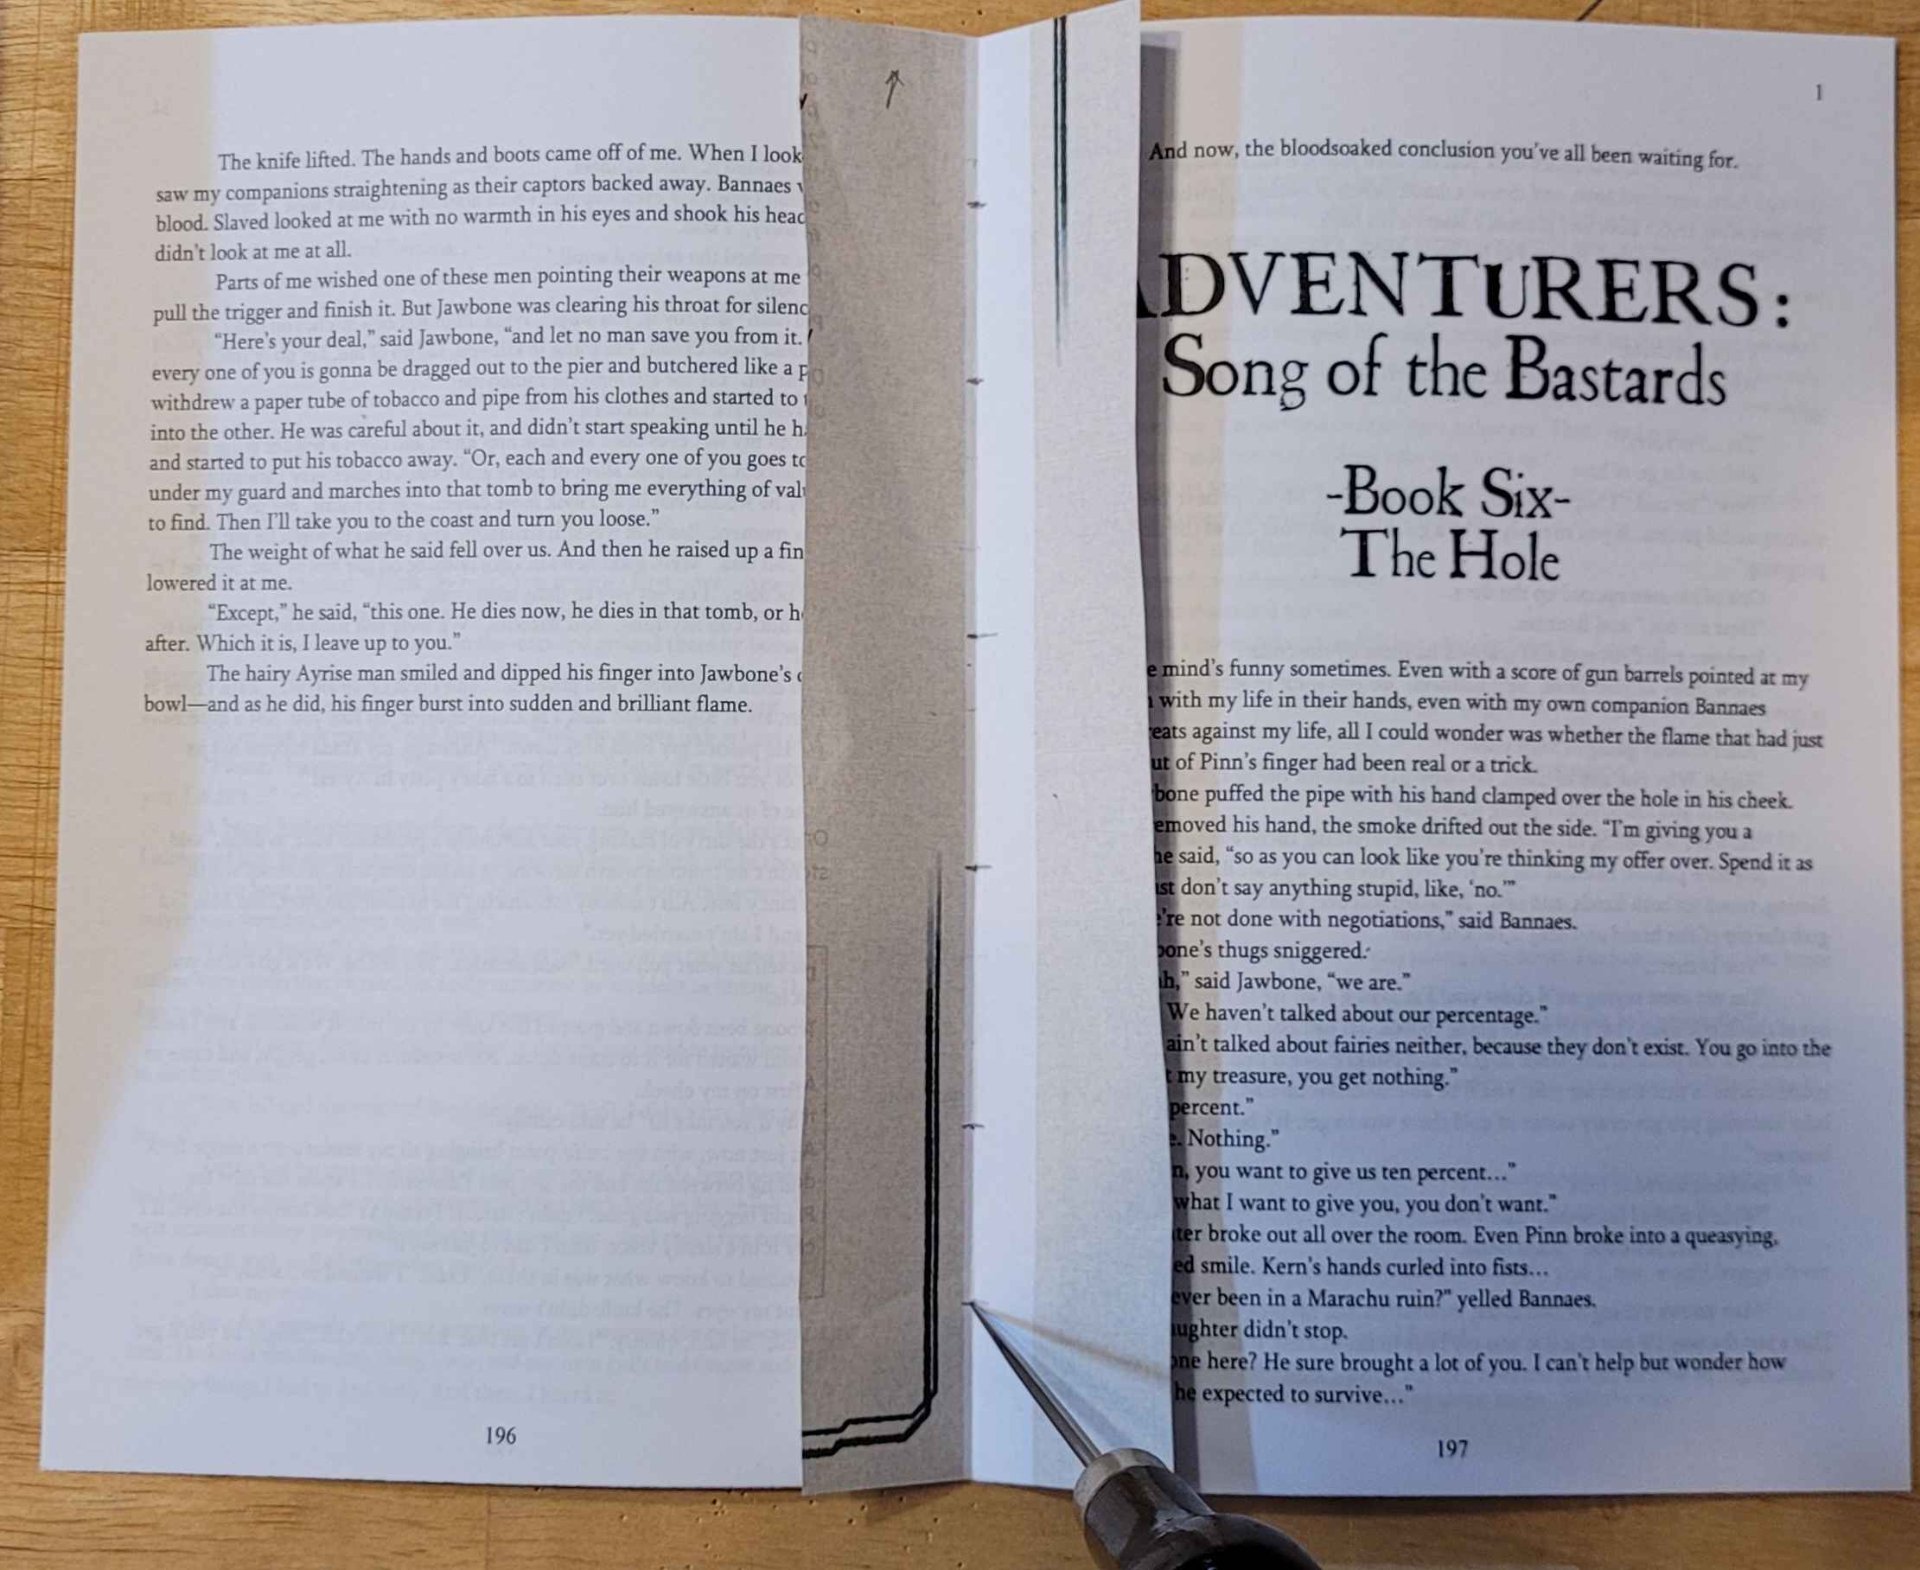
I think it's fair to say that this book is extremely rare. The author has told me that the one physical copy I've made is the only one in the world, aside from an 'ugly stapled proof [he has] in a drawer somewhere.' The book was released on patreon as serialized fiction, with each of the six sections being made available as early drafts to a certain tier. The plan was that he'd put them up briefly, take them down again, then compile the drafts and eventually release a full published version. For life-happened reasons, the last step never got done (though the author was kind enough to repost the six sections on a discord channel when I asked).
Just the same, it was one of my all-time favorite stories, so if it wasn't likely to end up somewhere I could buy it, I was at least going to make a copy of my own.
So I took the six pdfs and started editing them using whichever online tools seemed like they'd do the best job. I started by cropping the files so they'd fit the correct aspect ratio for 8.5x11" letter paper folded in half, but started getting fancier as I went. I removed pages of bonus content from the back of each one so it'd flow better as a book. I merged them all together into one file (to reduce the number of mid-book blank pages from turning it into folio signatures). I even added a second set of page numbers to the bottom because the ones in the top right restarted in every section. I manually added some blank pages front and back.
By the time I was done, I had something to feed into https://momijizukamori.github.io/bookbinder-js/
I used that to create letter page folio signatures (with sets of 4 and 3 pages per signature). Now I had something I could actually print. We did so on a regular office photocoppier, and I can't recommend printing each signature separately and organizing them with paperclips enough. I would have lost my mind trying to sort them otherwise).
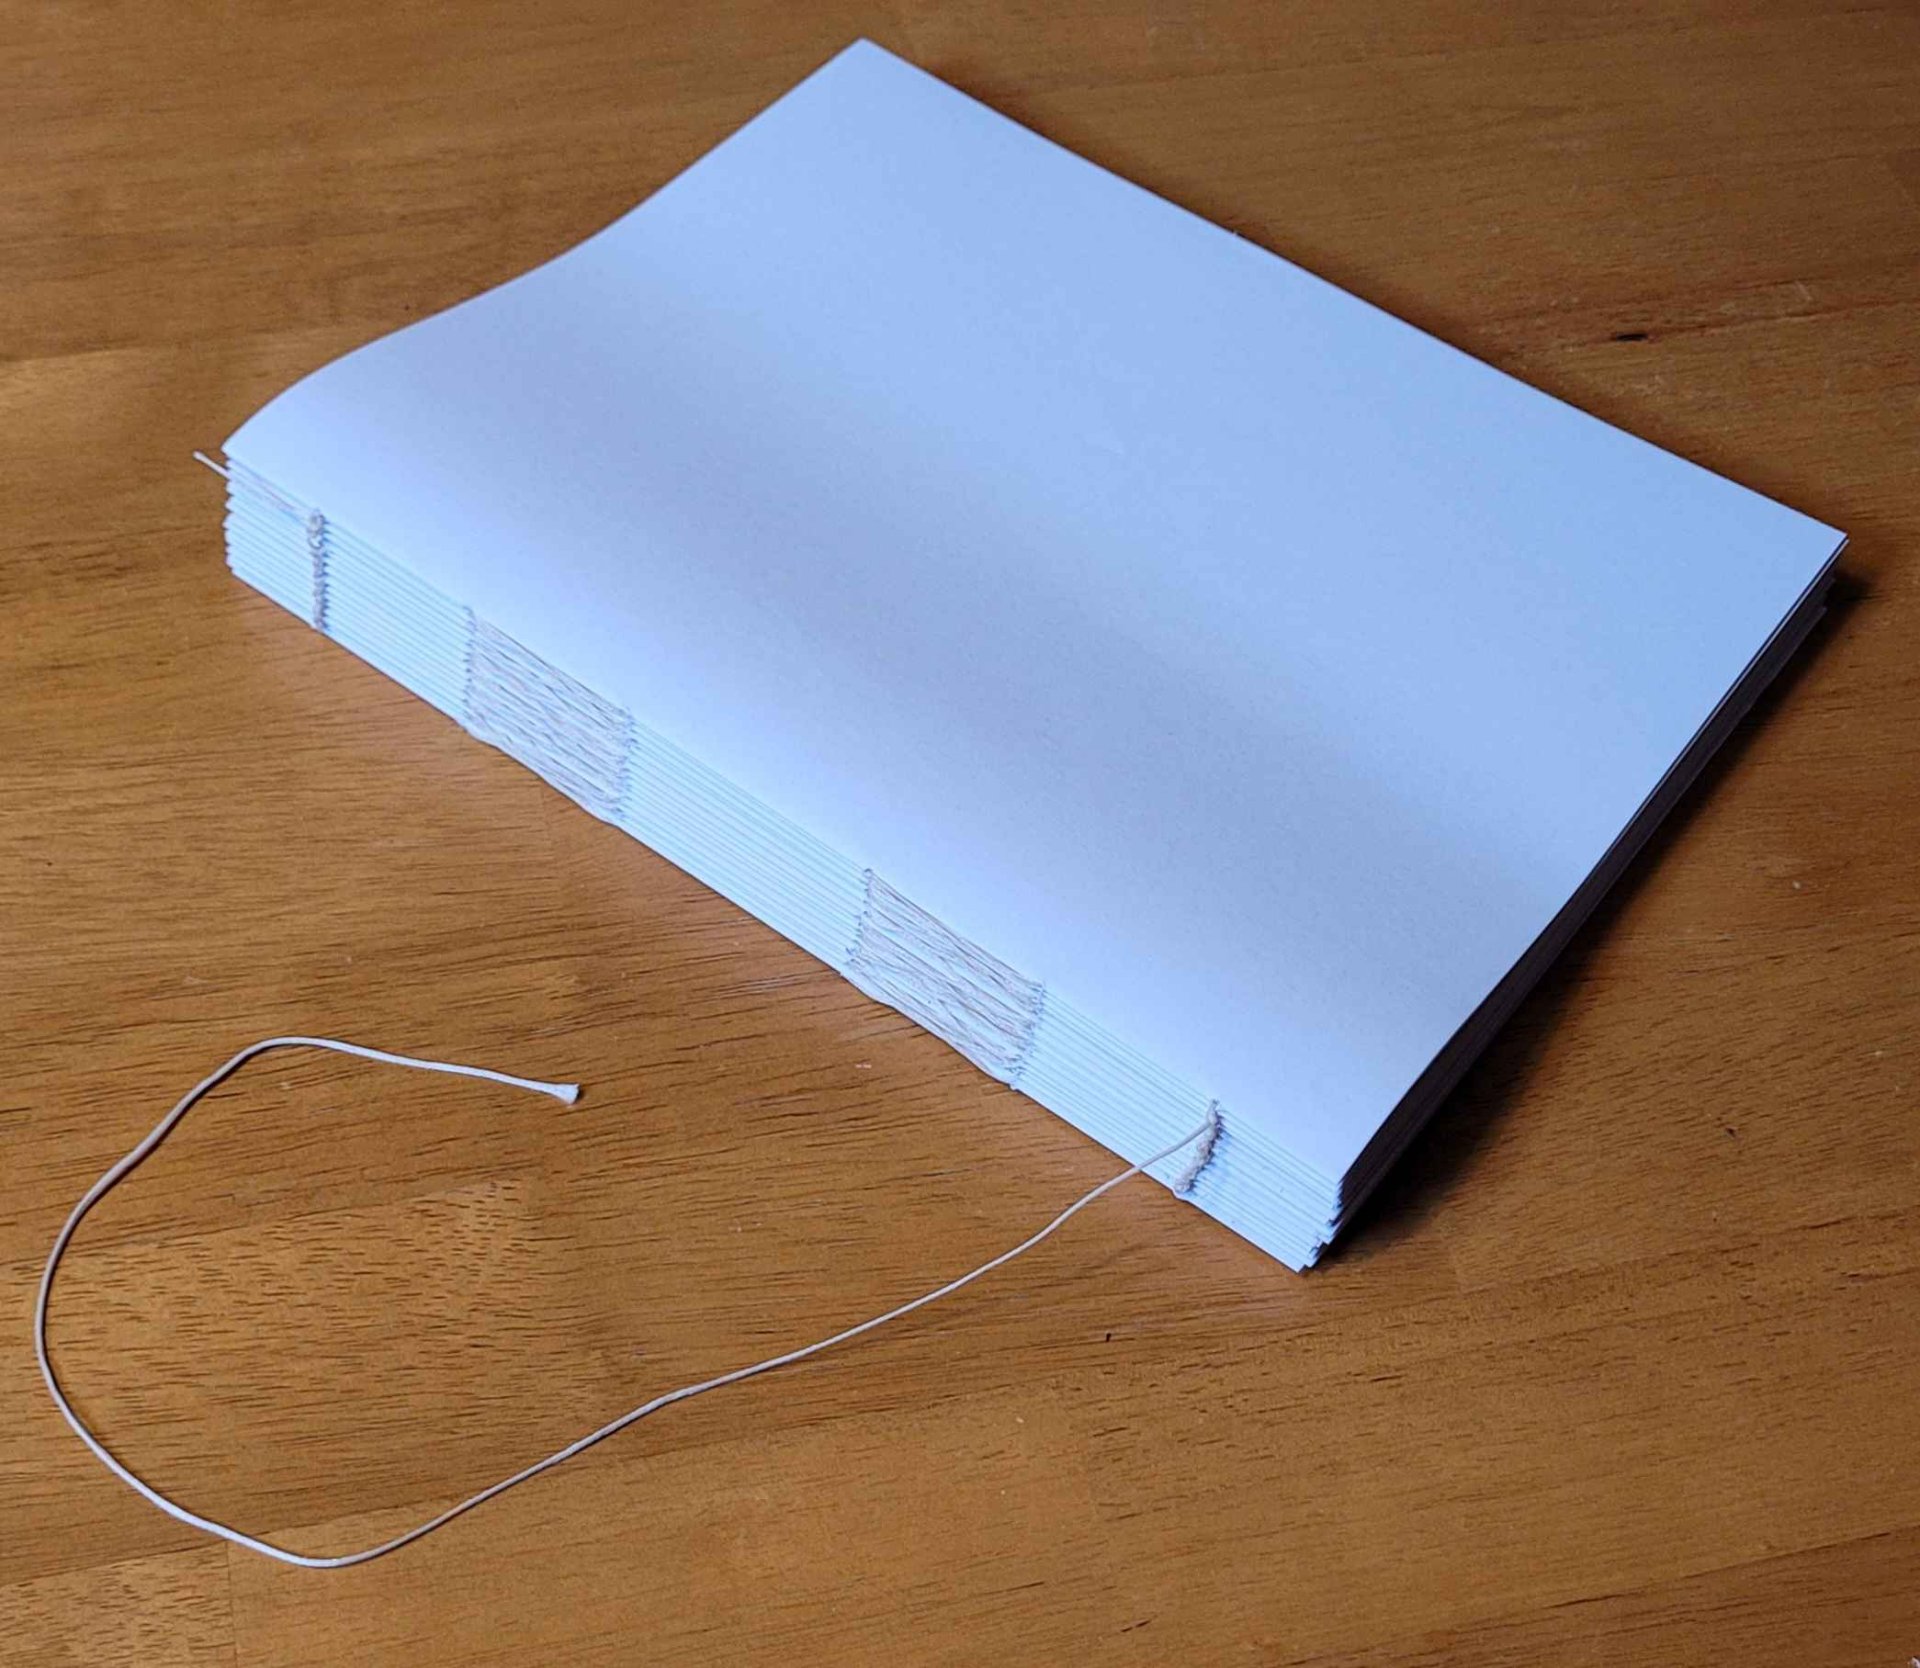
We start off the actual bookbinding in a pretty familiar way, taking each signature, folding each page of it in half with the bone folder, nesting them, and adding that signature to the stack.
Then I used my template from the previous bookbinding project to punch holes through each signature. One really nice thing about not having to trim whitespace from my pages is that the overall page size (and thus most dimensions of the cover except the spine) will remain the same no matter what is printed on the page or which printer I use. So I can reuse things like this template.
Here's my template with its measurements in case you want to reference it:
Eventually this left a nice stack of signatures ready to sew together:
As before, I sewed it together using waxed thread, following the Penrose Press Pretty Perfect Paperback Guide. I know there are a bunch of ways to do this, but I quite like this technique.
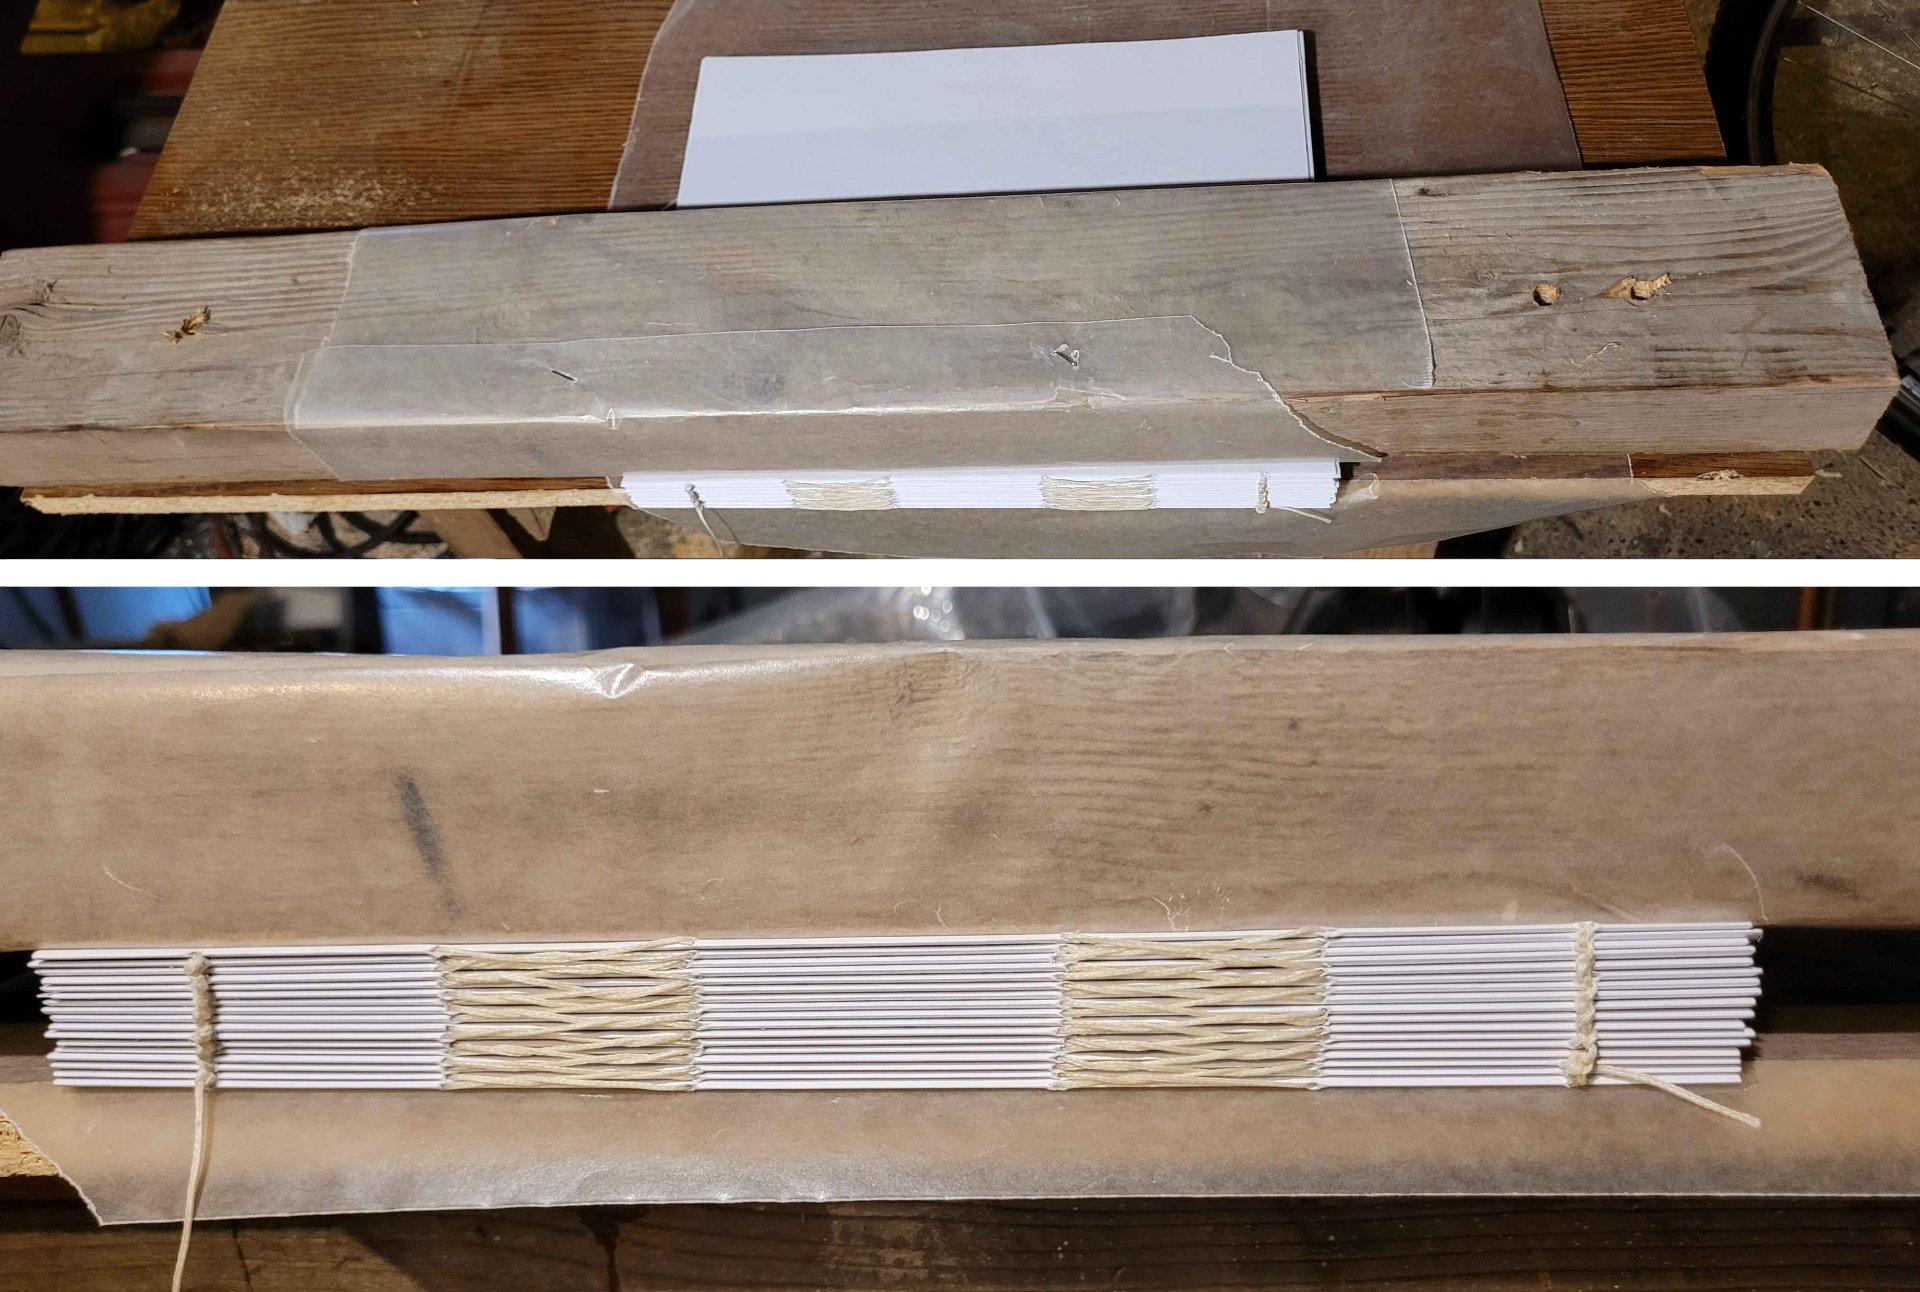
The next step is to clamp and glue the bookblock together. My clamp is pretty crude, it's just a 2x4' screwed to a piece of particleboard, with a couple ragged sheets of wax paper keeping the book from gluing to the clamp.
The goal is to get it as tightly pressed as possible while keeping the book block nice and square.
I didn't take a picture of this step for this project, so here's one from the last book. Note how the signatures are jumbled along the edge. I've gotten much better about lining them up recently.
I usually use my finger to work the glue into the gaps these days, it's faster and makes less mess than the brush. I think it gets into the gaps better too. I do three coats of glue on the spine. For hardcovers like this one, I then glue on a strip of mull or cheesecloth which is a couple inches wider than the spine on either side (front to back), and like an inch or so shorter than the top of the spine (heightwise).
Then I glue on a strip of watercolor paper (it's supposed to be manila paper but I don't have that).
Now it's time to start on the actual cover. I size the bookboard so it'll overlap the book block by 3mm on the top, bottom, and open edge. You're supposed to make it 3mm wider for that overhang, but then remove 6mm for the hinge by the spine (so that's actually -3mm) but I haven't had good luck with that, the open edge always seemed too close to the book block, so I just leave it the same width as the book block and slide it out 6mm. Somehow that works.
To get the spine width, you're supposed to measure the spine of the book plus one thickness of bookboard, but my spines often come out a bit thicker than the rest of the book so I'm sure about that guidance either.
That's the basic layout but I wanted the color to be darker. I was reusing fabric I bought for a halloween costume, but I was picturing more of a maroon color. I didn't want to buy new cloth when I had a bunch on hand I wasn't using, so I decided to dye this piece.
I started off trying to use some very old, expired, dark roast, decaf coffee, but the cloth just wouldn't take the stain, likely due to not being natural fibers. So instead I switched to using some old rit dye I had. I took lots of pictures for the coffee and almost none for the rit dye, so just pretend it's slightly blacker and in a different pot. And that I'm using a stick instead of a wooden spoon.
The nice thing is the rit dye isn't really going to go bad, so I just poured it from the old pot I used (we stopped cooking with it because the nonstick lining had started to flake) into an old jug. I've actually reused it since and it worked fine!
After a lot of hassle, the rit dye finally made the difference.
I ironed the cloth to smooth it out:
And glued the bookboard down onto it. Make sure the gaps between the spine and the front and back is 6mm and that they're square/in line with one another.
The next step is to trim 45s off the corners (leave one bookboard's thickness between the corner of the bookboard and the cut edge) and to clean up the edges.
Then I applied glue to the bookcloth and bookboard and wrapped each edge over:
My attempts at this look kinda crude, but you don't really see this once the endpapers are glued on, so it doesn't bother me yet. Someday I'll probably look back on it and wonder why I thought this was good enough, but for now, it works just fine.
(You might notice that I glued the cut-off triangles to a scrap of bookboard, that'll come into play later)
When you apply glue to the endpapers they'll kind of liquify a little and stretch, so trim a couple mm off the leading/open edge. It'll look better.
Okay, final assembly. This is where it all comes together or goes horribly wrong.
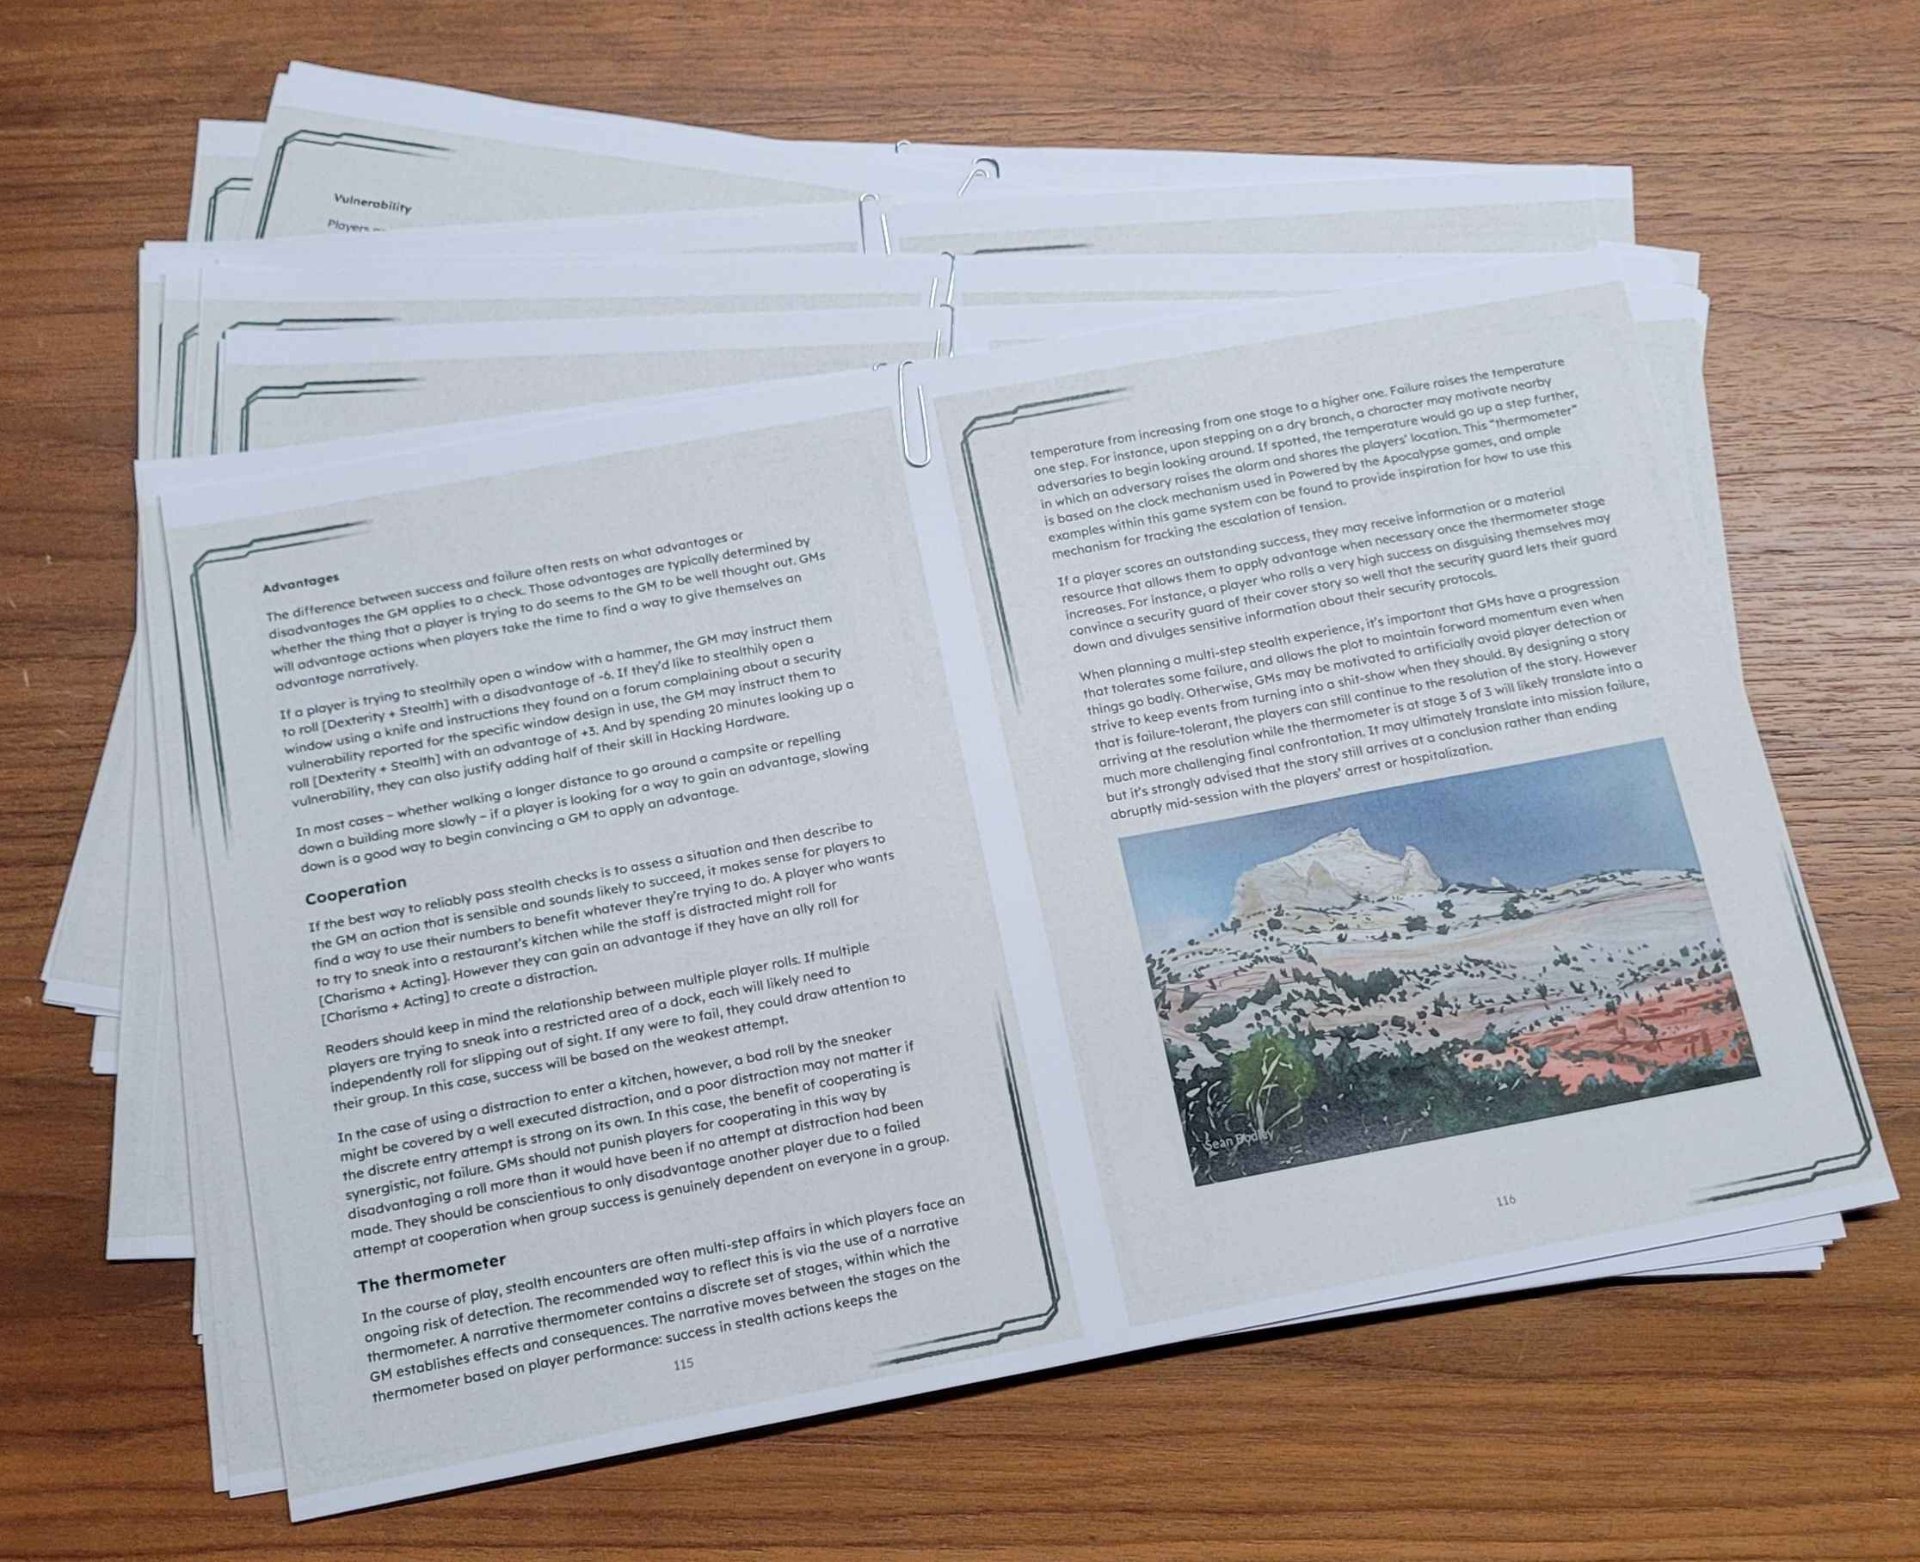
To do this you place the bookblock inside the cover and get it positioned how you want it. Open up the cover again, slide a piece of wax paper and a piece of scrap paper in between the topmost endpaper and whatever's underneath it. Make sure the scrap paper is on top.
Get your brush soaked with glue and then dab it on some scrap until its not really soaking where it hits. Use little vertical jabbing motions (Psycho style) to stipple the top paper so its completely glued. Apply glue under the mull/cheesecloth, then put the cloth in place, then apply glue on top of that.
When there's a good layer of glue everywhere take a deep breath and close the cover onto the page. Open it just a crack, look for wrinkles and smooth them out as best you can. If you open it too far the paper will pull away from the cover.
When you think you've got it as good as it's going to get, remove the scrap paper but leave the wax paper. Close the book, put something heavy on it, and hope for the best.
When its dry, flip it over and repeat the whole process.
We've now hit all the usual steps (except the end ribbon thing but I don't see the point of that). I was honestly very pleased with the results.
But lets get fancy with it. I had some time on the CO2 laser cutter at my local makerspace, and I'd seen online that people had managed to etch bookcloth, so I wanted to try finishing things that way.
We started with some tests, on very low power and working our way up. We weren't sure how well the poly-blend fabric would handle the laser, or what kind of damage it would cause.
We started with the settings for printer paper (95 speed, 10% power) and worked up by 5% increments, finding that the quality improved each time.
Once that was done, I banged out a quick cover layout by measuring the book, drawing a vector rectangle in those dimensions, and positioning the raster title in the middle.
We ran it with the lid open (runs as a test with just a visible dot) and made sure the rectangle followed the edges of the book.
I had to prop the cover open a little so it'd be more level (I used one of the little connector things we use to pin warped things to the work surface). Then it was just a matter of hoping for the best and rerunning the file with the lid closed.
It was kinda high stakes but I'm very pleased with how it tuned out.
#diy #bookbinding #lasercutter #etching
I recently started making solarpunk postcards again, and I had a lot of fun with a quick scene of a solarpunk cargo ship (a steel-hulled, four-masted barque) in a storm. I'd like to do more but don't yet have any strong points to make or designs I'm excited to feature.
So what would you like to see? What scene is missing from solarpunk art of humans interacting with oceans, rivers, lakes, canals? What weird idea, or old, practical design should make a comeback?
I can't promise that I'll make everything but I really do try to include as many suggestions as possible.
So far suggestions from reddit and discord have included:
- Showing more of the mooring ropes and foundations festooned with underwater life (perhaps in another storm or low tide?)
- Boats or ships with soft wing sails which are apparently good (in theory) when it comes to performance as they maintain their shape regardless of wind conditions.
- edit to add: a clipper ship
I'll state up front that I'm not a nautical kinda guy. I like to pick up terminology and learn but I've never sailed anything larger than a sunfish and I see the ocean maybe once every five years. So feel free to spell out practical considerations and realism stuff because I probably won't think of it.
And thanks!
I’ve been wanting to do scenes of solarpunk ships and shipping for awhile now. I love reexamining old technologies and seeing if they could work again, mixed with modern advancements, especially in a society with different values, or one that uses more metrics than just money to make their decisions.
I’ve read about the various attempts to make container ships more green with massive sails and kites and alternative fuels, but I never really loved any of them enough to make art of them. At best, they seemed to promise that they might use somewhat less fuel in the future, but they seem committed to the basic container ship format because its so efficient (in cost) and because everything is optimized around it.
I was talking with some of the folks from Fully Automated! about future weather changes, megastorms and tsunamis (and the potential for tsunamis to set off undersea avalanches that cause more tsunamis) and the damage those could all do to ports. How all that carefully-optimized equipment, even the depth of the ports themselves, could be damaged suddenly.
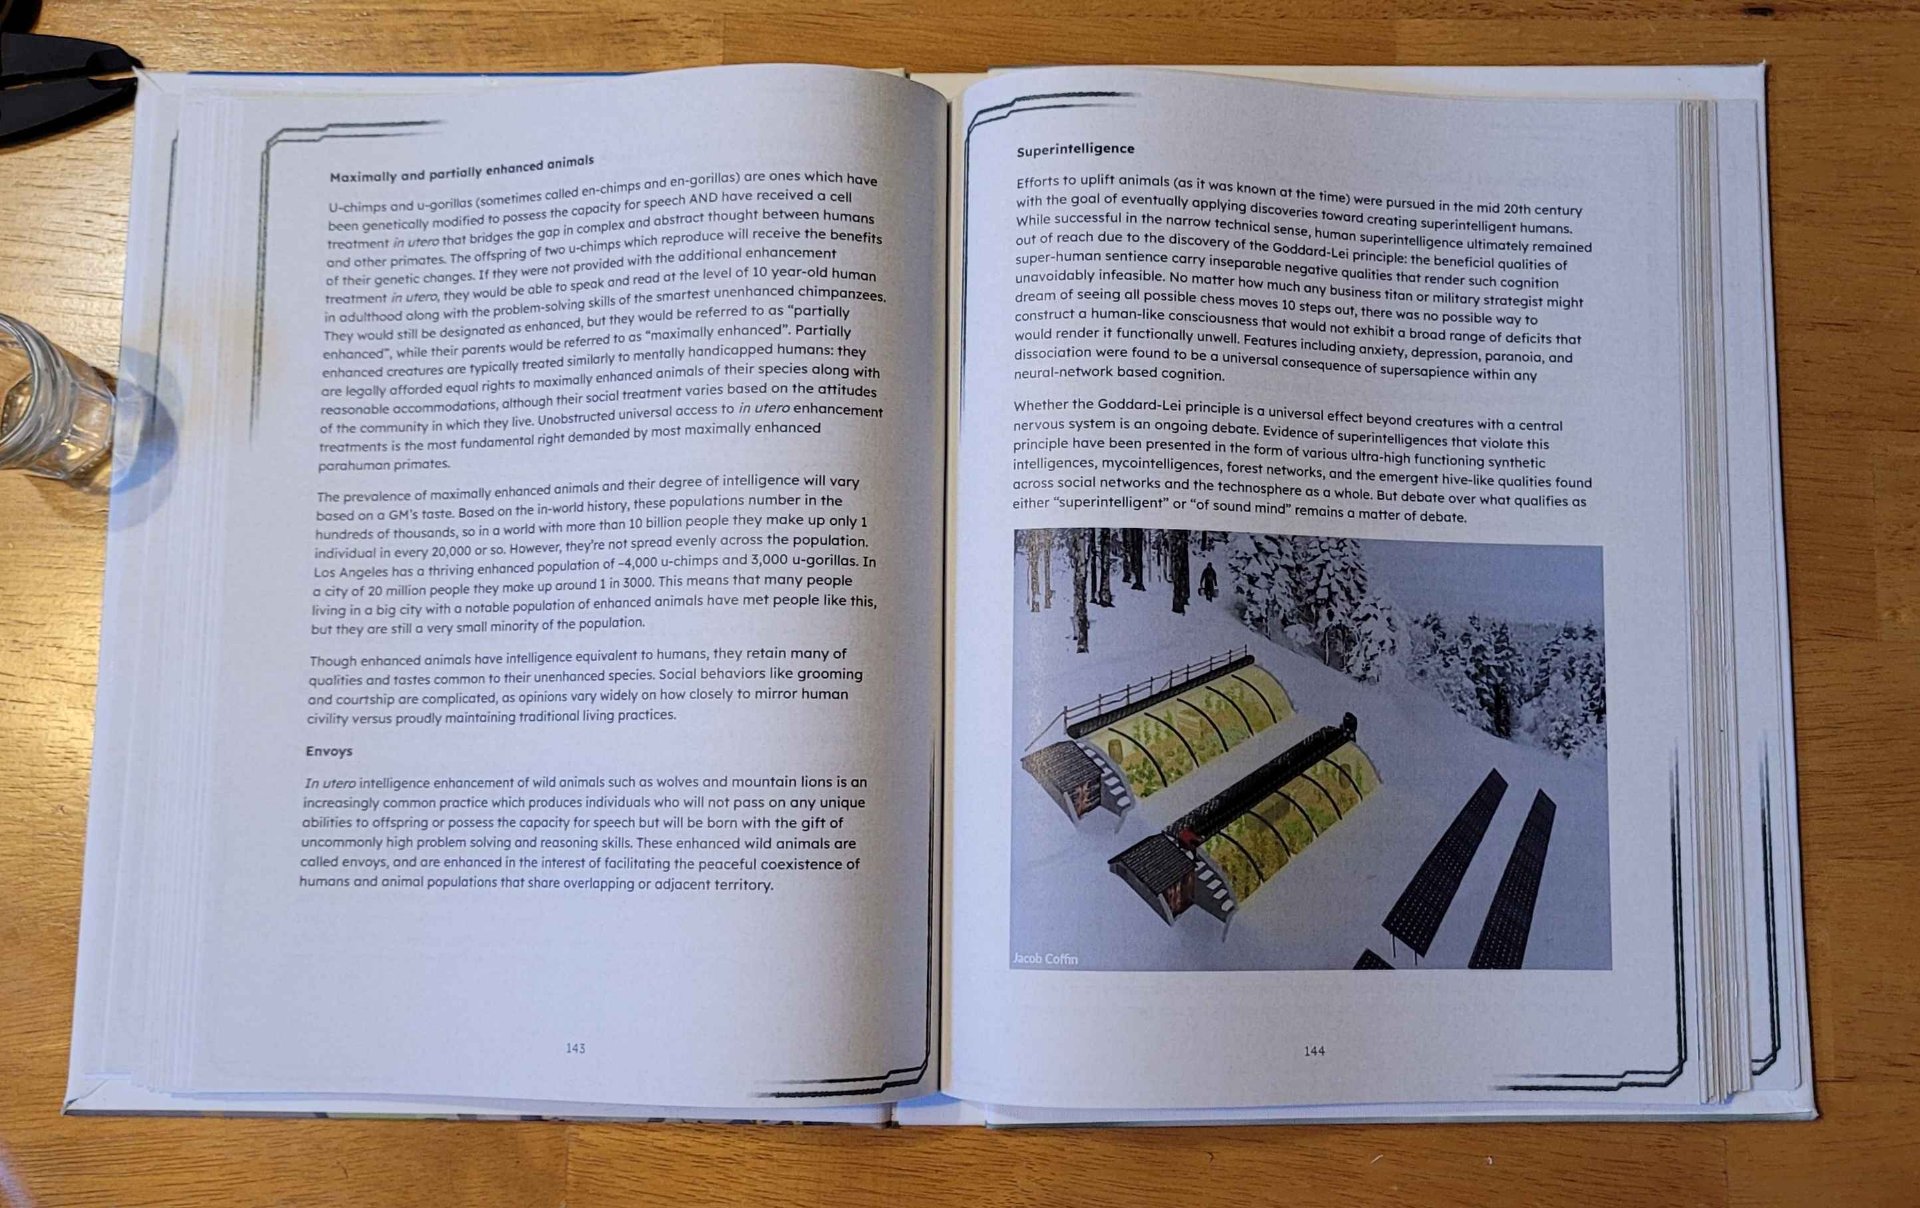
I started to think about solarpunk ocean scenes again, and about smaller vessels (which could perhaps use the shallower ports) could operate largely by wind, more or less traditionally.
Can the concept of container ships fit solarpunk? I genuinely like the optimization and logistical advantage of using standardized, stackable shipping containers which fit on ships, trucks, and trains without the need to load and unload the cargoes by hand at each transition in their journey. That’s great stuff, no complaints. What I wonder about is if that cost efficiency has caused other problems. We ship cargo all over the world but much of the time, we do it because it’s so cheap to do so. We ship raw material from one continent to process it on another, we ship that material again so we can shape it into parts, which are shipped back to the second continent for partial assembly, and then for final assembly on a fourth. Is that efficient? It’s cost efficient. But we burn terrible amounts of fuel each time we do it, and we do it for so many things.
So I’m skeptical.
Alright, my complaints out of the way, what’s actually in this scene? We’ve got an offshore windmill and a steel-hulled, four-masted barque with what’s hopefully an open-source variant of DynaRig sails.
So what does that mean? I’m very much not nautical – as with most of my postcards I’m doing my best to combine a bunch of concepts I’m only newly familiar with, so I’ve tried to make sure they’re at least based on reasonable starting points:
Cromlyngames in the FA! team mentioned DynaRig sails, these kind of funny-looking sails that taper towards the base, with thick masts and curved yards. They’ve seen some limited use on expensive yachts, there’s some proposals/plans to use them on container ships, and do seem to work well from what I’ve read. Their main advantage is in labor-savings and safety – the sails apparently slide out from inside the masts following tracks in the yards, so nobody has to climb the rigging to raise or lower them. And the entire mast rotates to best catch the wind. This allows for a smaller crew, and less of the traditional risks.
Crom suggested that they could work with any square-rigged ship, and a quick perusal of some nautical and sailing forums agreed with that (and taught me what those were). I started reading about traditional maritime shipping, and eventually found a forum discussion about the potential return of sail to modern day shipping. A poster on there mentioned the Passat, a German Flying P-Liner, and I was delighted to learn that a whole set of steel-hulled sail ships were hauling cargo well into the 1950s. Heck, one of them was captured by New Zealand during WW2 and put right into service hauling construction supplies.
So I borrowed the hull. IRL, I’m sure there’s a ton of quality-of-life improvements ship designers and sailors could suggest for a modern barque, and I’m sure I’ve included some stuff that doesn’t belong, but I’m just happy to have found a sail ship that was still effective in fairly modern days. In fact, it looks like staffing (both the difficulty finding qualified crew, and changing laws requiring more crew than traditional) was a big factor in the end of their service, and that’s something I suspect the modernized sails could help with.
I’d like to do more nautical scenes, so if you have improvements or alternative designs, let me know! I think I might do one with an offshore windmill substation, a clipper ship, or anything else you think would be worth showing. I know there’s been a ton of tech and safety features invented and added to ships since the P-Liners were modernized, and I think those things could help shorten their journeys and improve their safety at sea.
Art stuff: usually, unless I already have a strong plan for the visuals, part of my research is looking up various real life postcards and other art of similar content for inspiration. People have made postcards of almost everything.
There’s no shortage of paintings of ships at sea – I started this as a peaceful, sunny scene, but eventually gave in and went for a dramatic storm instead. Maybe showing the ship in a storm weakens the point a little, but ships run into bad storms even now, with all our modern day early warning systems – you can see plenty of videos online of even massive container ships losing cargo from being heaved around by the weather.
And one of my goals is to show weather, seasons, and locations that Solarpunk art doesn’t often feature. Bad weather is a fact of life, and it’s likely to get even more wild as our climate changes. I’ve done a couple scenes of blizzards, but none of terrible rains yet.
Given the premise that this is a postcard from a solarpunk future, it might be a historical scene of a famous ship that survived a hurricane, perhaps in the moments when the storm blew it dangerously close to an offshore wind farm.
This image (and all the other Postcards from a Solarpunk Future) is CC-BY, use it how you like.
This was another of those still images, where I wanted to capture a specific kind of place, the old farmhouses you find all throughout my hometowns, and a specific time of day in November when the sun has set and everything is this almost monochrome purple but the grass and crops look almost tan. In a few months, on cold grey days like this, when there’s a layer of snow on the ground, it almost mirrors the sky with just dark trees between them. But for now it’s this very specific color.
I used to go for walks or snowshoe trips most afternoons, and would often find myself hurrying to get back as night settled in. On those early evenings, I loved the yellow lights in the distance, the warmth and human routine they contained.
I wanted the farm in the comic to be a little more active than some of the ones back home. I did a fair bit of reading about agriculture UAVs and autonomous tractors, and I very much liked the used-future feel of the brand new stuff from those articles being kind of old and hacked-together at this point. Something these folks bought second- or third-hand, probably after it was already hacked by a previous owner to remove the manufacturer’s ability to remotely disable it. I like the idea that they have a sort of workshop/hangar for launching drones and inspecting their crops set up in the loft of the barn.
The standing figure is based a bit on my grandfather.
If want to read the rest of this silly rural cyberpunk webcomic about a stolen secret service prototype and the endangered deer it thinks is the president, you can find it here: https://jacobcoffinwrites.wordpress.com/president-deer-adventures/
If you’d like to read the related-but-mutually-non-canonical short story version, you can find it here: https://en.scrappycapydistro.info/harbour it’s in the first edition, on page 3!
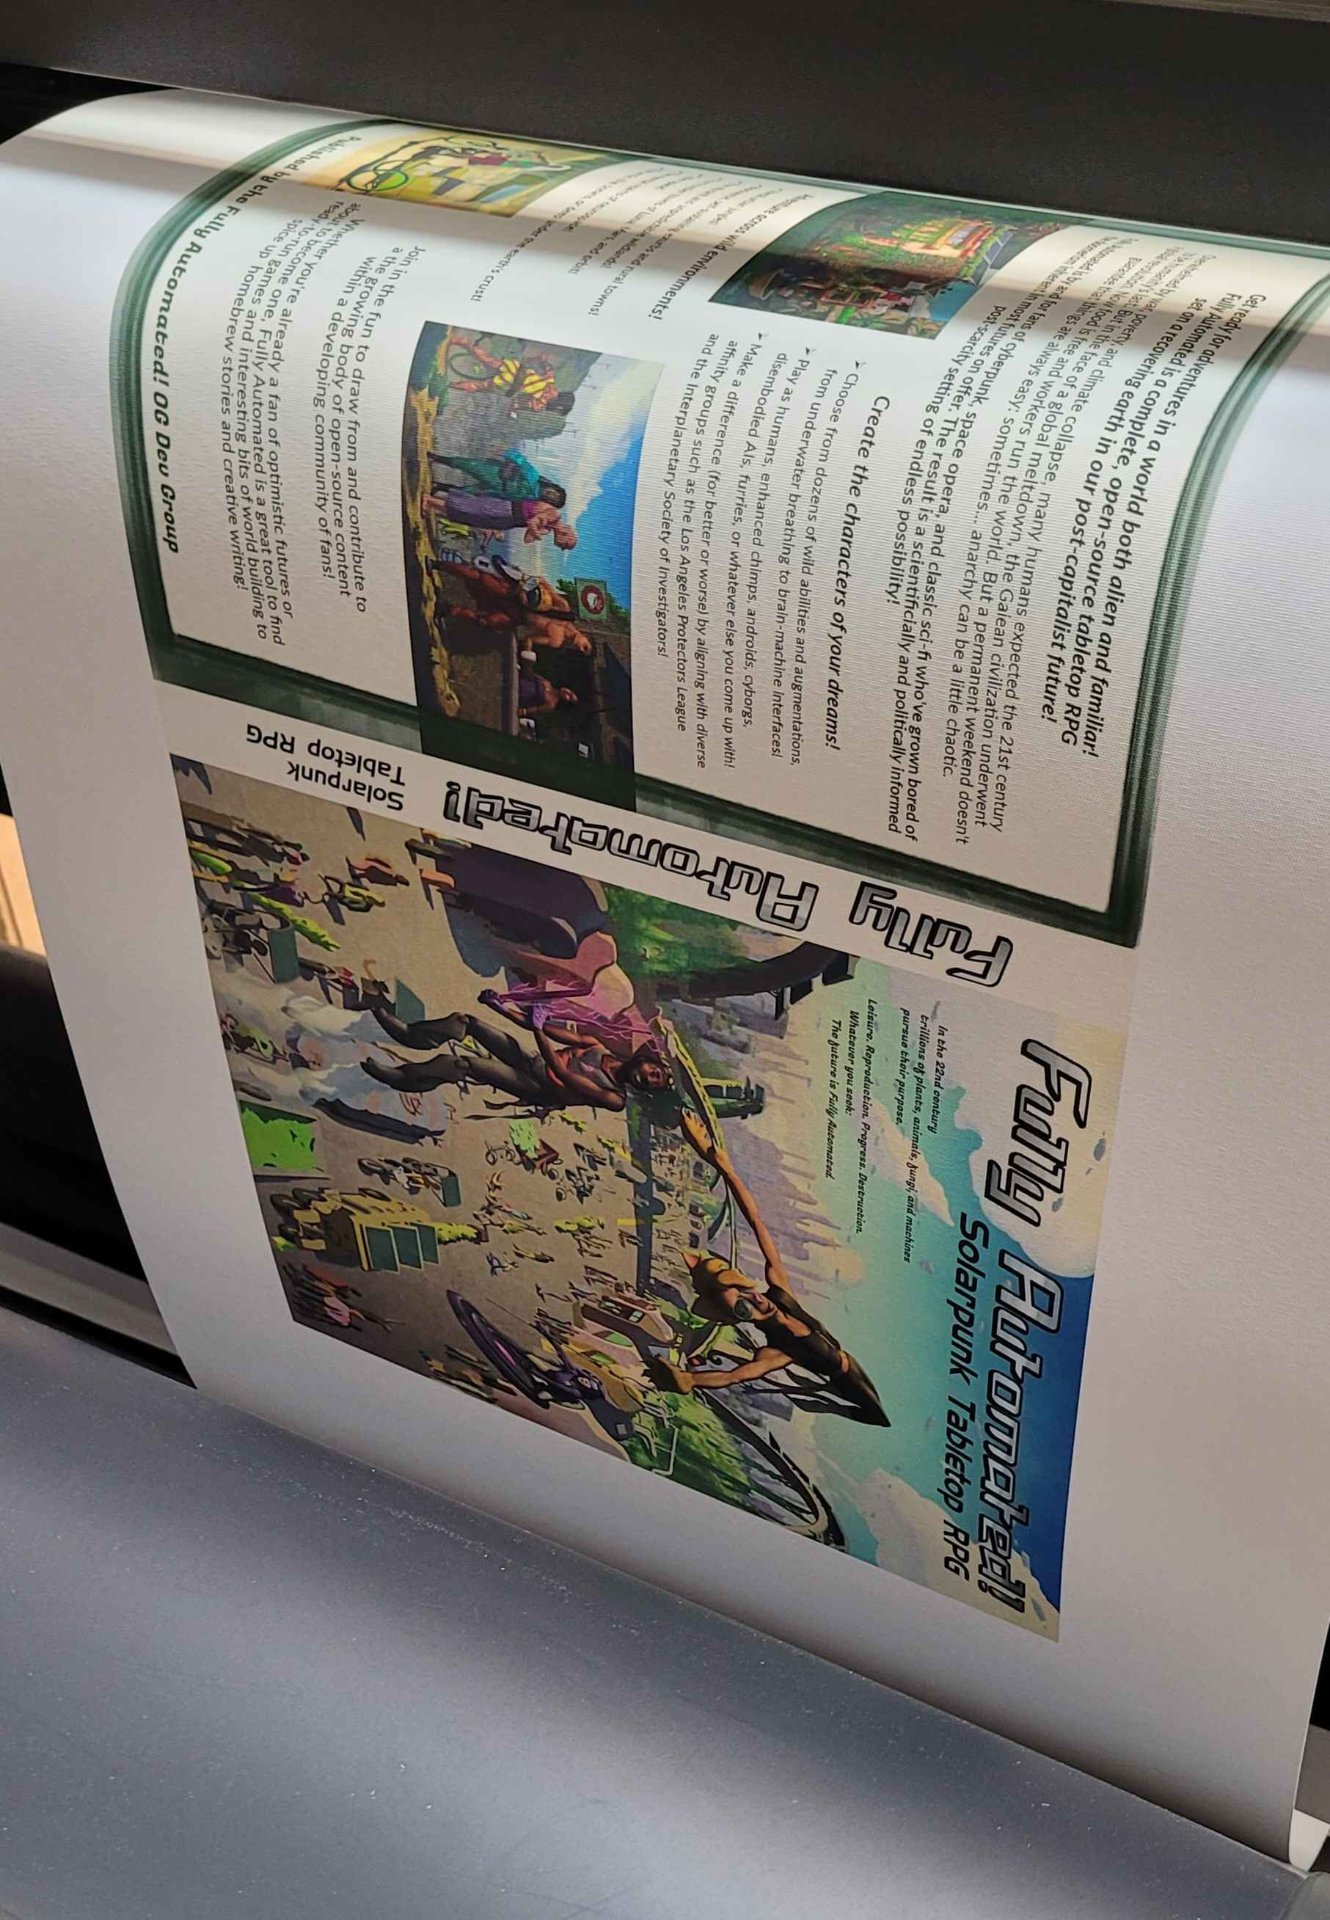
It’s been a little while since I posted one of these. I’ve been working on writing a campaign(?) adventure module(?) For the solarpunk TTRPG Fully Automated (which I’m hoping to release libre and gratis through their channels in a few months) and that’s taken up a lot of my creative time lately. It’s the first piece of solarpunk fiction I’ve written, and it includes almost every setting concept I’ve been playing with in the postcards.
(In case you’re wondering, it’s a sort of treasure hunting adventure, where the players are on a quest to find several tons of illegally-dumped industrial waste, which is useful in the production of geopolymers. Through their investigation they’ll explore a mostly-abandoned town which is in the process of being deconstructed and rewilded, talk to locals and work crews, and hopefully unravel a cold-case murder mystery lost to the region’s chaotic past during the setting’s Global Climate War 60 years before.)
Either way, I’ve gotten far enough along that I think I can start photobashing together some art for some of the locations the players might decide to visit (starting with this bike kitchen in the village where the game begins).
In my postcard about deconstructing McMansions to reclaim the building materials and rewild the land, a few people brought up simply repurposing the buildings. I’d been batting around the concept in my head for awhile before then, but had struggled to figure out how to render a scene that showed everything I wanted it to.
I ended up using pretty much every idea I had for those scenes in the campaign’s starting village (a planned community which has repurposed an abandoned wealth enclave and its golf course as communal housing, workshops, and a food forest. That means I can put together photobashes of specific spots within that village, which I think is more achievable.
So here’s the first of the set. It shows a little bit of a repurposed discount mansion, but focuses mostly on the old back yard. The concrete patio has been removed, the large lawns and nearby golf course have grown into proper forests, and public paths have been brought right up to the house. The pool house has been turned into a bike co-op, and the swimming pool has been converted into a sunken greenhouse or Walipini.
Generally when you end up with an old swimming pool you don’t want, your options are to tear it out and fill in the hole, just fill in the pool, convert it into a natural pond, or (perhaps the least common answer) build one of these. Which one you pick will likely depend on your goals, the quality of the structure, and how far down your water table is. If it’s too high, it can lift an empty pool like a concrete boat, or cause other structural damage. But if circumstances are right, and the pool is intact after being abandoned and empty for a good many years already, it might be worth repurposing.
There are some beautiful and solarpunk photos online of real life versions of these, which have a far grander scale than what I’ve depicted here. This is more like the old pineapple pits, or a fancy version of the citrus trenches. Who knows, maybe they even cut away part of the floor so they could plant into the ground below.
The above-ground portion of the greenhouse is backed with an earthen berm/raised bed meant to help it maintain a consistent temperature. The retaining walls of the tiered bed are made from repruposed, broken-up concrete (sometimes called urbanite), likely sourced from the concert patio which was replaced with wood chips for better water permeability. Some full-shade plants like rhubarb and mint have been planted on the back slope, and a grape arbor has been built over it. Sweet peas are growing along the side where there’s more light. Raspberries and wildflowers grow around the rest of the smaller yard space.
In the background of the scene, an old pool house has been converted into a bike kitchen, one locations where the players will be able to obtain transportation.
A network of paths have been built all throughout the village, the food forest, and the region beyond. Even the town the players will explore is riddled with small trails and paths which the locals have built in lieu of trying to maintain a full network of paved roads. This was inspired by my hometowns' network of backwoods trails, and the downsizing to achieve a maintainable transportation network described in this article. Some roads obviously still exist because they're useful, but others have been washed out and never repaired because none of the current residents need them for anything, while new trails cut straight through properties nobody has lived in for decades.
The buildings are painted with colorful murals. This is always a challenge for me in these photobashes. I love the idea of a society that makes art everywhere for its own sake and I'd hope a solarpunk society would abandon some of the obsession with property values and would decorate everything from buildings to machines, in all kinds of styles. That might mean folk art with historical roots, like the zapista murals, it might mean carved panels on cabinets, or etchings on tools, metal sculpture, or who knows what. Embellishment not for commercial value but as self expression and messaging. So the topics and content would vary a lot.
I think there's a bit of punk in that, in refusing to paint or decorate with an eye on the resale value, like your house is a product for others rather than your own home.
So I try to include murals, carvings, and other decorations in my solarpunk art. Unfortunately I've also found that in my postcards, where the buildings are usually part of a cluttered background, murals can kind of act like dazzle camouflage, making it hard to tell what exactly is happening. So I'm still figuring out what works and what doesn't. (Ideally, I want the contents of the mural to be clear while also allowing for the building and the assorted stuff attached to it (plants, solar panels, other tech) to be easily recognized and understood. It's challenging and something I might revisit someday. I did try a version where the bike kitchen's mural was made out of silhouetted bike parts, but it looked less obviously like a paint job on a building, so I went with the mandala for clarity for now.
Edit to add: this photobash (and all the Postcards from a Solarpunk Future) is CC-BY, use it how you like.
You may have noticed that I don’t share many repairs here on the blog. Although useful (and I’m glad people do share their knowledge) I think they’re pretty dry to read and I don&…

I really enjoy the arcade blogger for the arcade cabinet raid writeups he does, and his step-by-step repair posts. The history aspect is neat too.
This is a repair post with a bit of history.
Decades ago, to combat ROM-cloning piracy, Capcom started adding a chip to their PCBs that stored encryption keys in memory backed up by an onboard battery. You may see the problem here - batteries are not meant to last forever, and if the chip lost power AT ANY TIME the keys were lost and the game was unplayable.
This feels like yet another example of the total disregard corporations hold for the media they own the rights to, in favor of short term profits. We've seen before that many works produced by entire teams would have been lost if not for the efforts of pirates and amateur archivists.
To quote the blog: >Its hard to say if Capcom knew this would happen, but then again, the shelf life of most arcade games was months, or at most a couple of years – I guess it wasn’t something they planned for.
Fortunately, this is a well established problem with a motivated, technically-minded community looking for a solution, so this early DRM has already been circumvented. The article doesn't go into detail on how they researched and reverse engineered this sabotage, but I might do a little reading and edit the post if I find anything cool.
Edit: this seems to have more details and is an interesting read so far: https://arcadehacker.blogspot.com/2014/11/capcom-kabuki-cpu-intro.html?m=1
The gist is that the problem is well solved at this point and there's a small industry of aftermarket components out there that are nearly plug and play. The version the author went with works like this:
You desolder the dead battery and replace it. Then desolder the blank sabotage chip. You swap in the aftermarket one and configure it (by using tiny switches) to inject the correct set of encryption keys. Then you slot the blank sabotage chip into the aftermarket one.
When the game is powered up, the aftermarket chip restores the encryption keys, the PCB looks for the keys, then successfully used them to run the game files.
The cool thing is that the sabotage chip is now functional again on its own.
The author spent some time restoring the board to stock, by keeping the sabotage chip powered with another battery while removing the aftermarket chip so it could be used elsewhere. I should appreciate the effort at not wasting any resources but I think it makes sense to keep the de-sabotauge chip as a permanent addition, as it automatically prevents the kind of data loss the company intended.
Either way, it's a neat article and I'd recommended reading it. He does a lot of arcade cabinet restorations, but generally sends the electronics away for repair, so this was a neat one.
I know tech has come a long way since these were made but there's something to be said for these big, chunky, through-soldered components and the well-documented wiring instructions that often came with them.
I stumbled onto this article while working on a photobash of a solarpunk scene. I think it does a good job of explaining the concept but there seems to be something wrong with its certificates, which might throw an error in your web browser. https://nwedible.com/urbanite-broken-concrete-retaining-wall-as-a-garden-feature/
Just in case you don't want to check the link I'm also going to plagiarize a few quotes and images from the article:
"The marketing term for “old chunks of broken up concrete” is urbanite. Urbanite has a lot going for it: it’s durable and heavy like natural stone, reusing this product in garden and landscape design takes it out of the waste stream, it’s often a uniform thickness which makes it easy to stack or lay as a permeable patio surface, it’s often available in most urban locations, and it’s frequently free for the hauling. Free is good.
Drawbacks to urbanite can include potential contamination – this is more of an concern if your urbanite comes from a torn out commercial parking lot where all manner of auto fluids may have seeped into it than from the neighbor’s pool deck tear-out. Concrete itself can contain additives that might pose a health or contamination risk, although my feeling is that old, weathered concrete has probably already leached the worst of itself out somewhere else.
I probably wouldn’t use urbanite to build edible garden beds, but I can see great potential for turning this waste product in retaining walls, steps, and patio areas."
And a few examples of recycled concrete patios:
This last one came from https://www.terranovalandscaping.com/90/, which has a few other examples, including raised beds, so perhaps they knew their source of concrete was clean, or weren't worried about the potential for contanimation?
One more bookbinding project. It looks like one of the advantages of this hobby is suddenly being…
I've actually done a couple posts about softcover books on my movim blog, this one and one previous one. The Fully Automated softcovers are a little fancier, but this one I think is a good example of the benefits of being able to just make a book when you want a physical copy.
I have a few advantages in this project: my SO had already bought a bookbinding kit and book which I was able to use, and I have access to a free color printer, and, through my local makerspace, a plotter printer which can print on canvas. Everything else, the graphic design, the interposing, etc, was done using free tools like GIMP, an online pdf cropping website, and https://momijizukamori.github.io/bookbinder-js/.
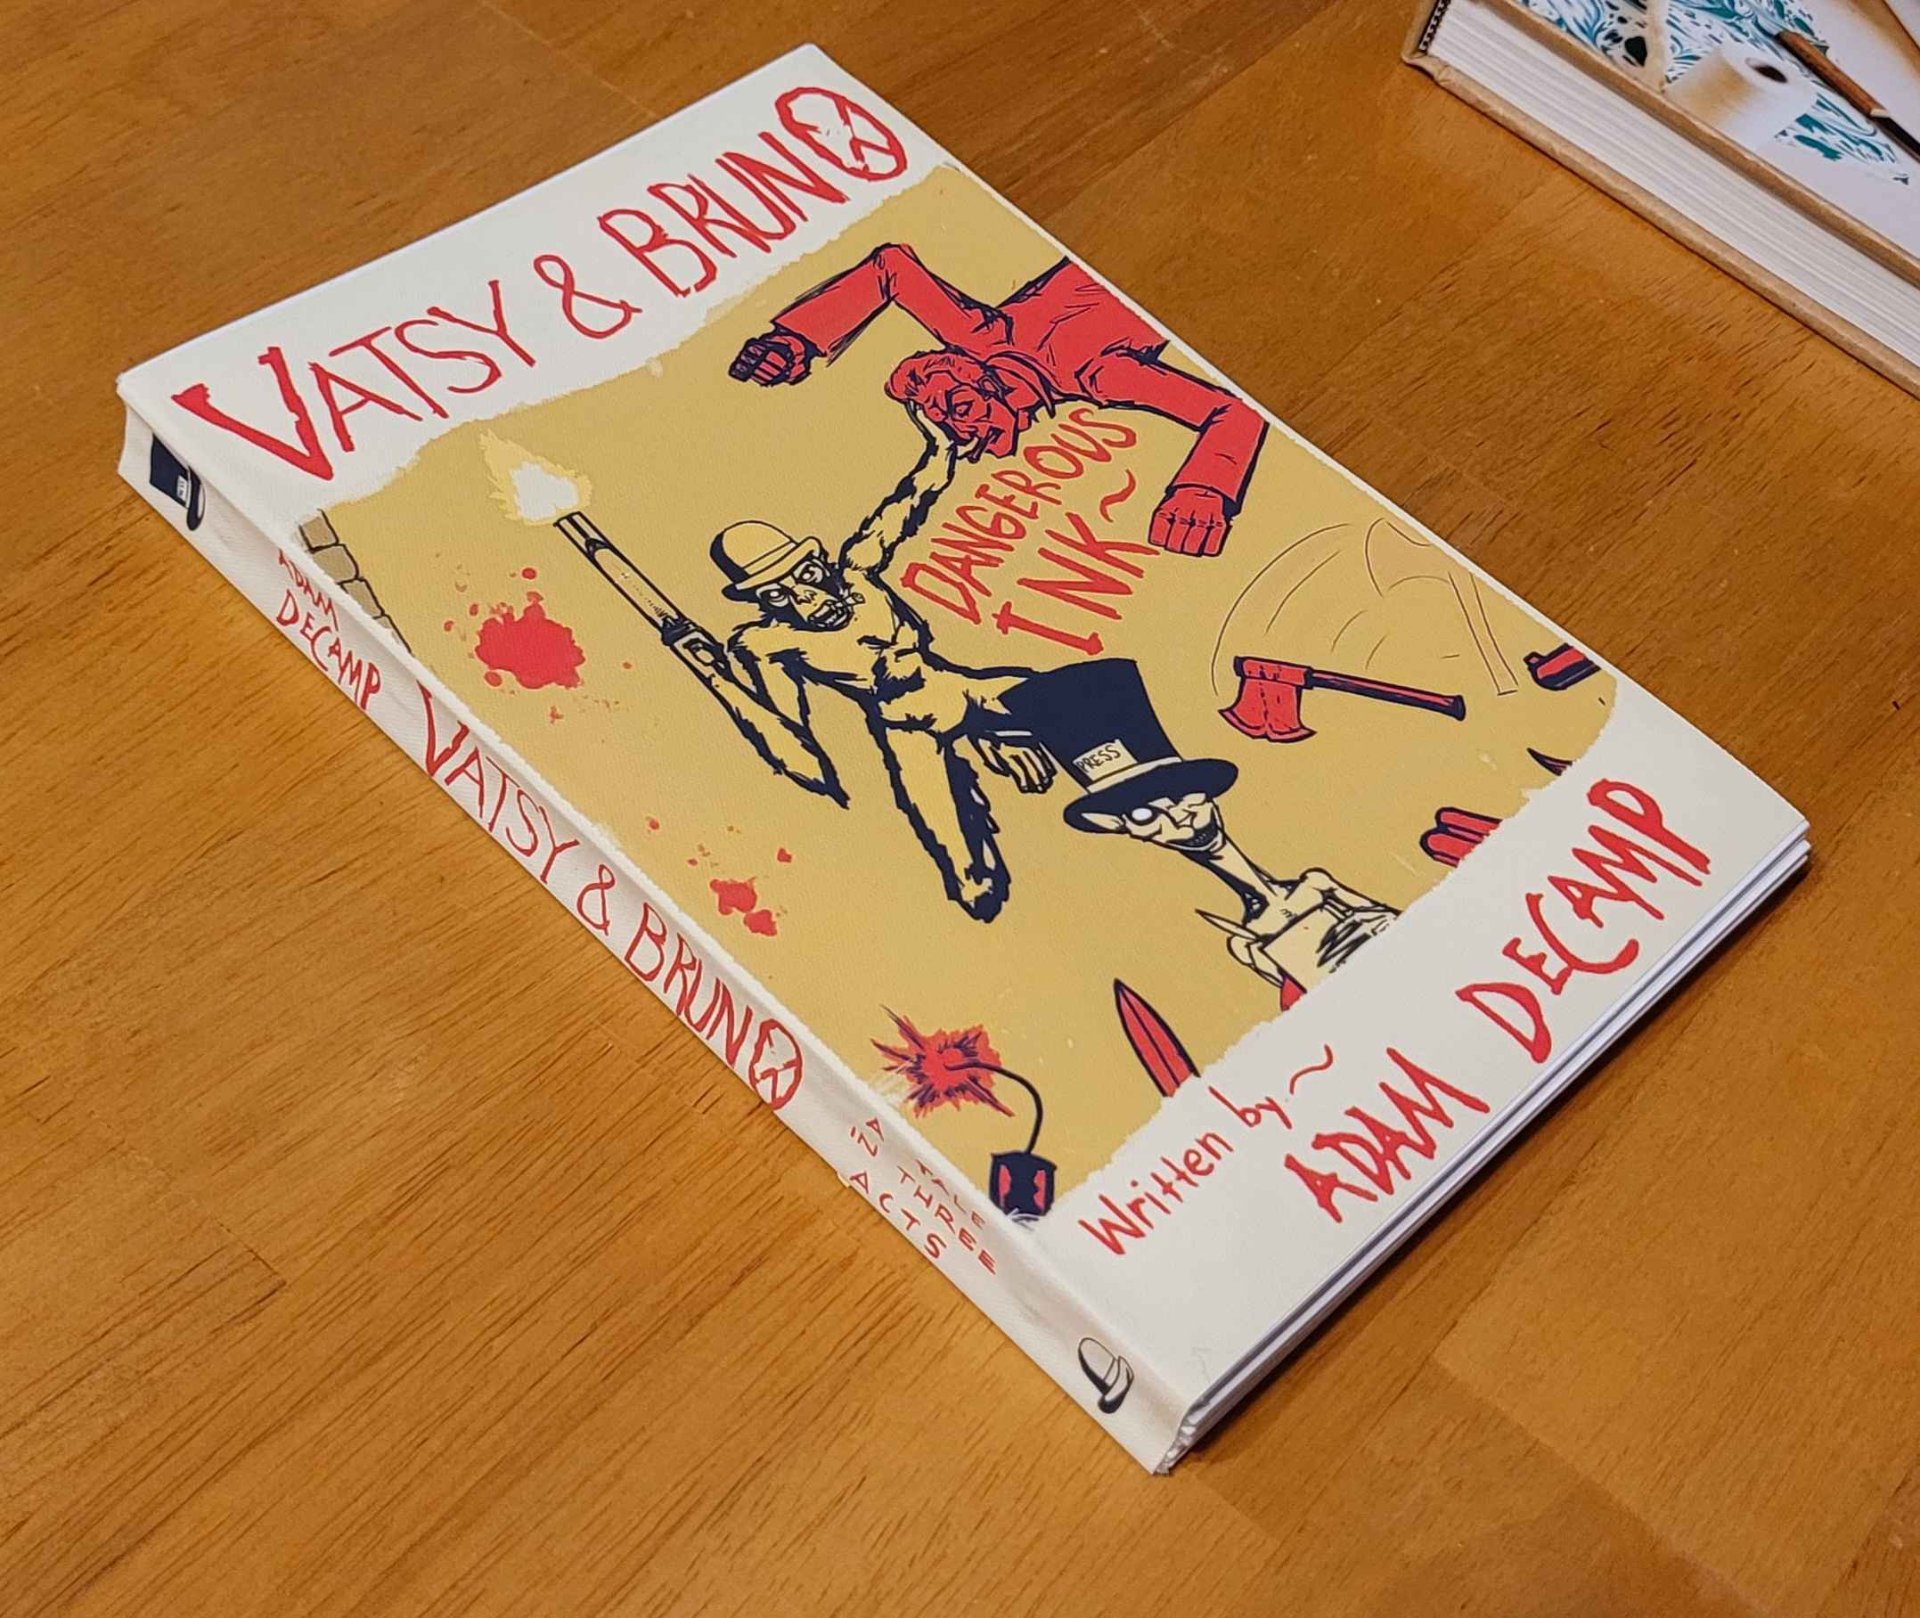
It looks like one of the advantages of this hobby is suddenly being able to get physical copies of books that aren't available as anything other than PDF ebooks. I've got a handfull of favorite books from various authors which were extremely self-published, sometimes as serial fiction later edited into a PDF. One or two eventually got a limited print run, or the author made it available on a Print-On-Demand site, but at this point, I think I've found and bought all of those. That leaves a few that I'm very happy to finally be able to hold in my hands while I read them.
Vatsy and Bruno was one of those. Written in 2010 by Adam "Rutskarn" DeCamp, and published on the old version of https://www.chocolatehammer.org/ , Vatsy and Bruno is a high-strung, noire, dark-comedy-adventure story set in a radio-era city under the thumb of vague oppression. It's a fun story, and one that feels like it should be typewritten on paper (preferably cheap, grubby, fish-stained paper with some suspiciously blood-like smears).
Making this one actually took a bit more prep work on the files.
I started with the PDF DeCamp released on his website over a decade ago. This, unfortunately, wasn't really sized or laid out for bookbinding (re. the wide margins, the page size, and all the page numbers being on the right side of the page). I could get really fancy with editing this, but it's just for me, so "good enough done quick" was the order of the day.
I wanted to print this with no extra trimming, so I planned to use 8.5x11 paper folded in half. Unfortunately, the PDF was, itself, scaled for 8.5x11" paper, and when you fold that in half, the aspect ratio changes. So when I fed the PDF into (the tool I use for interposing the pages](https://momijizukamori.github.io/bookbinder-js) it stretched it vertically quite a bit. It was also showing some fairly large margins, which was unfortunate as those came from the original file. So keeping things "good enough" I threw it into an online PDF cropping tool, cropped it closer to what I'd need, and let it stretch the file a little.
I spent a good bit more time on the cover.
The original covers were also the wrong aspect ratio, but they had almost everything I needed.
I used them and a cover from one of the three sections the story was originally released in, to bash this together:
The cover, spine, text, and back cover were all made from DeCamp's own art, just re-arranged to fit this aspect ratio. From there, I followed the same process as before, but with much faster prints (no giant backgrounds) and no trimming the pages (no giant backgrounds) so that part was easy.
Fold, punch, sew, glue:
I took each signature (stack of four pages meant to fold together) and folded each page in half with the bone folder, being careful to make sure I knew which side was 'in'. Then I nested them together.
I made a guide to lay out the six holes in each signature, and used it to punch holes through the fold with the awl. Then I sewed them together following the Penrose Press Pretty Perfect Paperback Guide:
Once the book block was all tied together nice and neat, I clamped it and glued it with three coats of acid-free PVA glue.
My book clamping station certainly looks ragged enough to do the title characters proud.
While it was drying, I swung by the makerspace and printed the cover. I need to remember to oversize these by a few millimeters, because the first one is always a little small. Ah well, maybe I'll find someone with a bookbinder's guillotine someday.
I folded the cover and glued in the book block just like with the previous project.
I find it easiest to attach the cover in three steps, back, spine, front, but I'm sure real bookbinders have better systems. I start with a flat smear of glue down the inside of the back cover, right beside the bound edge and to set the book block down on it. Then I glue the spine with the book upright (this time I tried on top of the bone folder, which has a similar shape). Then I glue the front cover. I squirted some acid-free fabric glue down the spine and used a paperclip to work it further down, to where it hadn't stuck, and then held it in place by hand for a bit to get a closer fit. I like this stuff, it bonds well and it seems to set much faster than the PVA. This time I also used it to glue the bound edge of the front of the book block to the inside of the cover too, so we'll see how that works out.
The results:
Cover size aside, I'm pretty pleased with it. If ever there was a book to glue into its cover the wrong way around, this would be it, but I got that right this time. I'm glad to be able to read it properly, and to finally be able to put it on my shelf.
#DIY #bookbinding
Awhile back I posted that one of my cyberpunk short stories got picked up by an anarchist fiction zine. I was excited because I had this related-but-sort-of-mutually-non-canonical photobash comic ready to go, about a stolen secret service protoptype and the endangered deer it thinks is the president. I don’t want to spam this community with my weekly updates, so I figured I’d just share the still panels, spaced out whenever I get to them in the posting schedule. They’re just quiet bits of art between the jokes.
There are a bunch of spots like this around my home towns. Not necessarily a business, not a house, just some kind of sandpit with an old workshop or metal building and some old vehicles in it. Probably if I really dug in to county records I’d find a registered business, likely defunct, in a local family name. Perhaps several. But usually they’re pretty quiet spots, at least until someone new buys them. I’d wanted to do the cyberpunk version of one of those.
(I’d like to extend a huge thanks to the ham radio community over on reddit, who were great sports about looking over an early draft of the building and the antennas, and who helped me with scale and even which antennas to include. The only one that came up as a possible issue was the discone on the back, and there was some debate on whether to scale it down to make it more ‘as expected’ or to leave it as an unusually large one, until someone settled it by mentioning that their mentor had had one about this size, which came from the Swedish military. I’m making a rural cyberpunk webcomic, so I will 100% include European military surplus equipment in the backgrounds if I get that opportunity.)
I recently started trying to learn bookbinding (and because I never liked practicing by making…

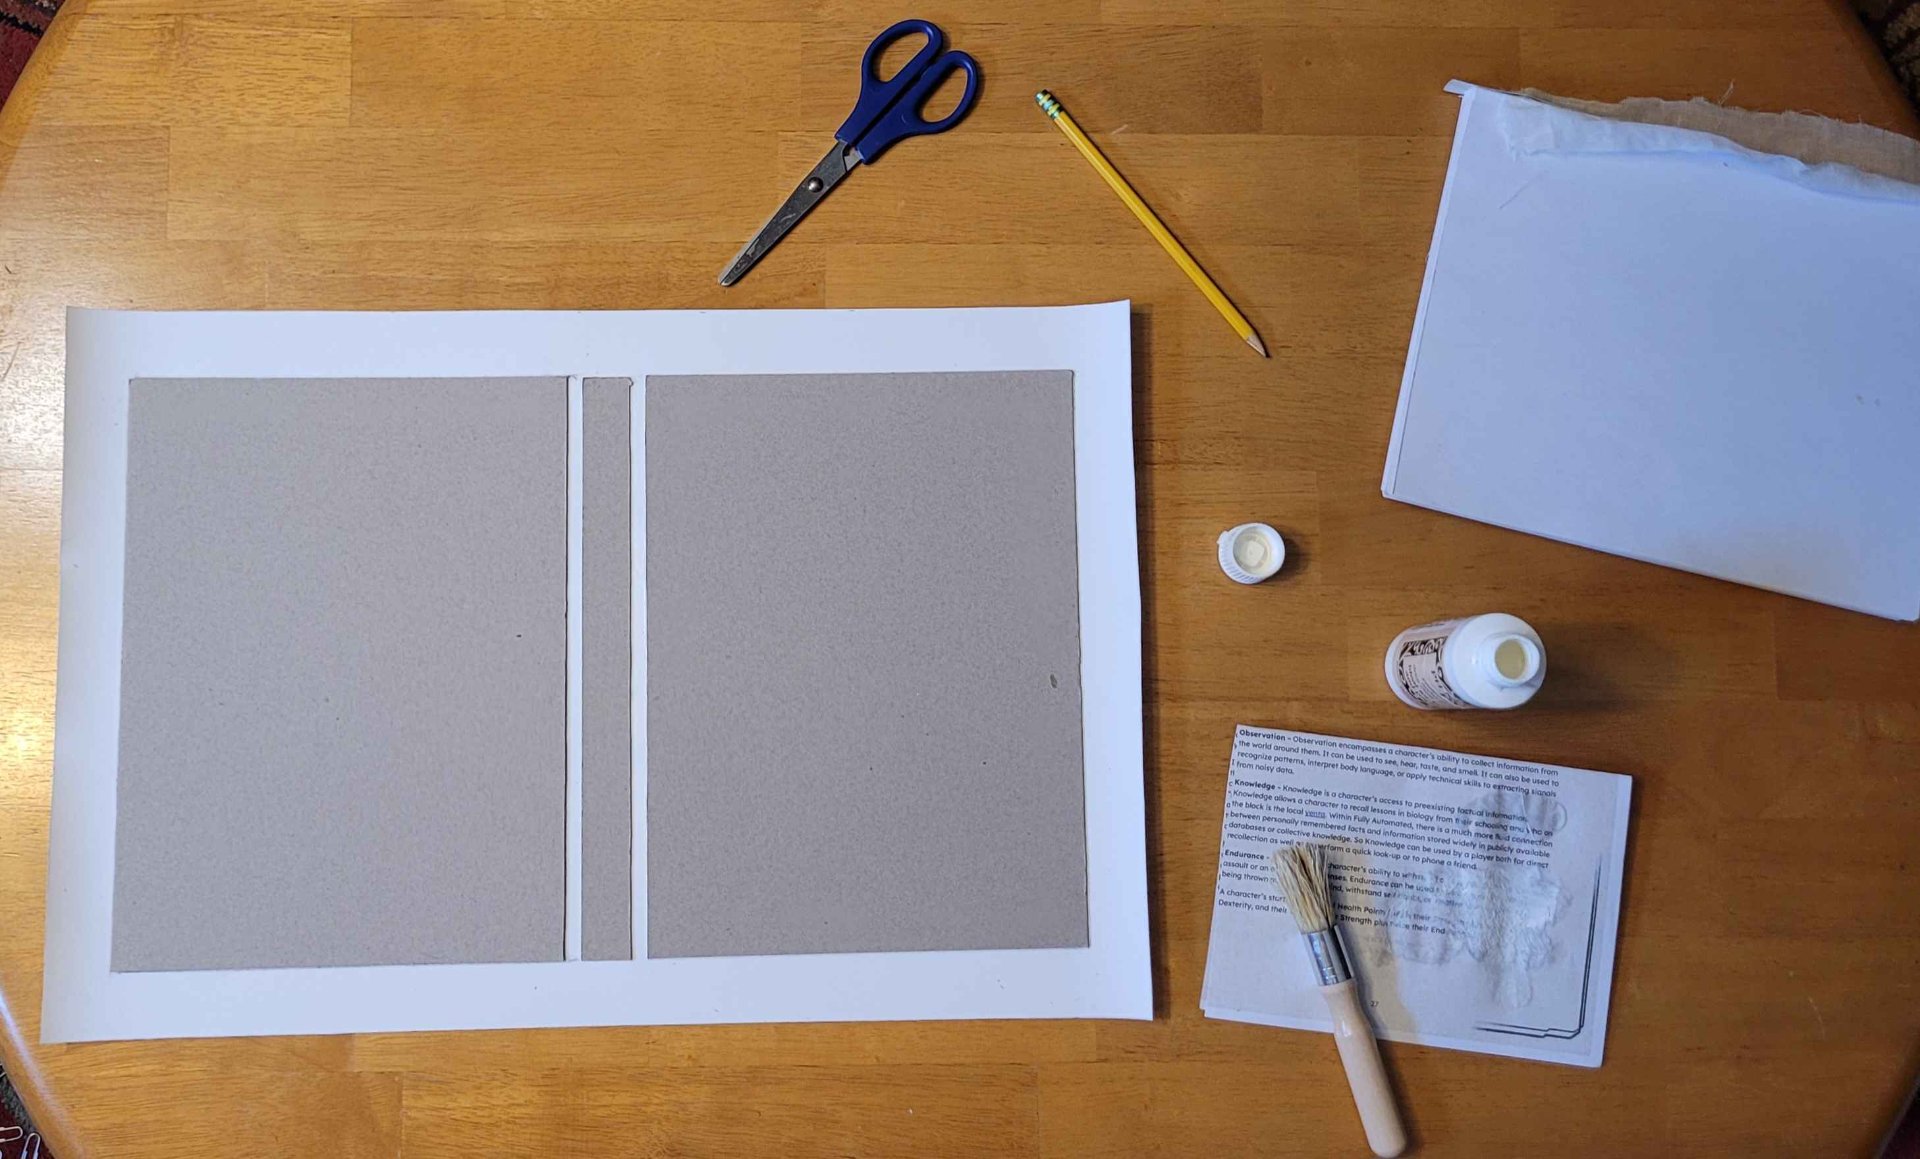
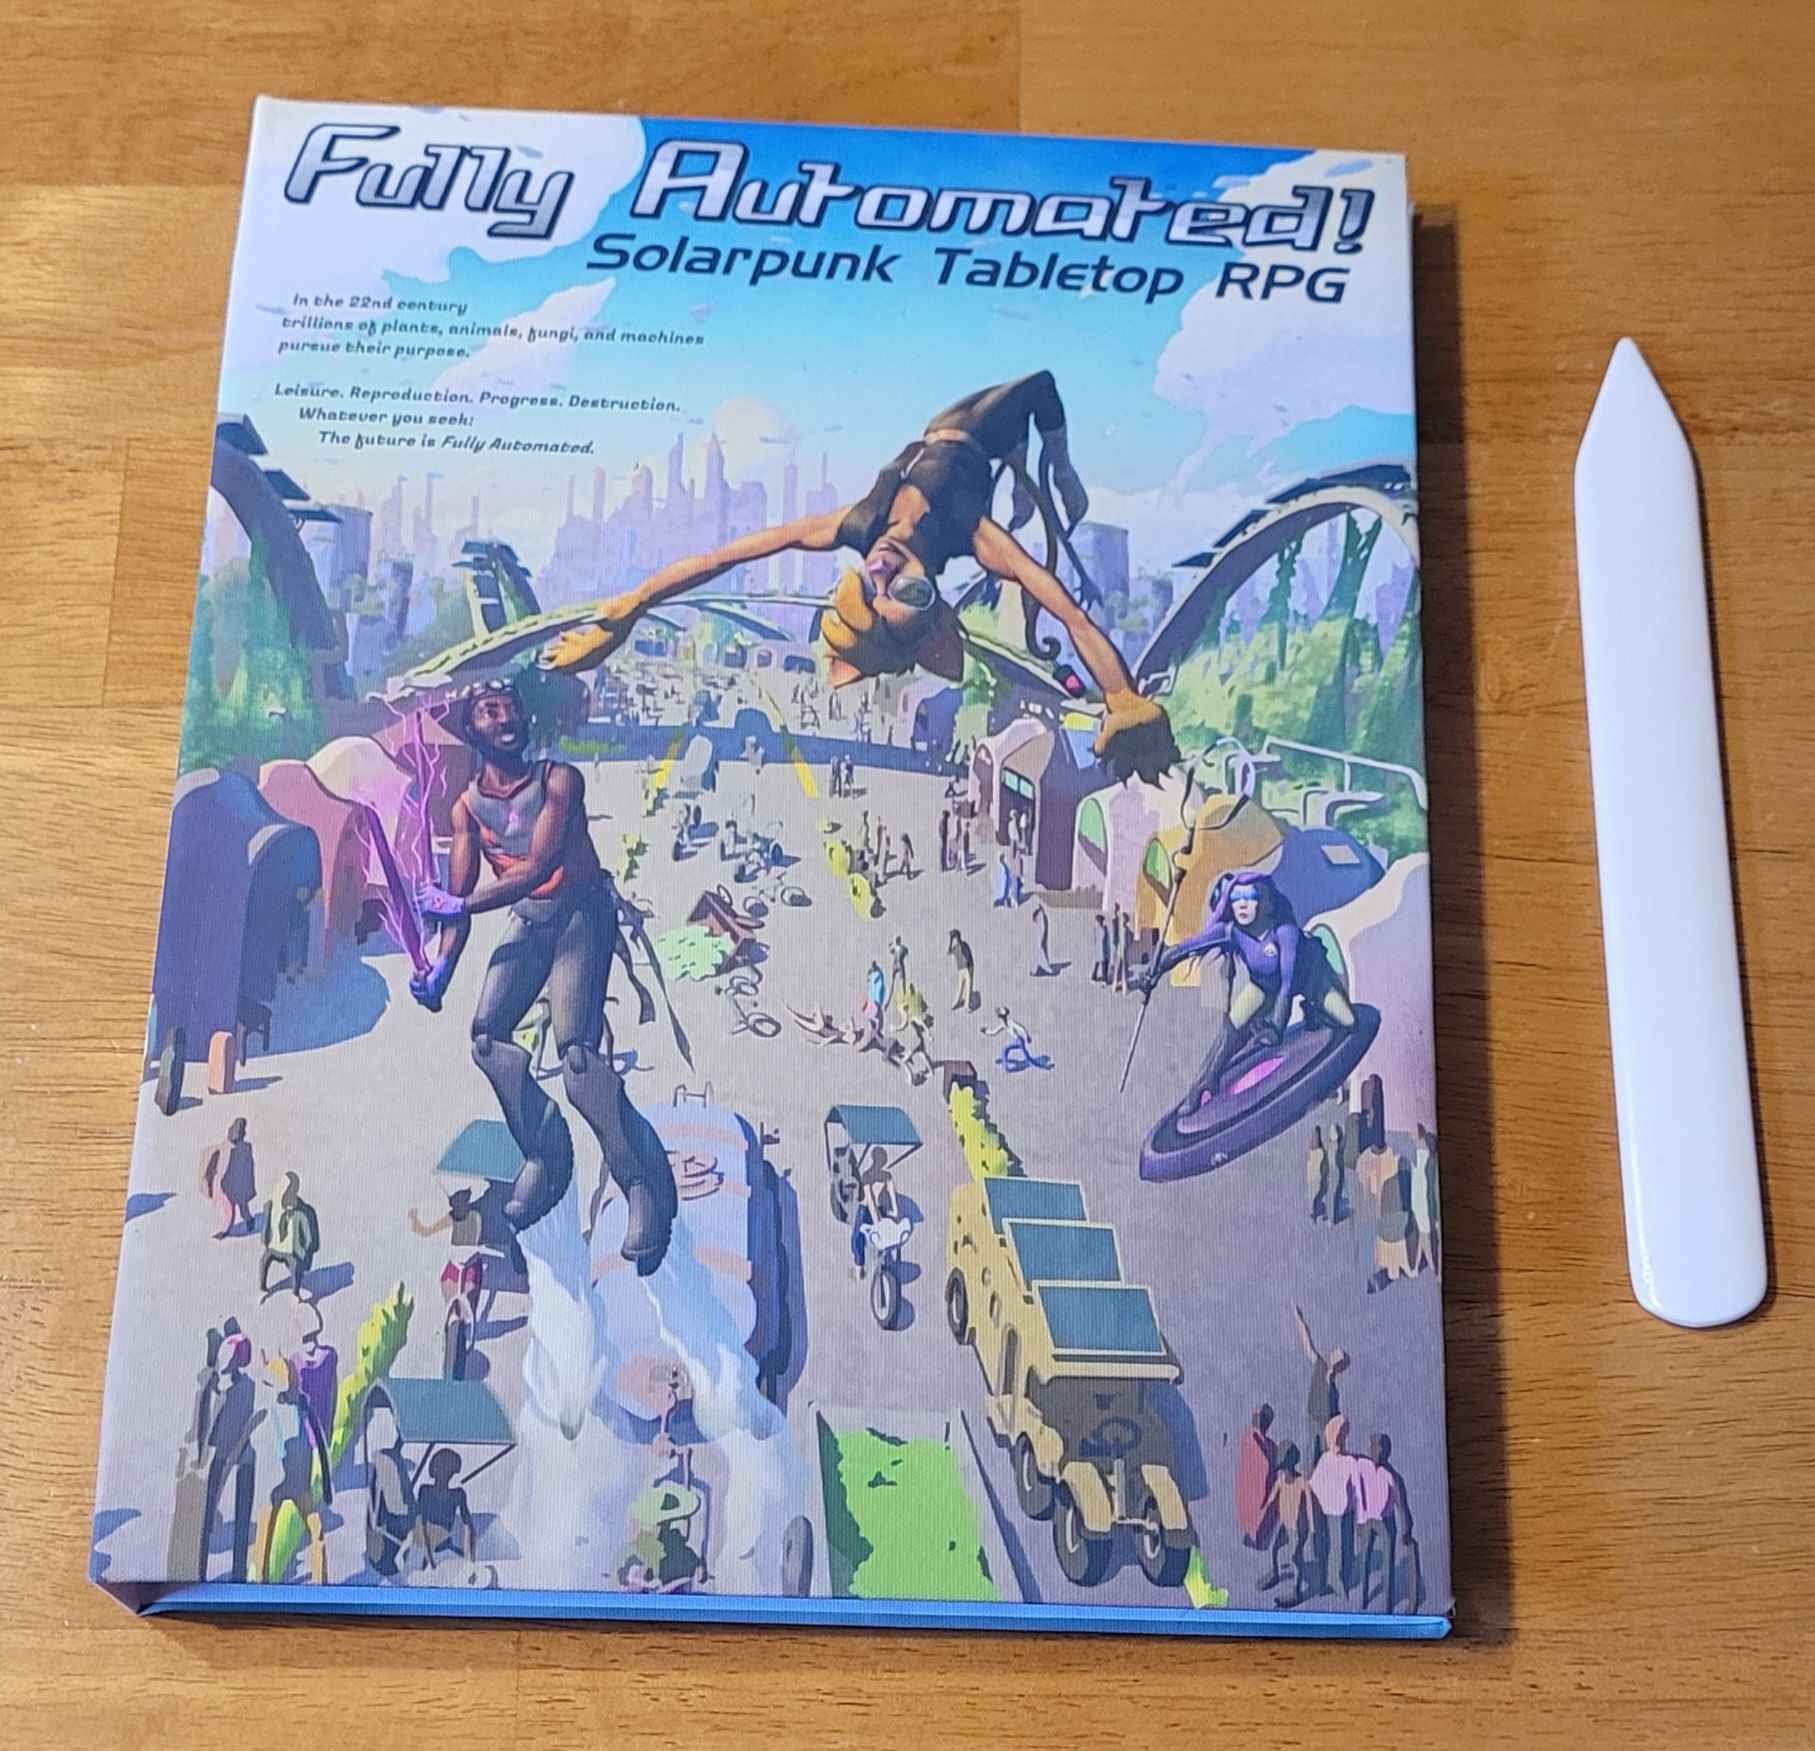
I recently started trying to learn bookbinding (and because I never liked practicing by making something I didn't need, I'm starting with a 266-page solarpunk TTRPG rulebook I helped make).
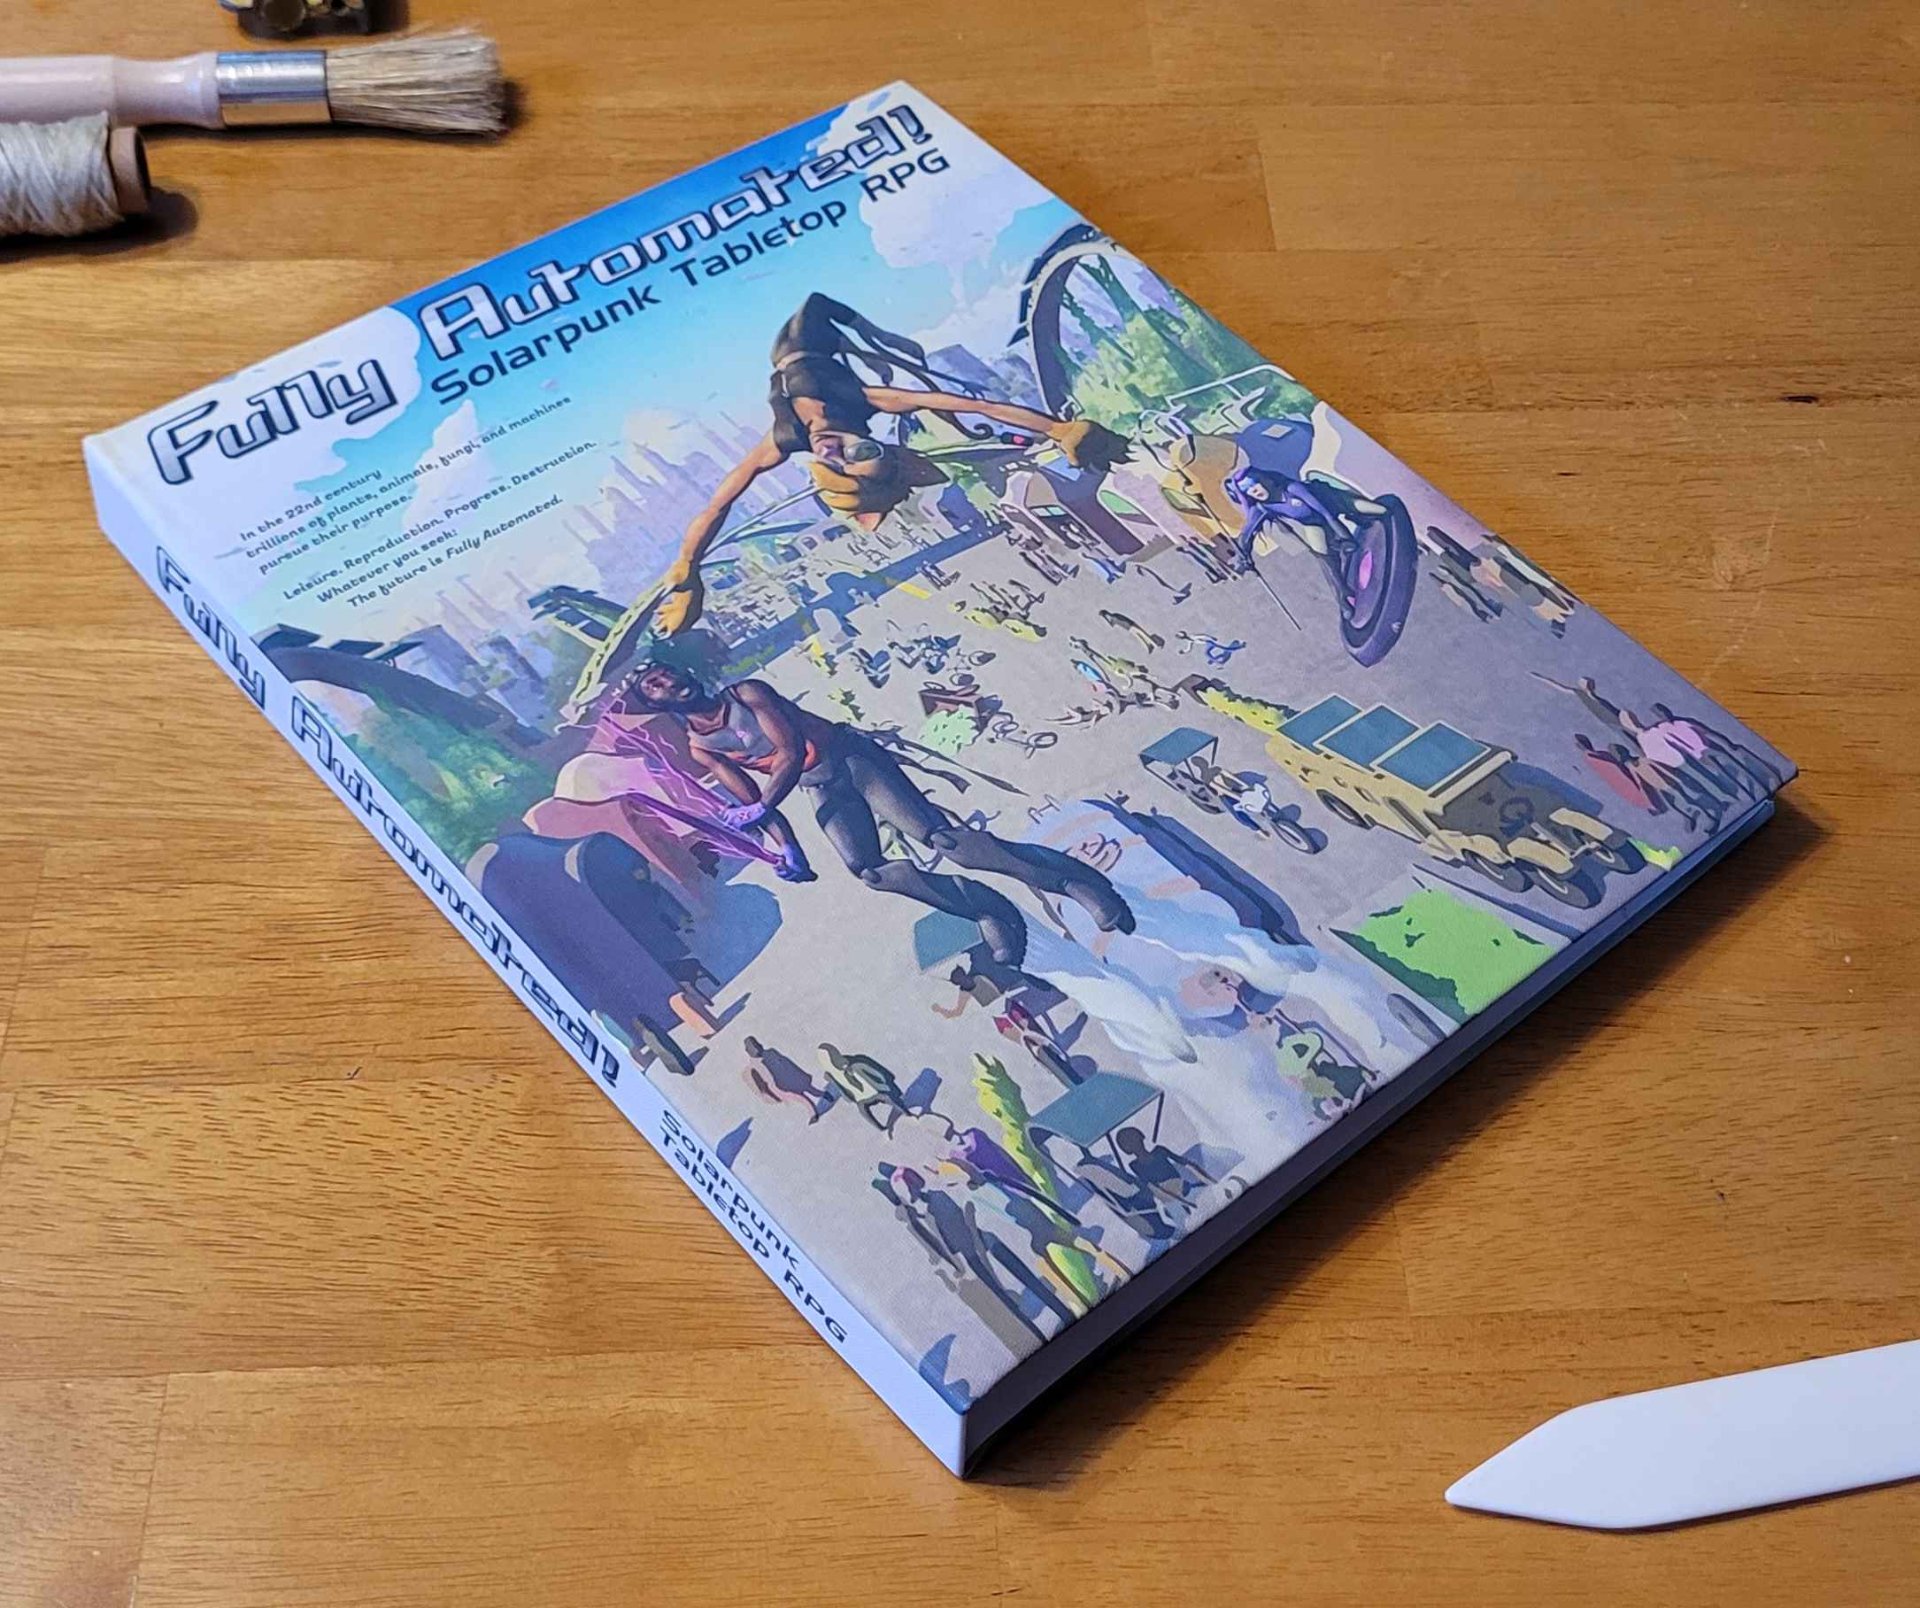
I joined the Fully Automated discord a while back, mostly because I was looking for a place to talk worldbuilding in the genre. I read the lore/setting part of the rulebook and it actually helped me start thinking bigger than I had been around ways the world could be better. If there's a solarpunk timeline from our modern day, through conflicts and crumbles and collapses, gradually rebuilding towards something eutopian, then they're much closer to that high-tech, post-scarcity end-state than the solarpunk stuff I normally write. But there's something kind of fascinating about that world, and it makes for a great place to tell stories.
I offered them the use of the art I'd already made, and then I got involved in writing and editing the lore, including contributing a couple sections around rural areas and reuse, which, true to form, they expanded into something bigger than I had come up with on my own.
Since the game is an open source, all-volunteers thing, we didn't do a print run, just released a series of PDFs. But I have free access to a printer that can do 11x17, a plotter printer that can print on canvas, my SO's unused bookbinding kit, and enough patience to learn to bind at least a few copies, so I decided to give it a try.
The first step was rearranging the pages into signatures. These are small pamphlets of folded papers that get sewn and glued together to form the book. This turned out to be way easier to do than I expected, as there are several online tools for interposing PDFs. I found and really like this one: https://momijizukamori.github.io/bookbinder-js/
This allowed me to take the regular letter-sized (8.5"x11") PDF and rearrange it into signatures of four or five 11"x17" pages, with two pages per side. It handled reordering the pages so they work correctly once the signature is folded together and stacked with the others. We also took these interposed files and made them available on the FA! website.
Once I had the interposed version, I could print off the signatures:
I really recommend printing each signature separately so you can paperclip them together and keep careful track of which pages are inside it. It's really, really easy to completely lose the plot on the numbering - I almost couldn't figure out how to put a four-page signature back in order once or twice, if it had been mixed with other ones I'd have been really confused. But it's easy as long as you keep them in their sets and remember which side is up (because its the only sheet/side where two page numbers show in order).
The free printer I had access to couldn't print without leaving a margin so I had to trim them by hand. I started off using a papercutter on the short sides, but eventually switched to using a straightedge and scalpel on all the sides.
The next step was folding the signatures folio-style using a bone folder:
And then punching holes so I could sew them together. Some guides have you sew each signature separately, then sew those together, but the one I followed (and recommend) does them all at once.
The folded piece of paper is a template marked and punched so all the holes in all the signatures line up as closely as possible.
Next, I sewed it together using the Penrose Press guide, being careful to pull the threat as tight as I could before tying it off on each signature. I really like how secure this seems to make the binding.
Even if you tie it tight though, it'll still have some gaps. That's were clamping and gluing it helps! The guides I followed suggested just stacking books for weight at this part, but I went ahead and built a really ugly book press with a piece of scrap particleboard, scrap 2"x4", some wax paper, and a couple deck screws. I pre-drilled the holes, wrapped the boards in the wax paper, and screwed them together so the book block could be clamped between them:
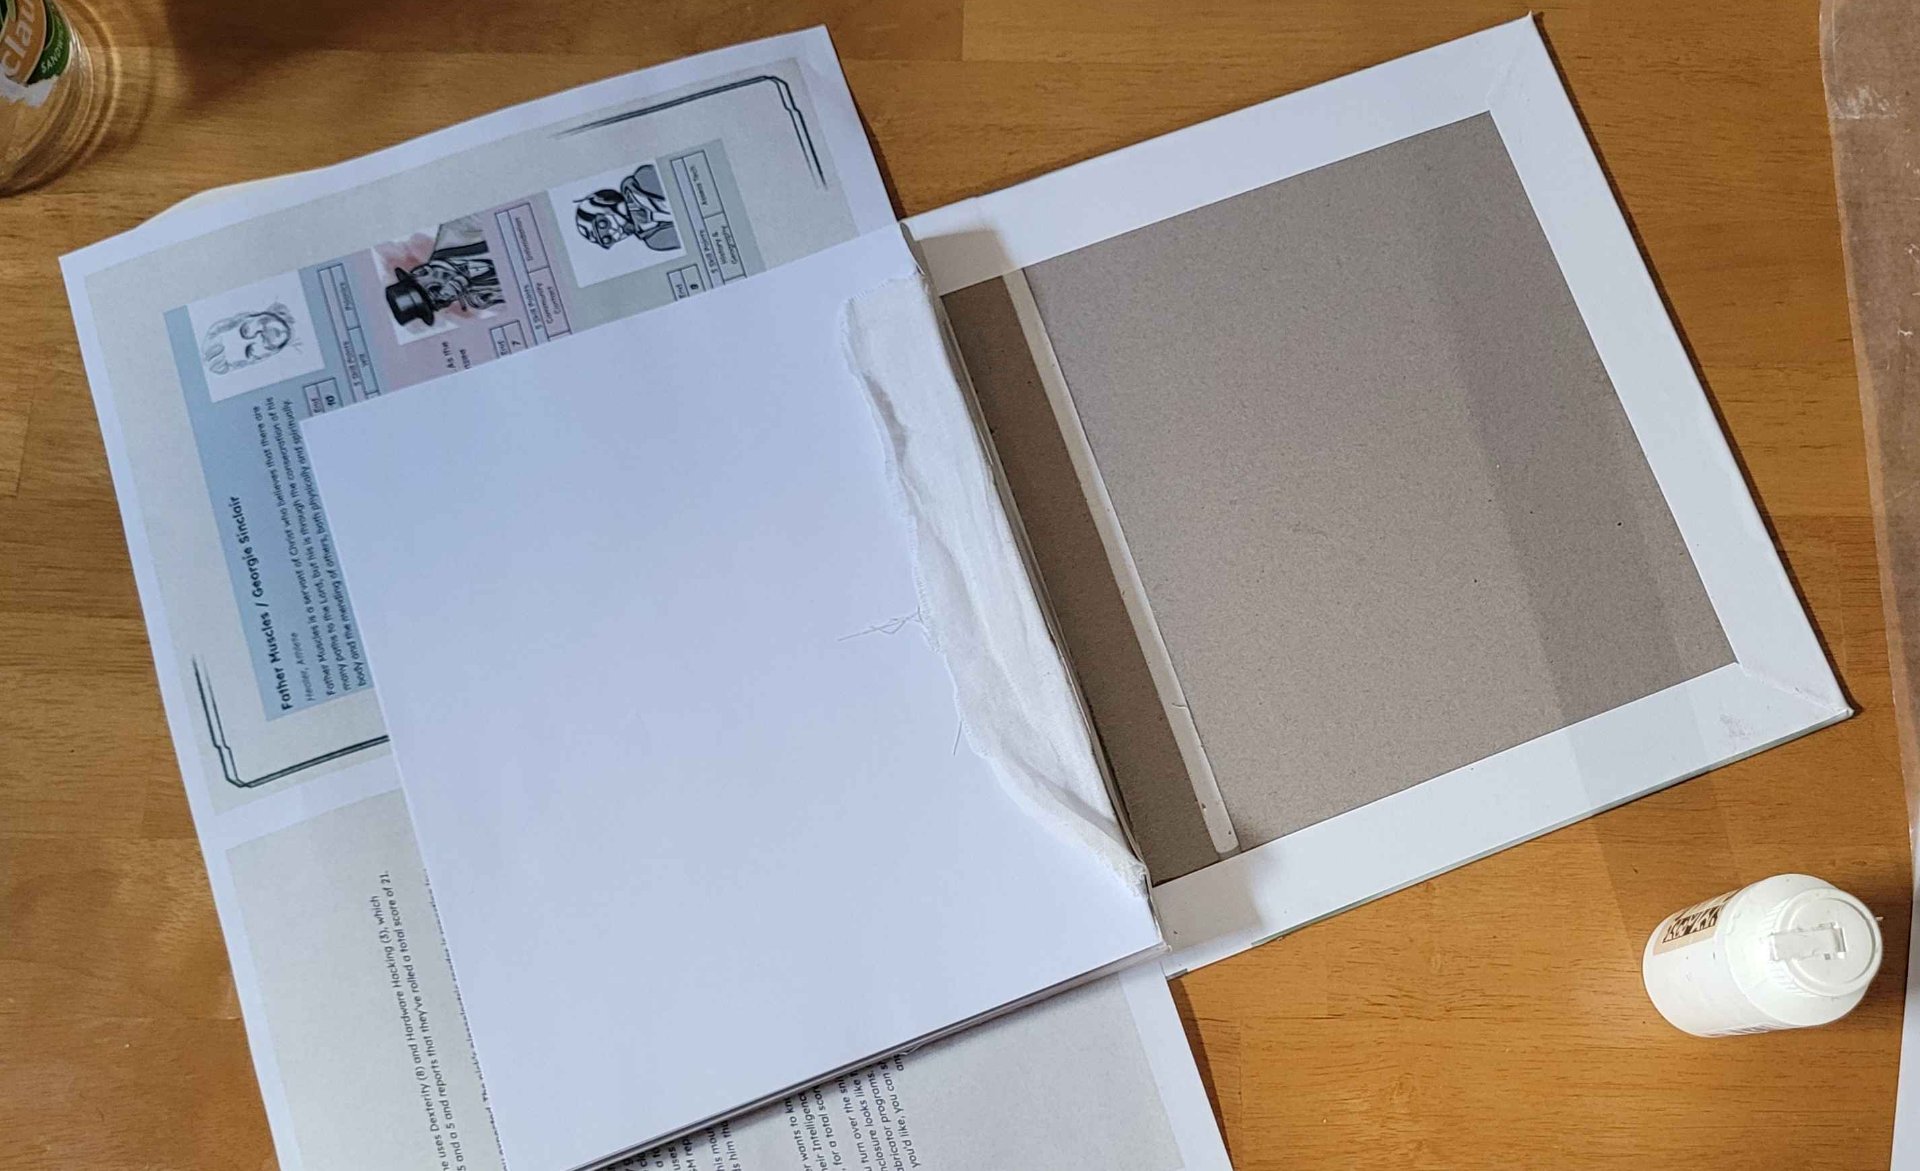
That's when scope-creep hit and I switched plans from making this first copy a softcover book to making a hardcover.
I followed my SO's bookbinding book, and this guide for the spine, and added a section of cheesecloth (in place of mull, which I didn't have) and manila paper in roughly the dimensions they specified. These help hold the spine together and attach it to the cover (called the case).
Next, I roped the Fully Automated folks into making a back cover for me, and I put together a printable version with a spine and everything. I took a lot of measurements, made my best guess, then went to our local makerspace to print it on their plotter printer:
It's slightly large but I'm happy with it!
The next steps came pretty much entirely from this guide.
I cut some bookboard (stiff cardboard) to size, and did my best to line it up with the image showing through the canvas. Once I had them in place, I traced them lightly onto the back of the canvas in pencil, held it up to the light to see if it was good, and made corrections until I had good lines. Then I measured out to the edges of the sheet and trimmed it down:
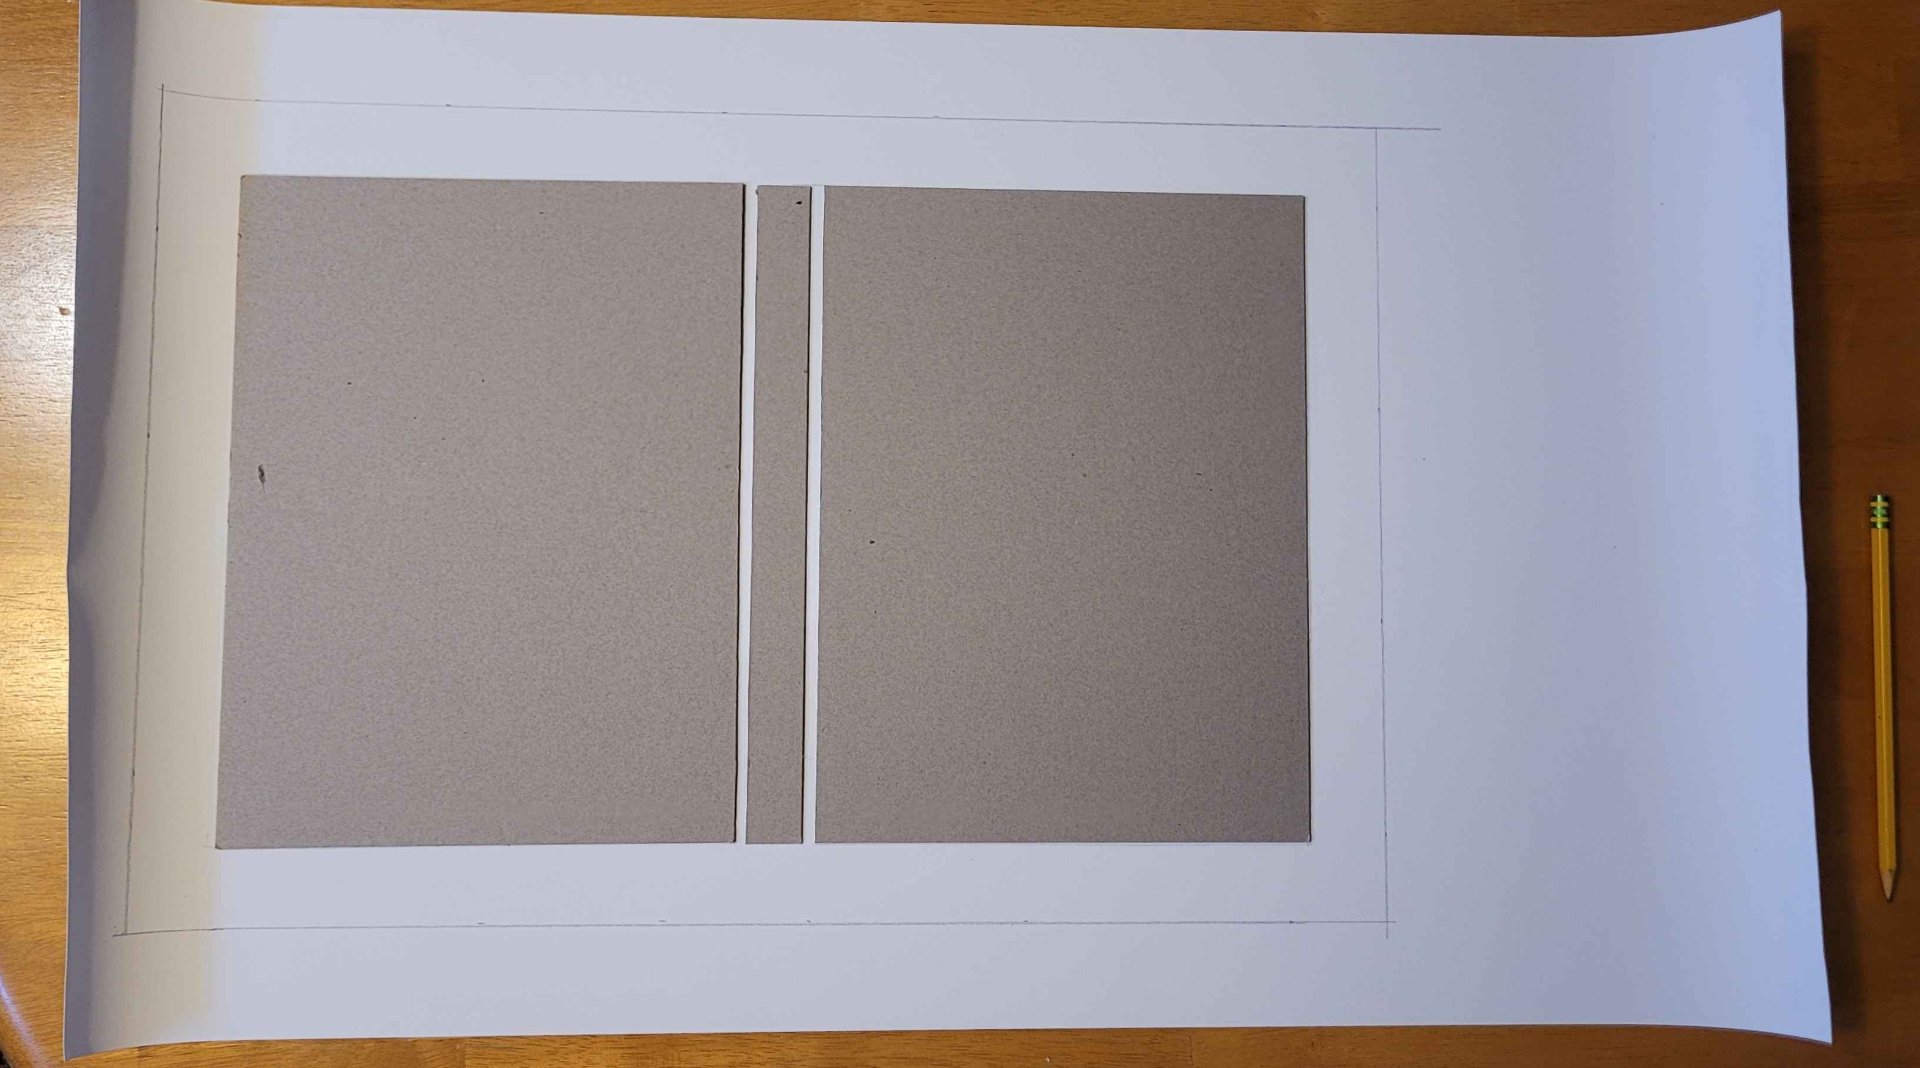
Then I glued the bookboard to the canvas:
I forgot to take some pictures for the next step (sorry) so you'll have to rely on my descriptions. First I cut the corners off the cover at a 45 degree angle 1/8" out from the corner of the bookboard. I used a carpenter's square to mark the angle. Then I folded the sheets over the bookboard and glued them.
Then it was time to glue the book block into the case. This happened fast enough that I didn't dare stop to take pictures. I slipped some wax paper between the endpaper (a blank sheet I included on front and back when I used the interposing software) and the rest of the book block. Then I painted it with glue as quickly as possible, being careful to first glue the cheesecloth to the paper, then painted it over with glue as well. Then I carefully closed the cover onto the sheet. The endpaper was just about a liquid at that point, despite how lightly I stippled on the glue, so I'm glad I didn't have to try to make changes. I flipped it, and let it dry for awhile.
Then I repeated those steps on the other side and left a heavy laptop sitting on it.
Its always tense waiting while the glue dries on a project, hoping its not clamped crooked, or the glue isn't running and sticking to something it shouldn't. Especially when you're combining the end result of two other projects. Luckily this one turned out mostly okay:
I can see where the endpapers stretched (just like one guide said they would) causing them to reach further towards the fore-edge than I'd have liked. But it generally looks pretty smooth and clean so I'm not very bothered by that.
All in all, I think not bad for my first bookbinding project!
I've made a few trips to the hardware store and other errands over the years, using a backpack on my bike (years ago, when it was my only transportation, I hauled a small amount of groceries in a backpack and just made multiple trips) but this is the first trip I've made since I started trying to turn this mountain bike into a cargo bike. I've got the rear rack I talked about in that post, some basic secondhand fabric panniers secured with straps and zip-ties, and a milk crate from a consignment shop. I went for a pretty light grocery run for the first trip, just two totes of frozen stuff, and it rode just fine on the way home.
Thanks for all your advice! I think I'm going to upgrade to bucket panniers at some point soon, but I'm glad I can at least start using it like I'd planned.
I posted to the slrpnk.net utility cycling community a little while back looking for advice on…

I previously posted looking for advice on turning my old steel-framed mountain bike into something I could use to haul groceries and maybe some bits of furniture I find on trash day.
I got a ton of helpful suggestions, and started out on what I think will be a gradual project as I make incremental improvements to this bicycle.
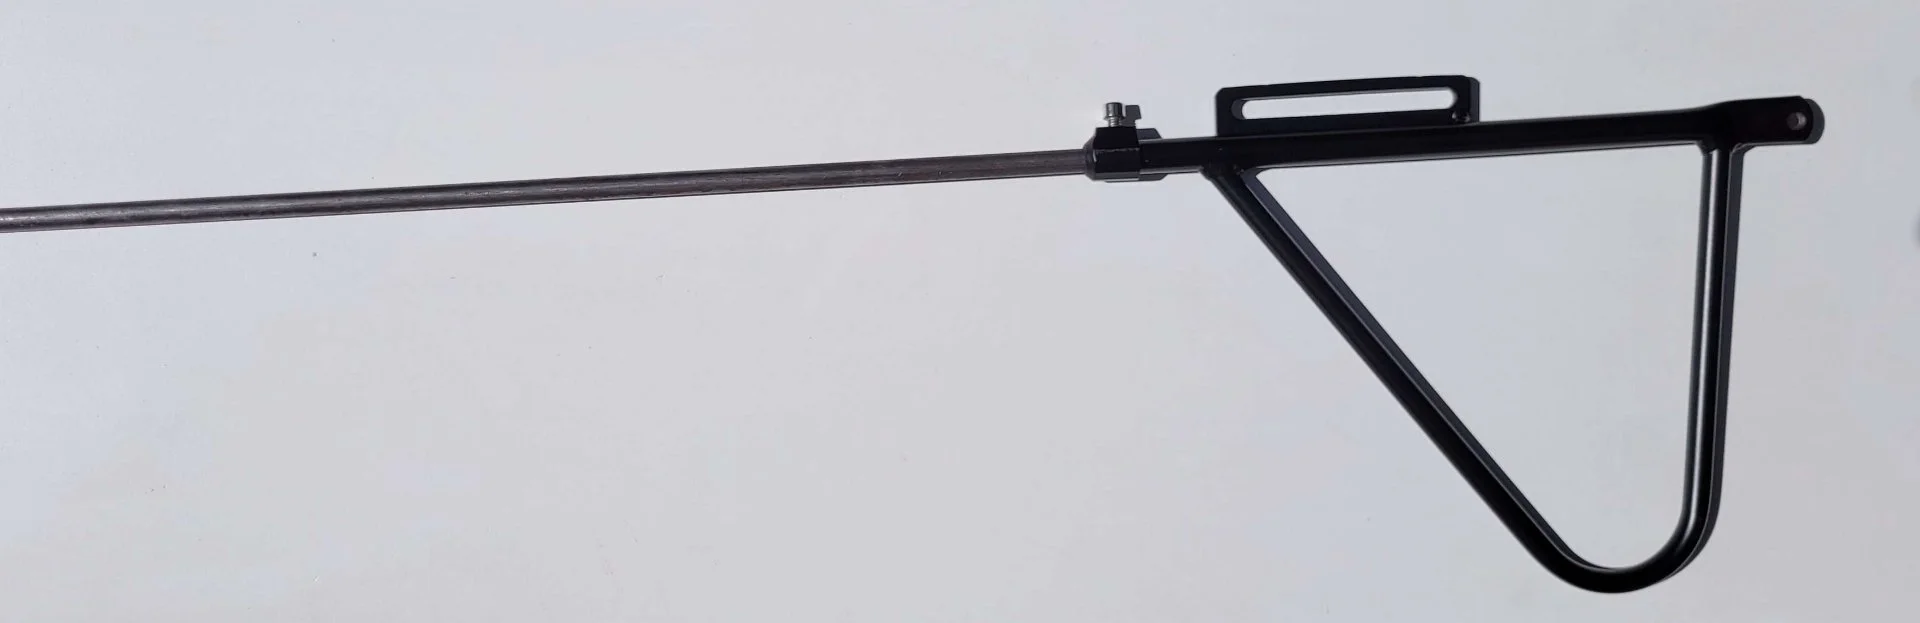
Step 1 was adding a rear rack, so I could add cargo panniers, or a basket behind the seat.
I settled on this one because I liked the extra support legs, and because it claimed to be able to support more weight than most other designs (something I remain skeptical about, but I'm pleased with the overall construction so far).
I did find that the right side seat stay was too crowded for two of the wraparound attachments to fit, so I'd need to use the built-in attachment point just above the rear gear.
Unfortunately, the lower support rod segment was too short to reach the attachment bolt. But that was fixable - the rod was just a length of 3/8 steel round stock with a flattened section where it bolted to the wraparound attachment bracket. It would be pretty easy to make one of my own.
I started by buying some 3/8” steel rod and a fresh can of propane for my offbrand bernzomatic torch (on two trips, one by train, one by bike because I didn’t realize the old one was empty till I tried to use it).
! (Test fitting the 3/8 rod into the upper section of the telescoping rear post)
Then I got some of my old forging tools together. Without a proper forge or anvil, I knew it’d be pretty sloppy blacksmithing, but I didn’t need this to be particularly fancy.
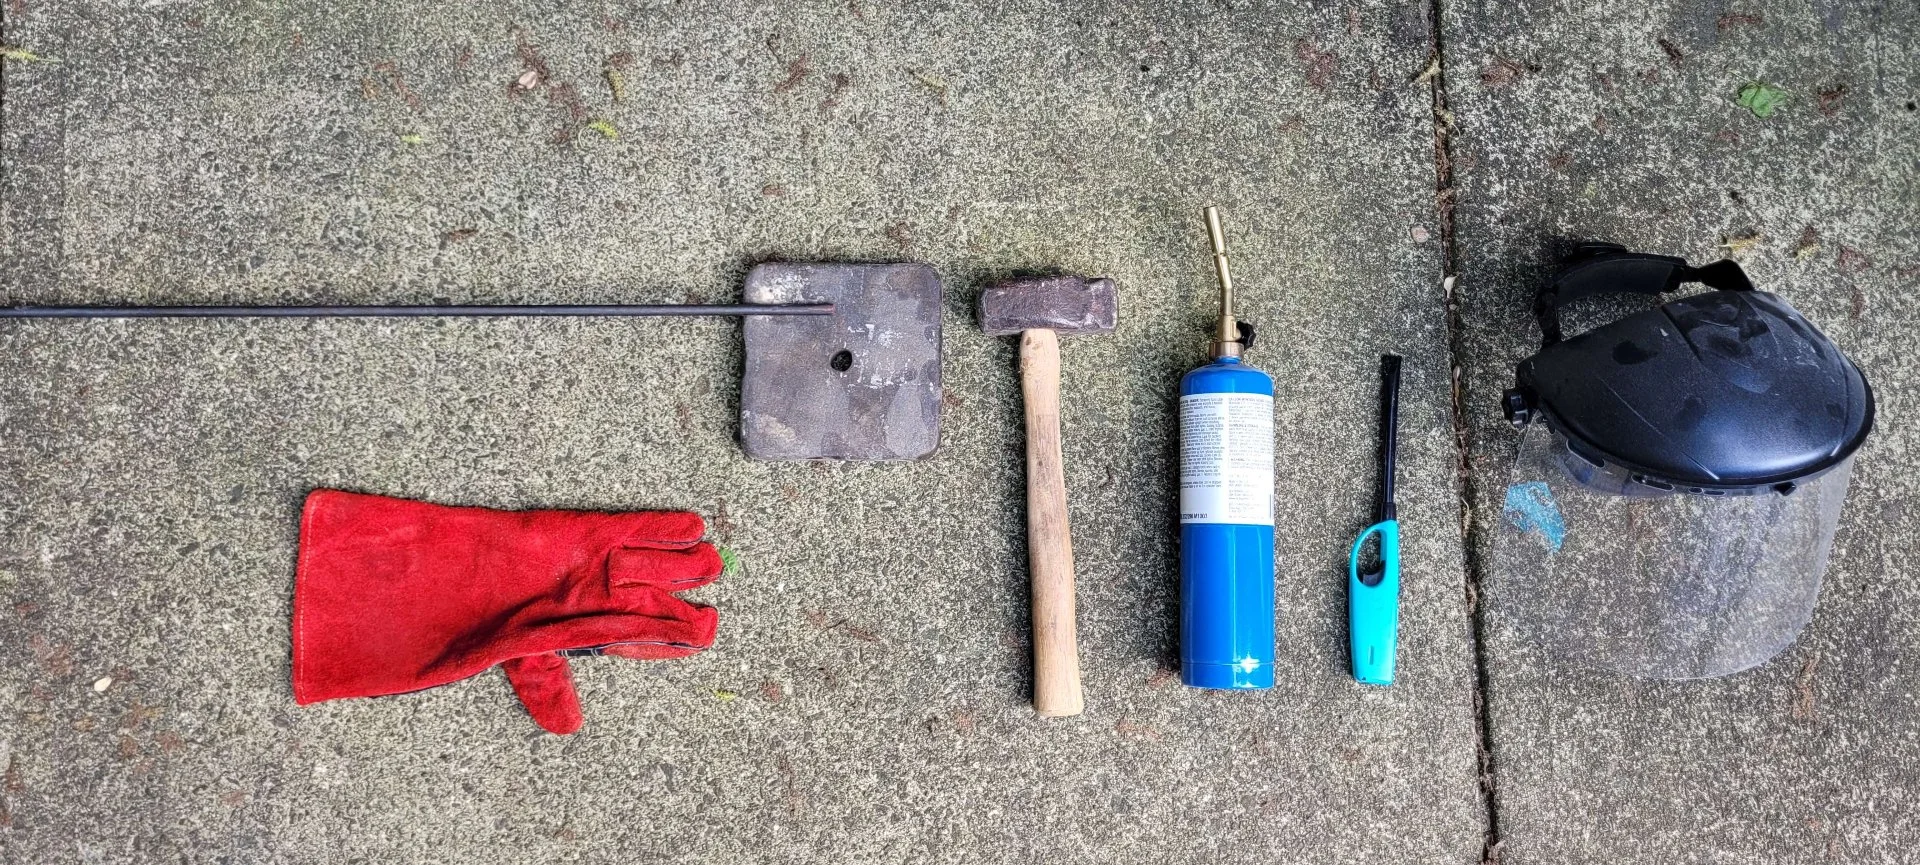
From left to right: 3/8ths steel round stock, fireplace glove, a steel block I found on the side of the road (my anvil, at the moment), my favorite forging hammer (combination round peen and straight peen), offbrand bernzomatic torch, lighter because I couldn't find my striker, and a face shield because you should wear safety goggles while forging (and this was easier to find)
I didn’t take any pictures while working because I didn’t want to waste additional fuel. Basically I just heated the end up as much as I could without a way to contain the heat, and hammered the daylights out of it whenever it seemed to be as hot as it’d get. It was halfway closer to cold forging than proper blacksmithing but I managed to spread the end of the rod flat enough to drill a hole through safely.
I used the drill press, a metal-drilling bit, and a bunch of tap oil, and went through the center of the piece without any real difficulty.
Once the hole was positioned, I used the grinder to clean up the overall shape of the forged part a little. Like the old wisdom says: a grinder and paint makes me the welder (or blacksmith) I ain’t.
(Top: the new one. Bottom: the original/stock part)
I decided to go much longer than necessary, which I suppose adds a little weight, but also some strength as we’re not relying on as much of the hollow tube it attaches to for structural support.
Once it was cleaned up and the oil removed, I spraypainted it. It would have been easy to go with Gloss Black to match the rest of the bike rack (I had a can of it handy) but I decided to paint it blue. I’d just put some work into making this part custom, and I’m working on rethinking if my goal needs to be to make something look like a product in the first place. For now I don’t mind calling a little attention to it.
Plus, the bike never looked great, which works great for me. One of my relatives found it rusting in a sandpit, gave it to me my first job away from home, and I’ve replaced piece after piece back when it was my sole means of transportation. For quite awhile it was held together with zip ties and various kinds of tape (and featured a fender made from cut-up gatorade bottles and duct tape) and the overall look meant it wasn’t exactly a high priority target for theft.
I gave the paint the full 24 hours to dry, then assembled the last bit of the rack.
Looking decent!
I have some panniers a relative gave me to hang over the rack if I can ever figure out how these straps work, but I wanted to see if it would work with a big steel basket I got out of a dumpster awhile back.
Turns out it’s ridable, though heavier than I'm used to. Cargo would likely make it even more tippy, though maybe not more so than those child seats I've seen around? Just the same, I suspect if “bicycle pickup truck” was a good idea, more people would be doing it so I'll swap on the panniers soon.
Next steps will be to add panniers, better brakes (per the previous post), and I think a frame bag and a handlebar basket.
Edit: I've removed the basket and I think I understand the paniers. I just don't trust the attachment system to stay attached and not get tangled up in the rear wheel and chain. Each side has an adjustable strap with a hook, and a loop of strap sewn on. It just seems like with the flex and stretch of the cloth bags as the bike moves and bounces along, it'd be too easy for the hook to come unhooked, at which point it'd be awesome at snagging a spoke or something. So I've got it hooked together I think the way it's intended, and a few zip ties should make sure it stays that way. When I go to buy bigger panniers someday (these are fairly small) I think I'll want ones with buckles or something more secure but still removable.
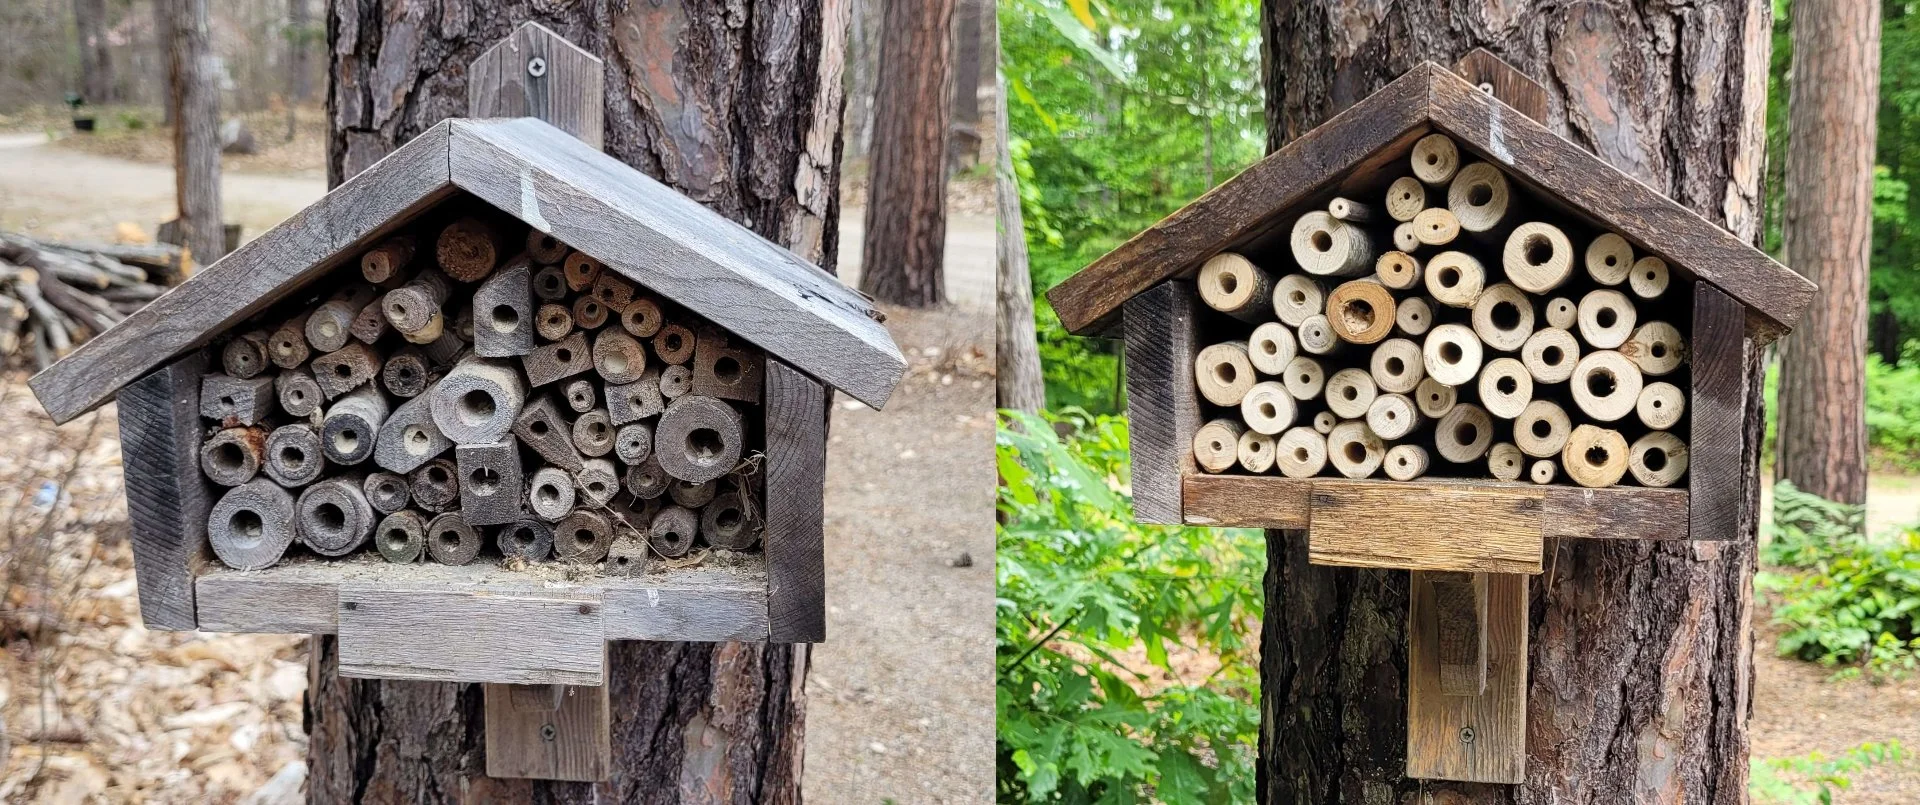
I posted awhile back after making a home for solitary bees, sharing that it had gotten some use. Its important to replace the sticks annually to prevent parasites from being passed from bee to bee as holes are reused.
Thanks to some winter storms, we had lots of downed branches to clear, so I had no shortage of sticks available for use as future bee housing:
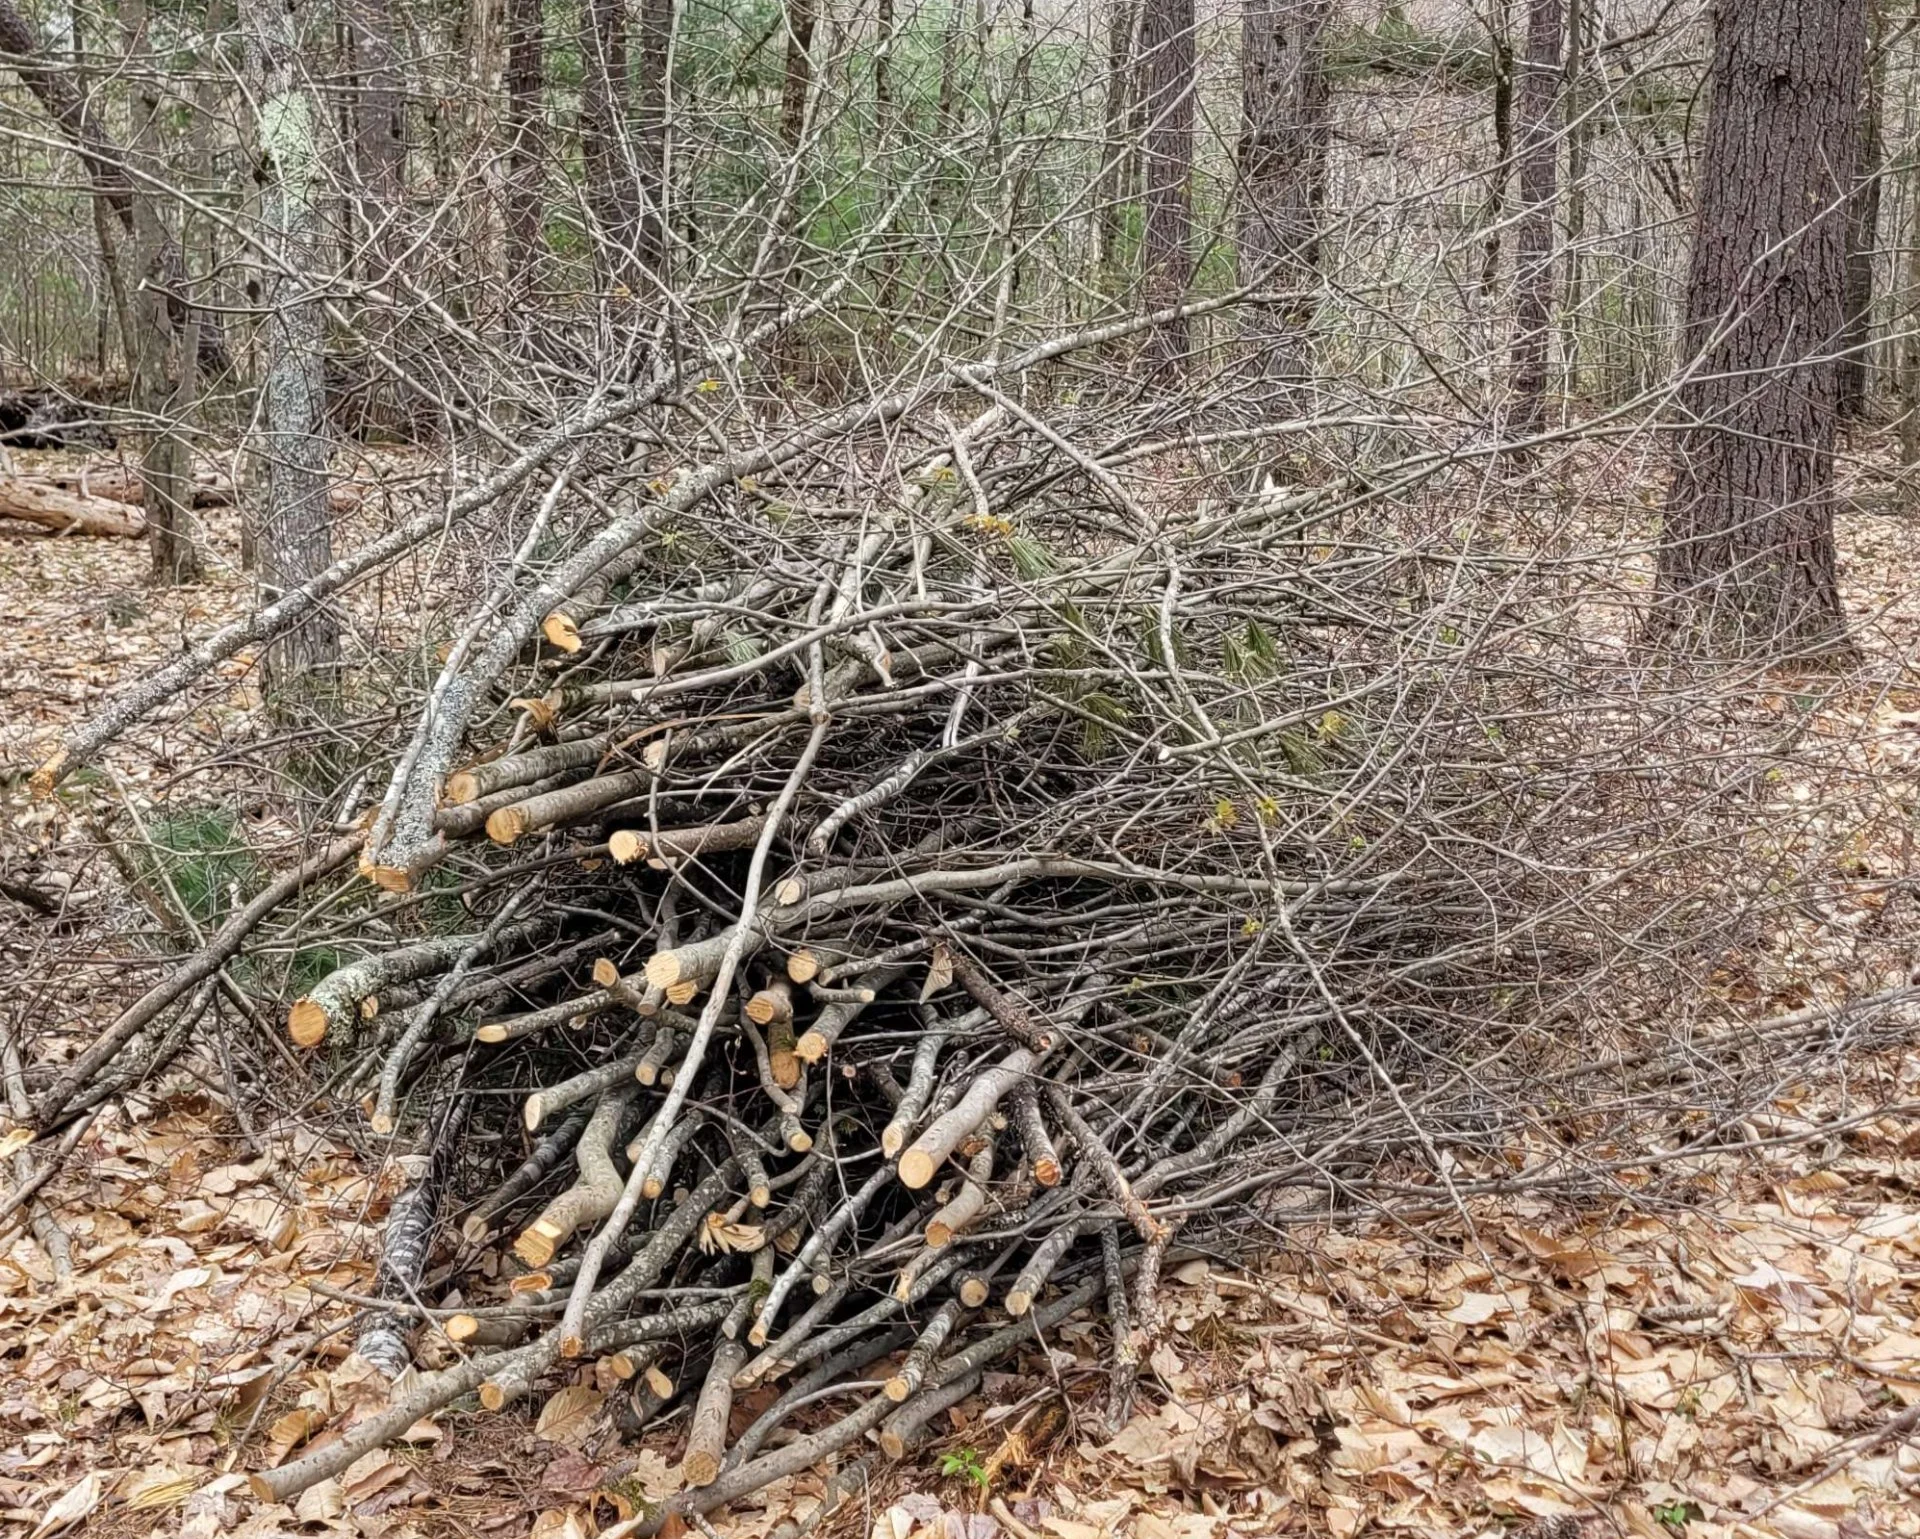
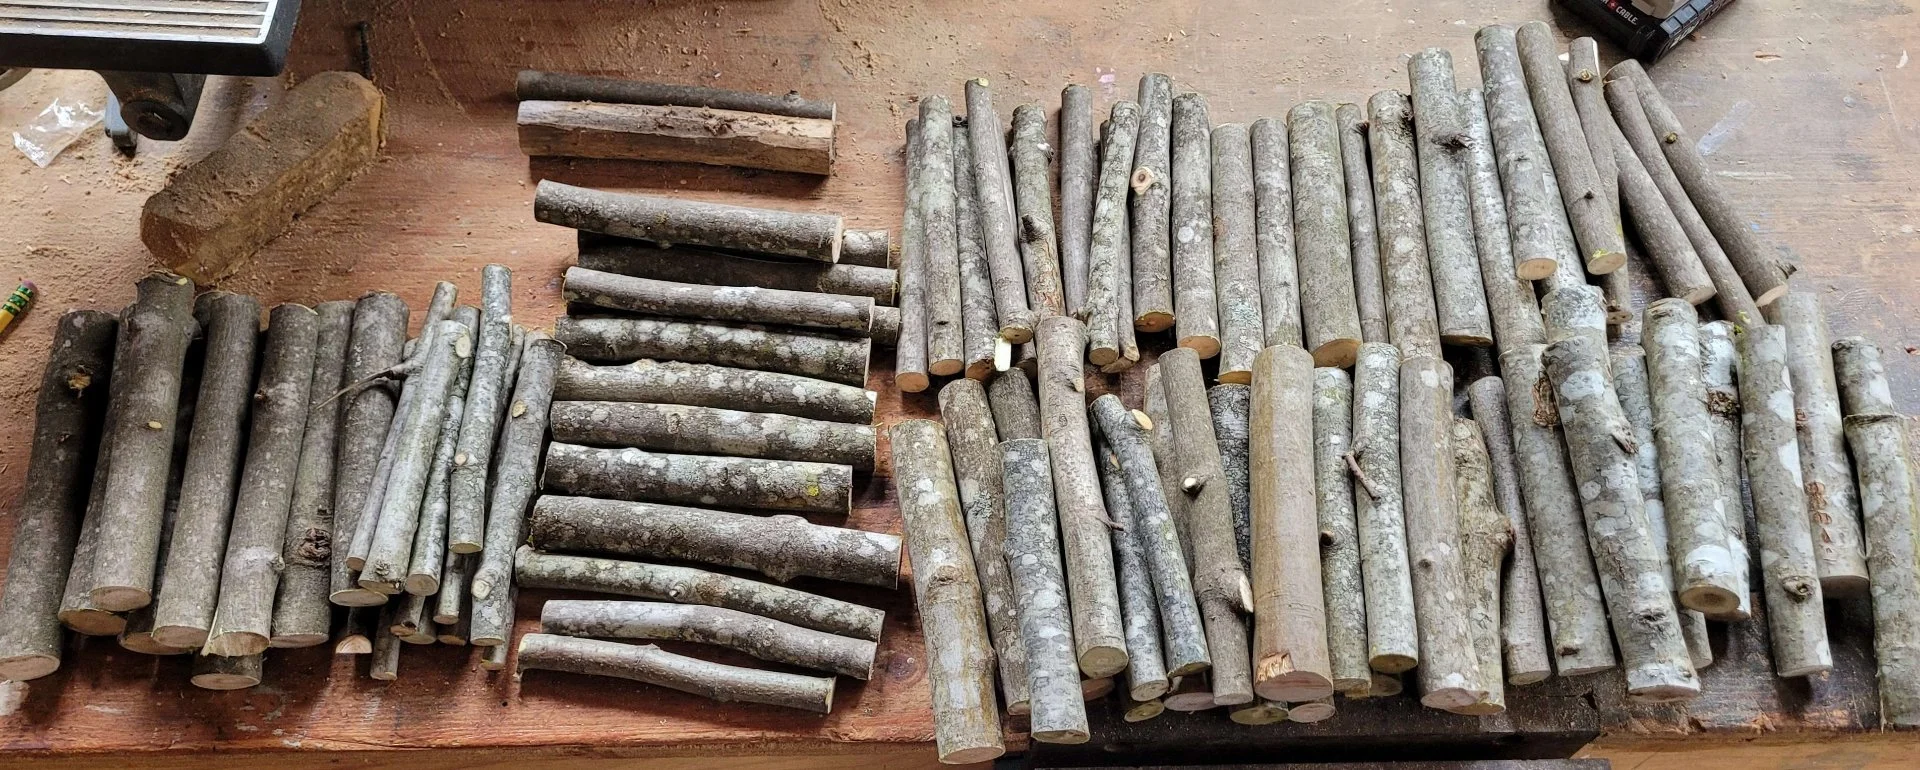
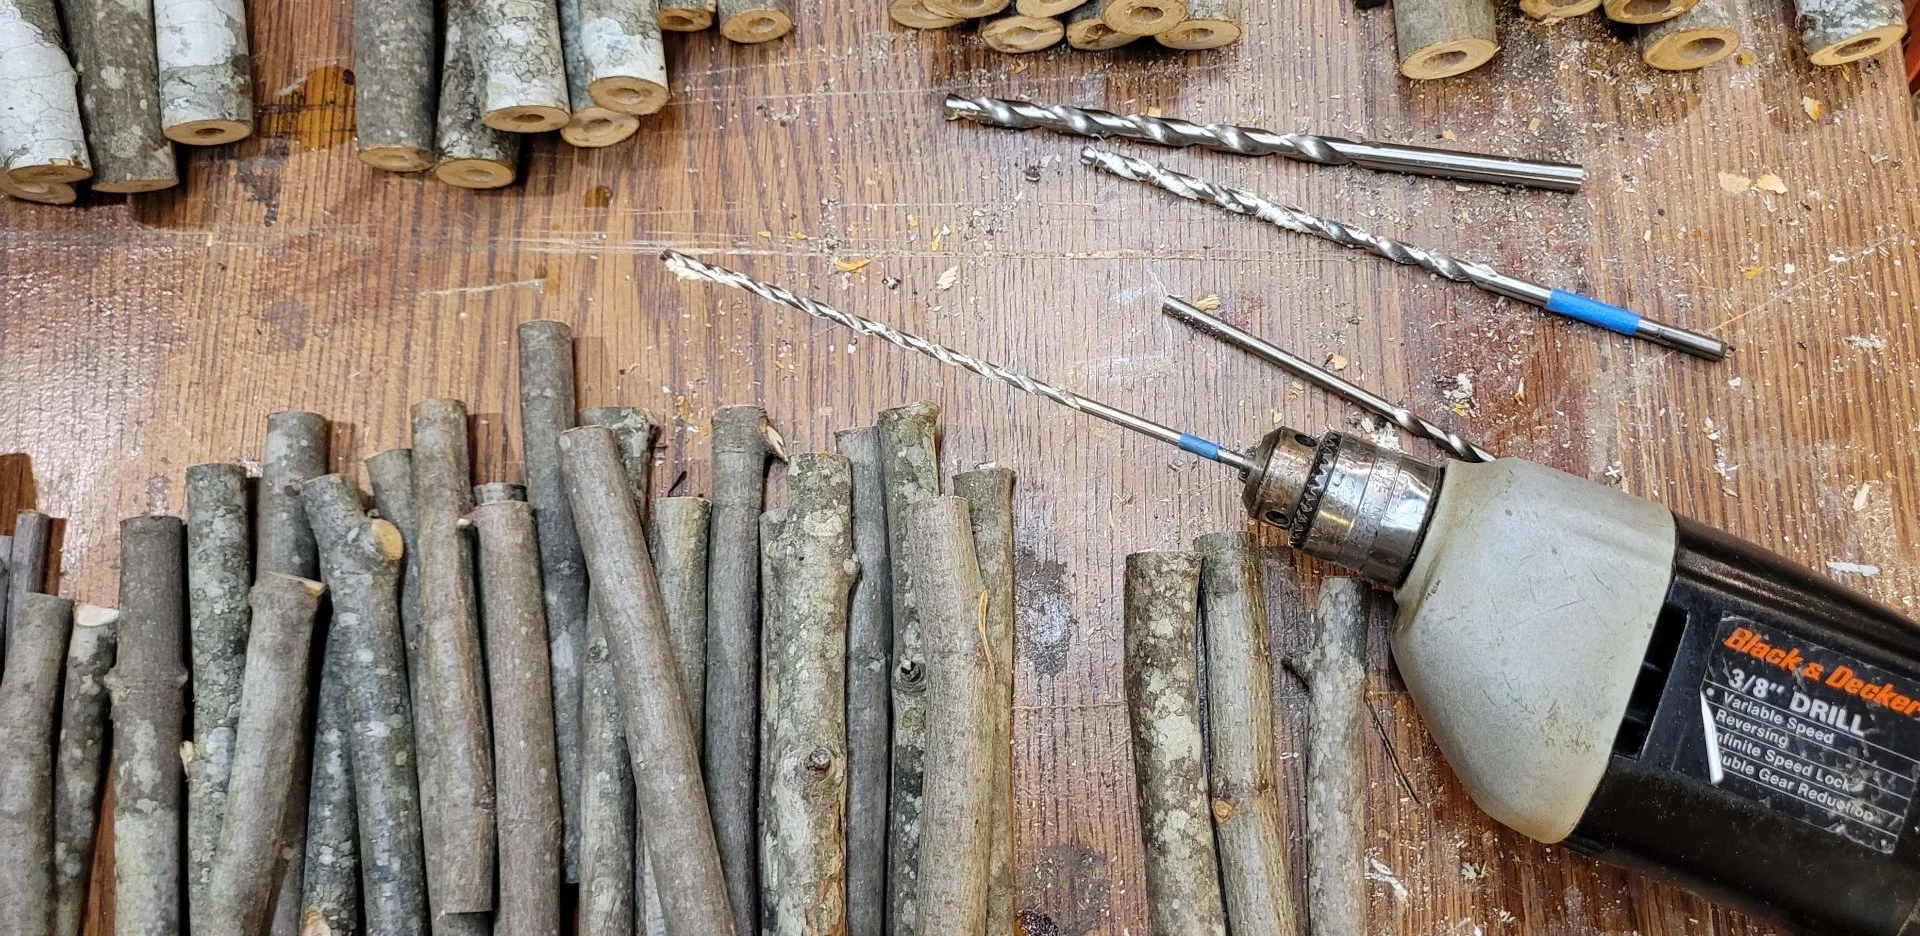
The holes need to be between 5" and 6" deep, so I started cutting the sticks into 6.5"-ish lengths.
This doesn't look like much but it took a lot of eight-foot branches to make these piles.
The next step was drilling holes. Different size bees need different diameter holes, so I read a few guides and picked out a range of drill bits between a metric #2 and a full half-inch (I don't think solitary bees care about unit standardization) to make sure any potential tenants can find a cozy caliber to call home.
I used the drill press to start the holes then used a set of extra long metric bits in a screwgun to get the full length the bees need
This didn't always go perfectly. I didn't break any bits, but sometimes the holes were crooked enough to punch through the side of the stick and I'd set them aside.
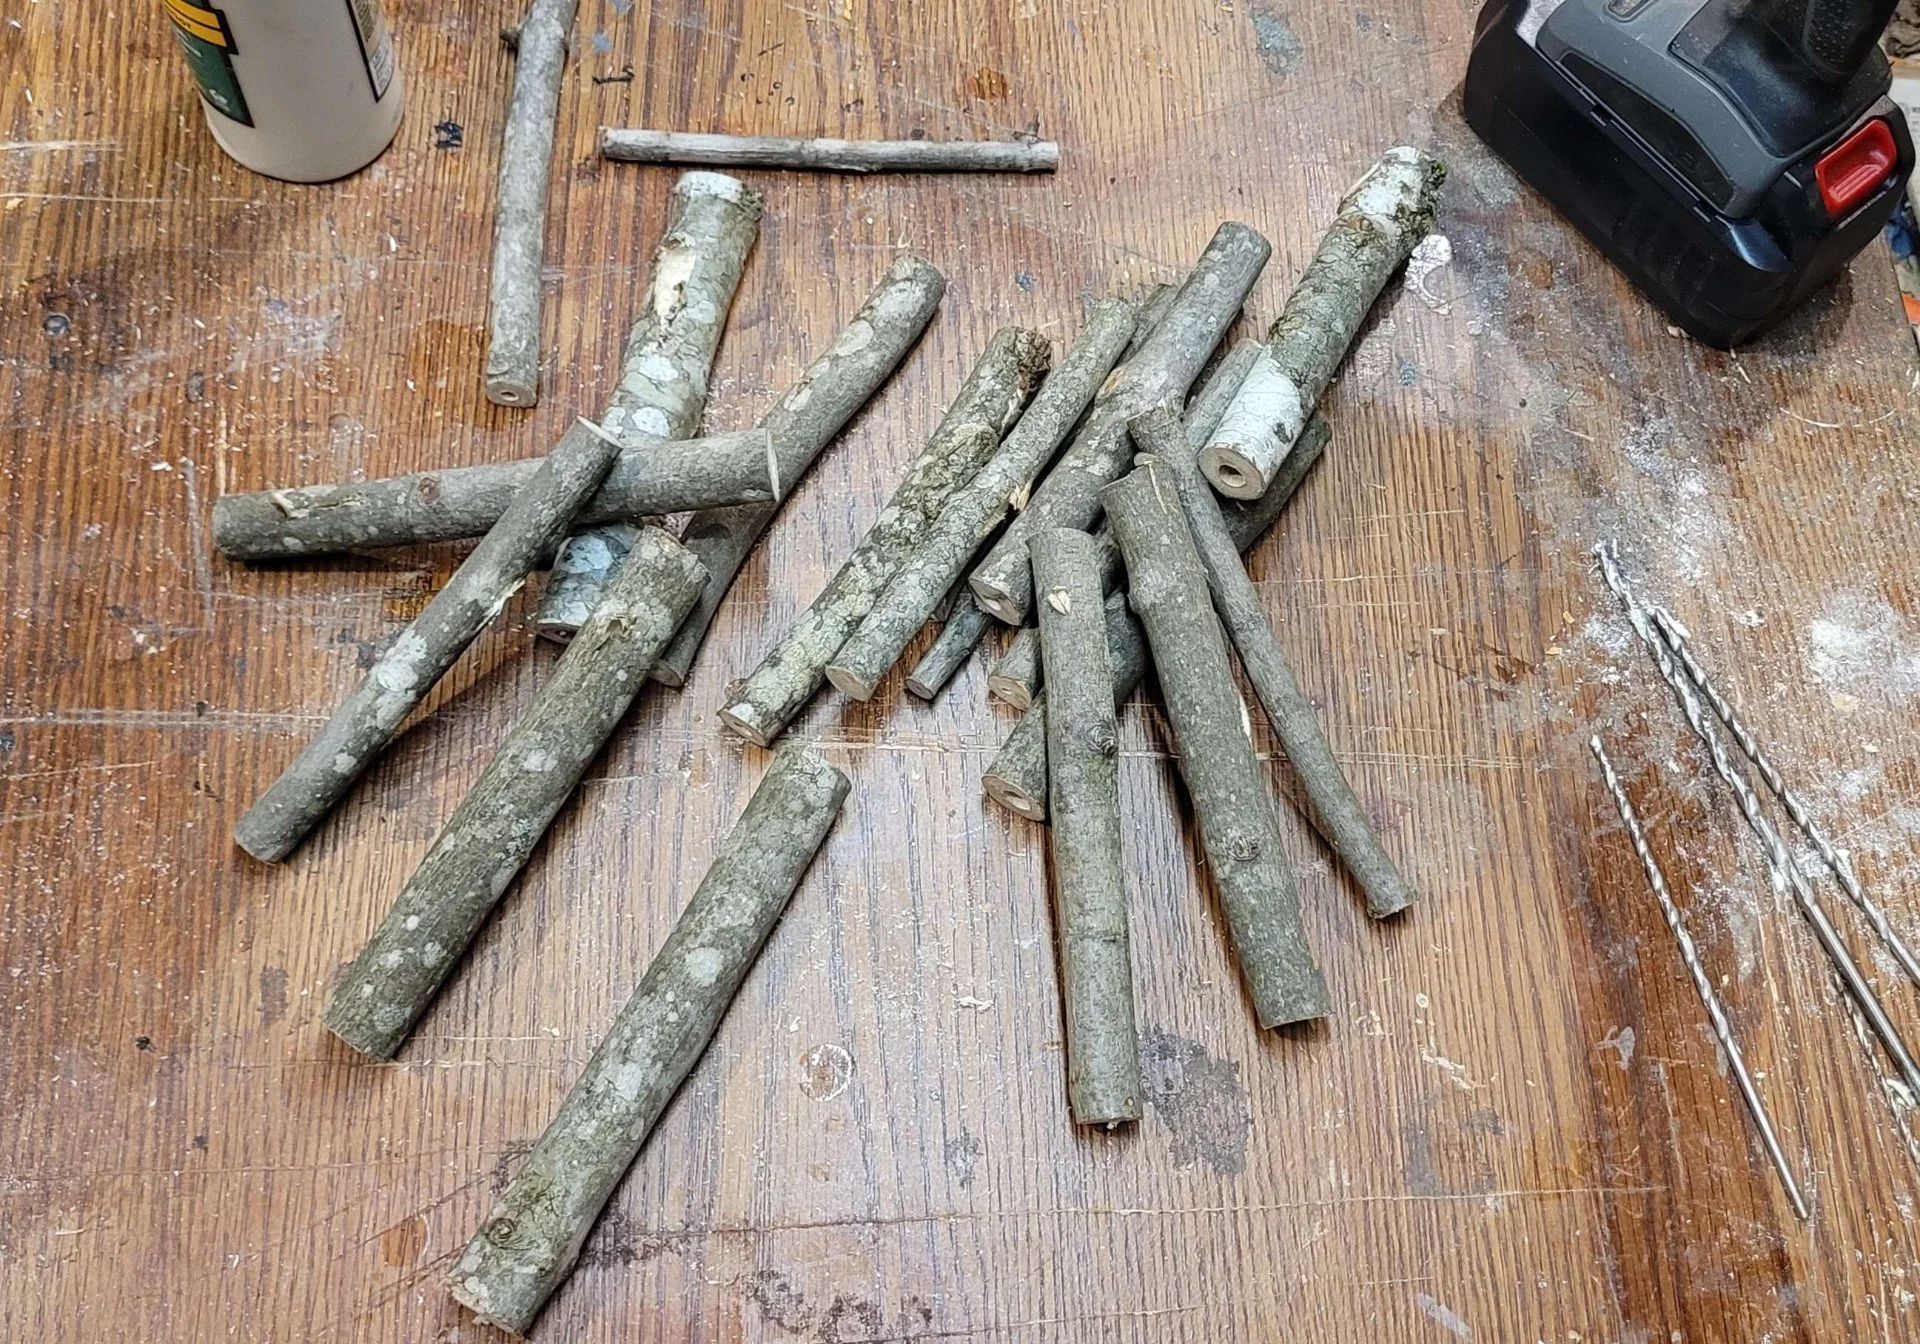
Then I just had to bag up what I'd made and replace the sticks in the bee house:
(Background omitted because it's easier than tidying the shop.)
I'd thought I'd made enough sticks for two years, but it took almost all of them to fill the bee house. Glad I prepared as many as I did.
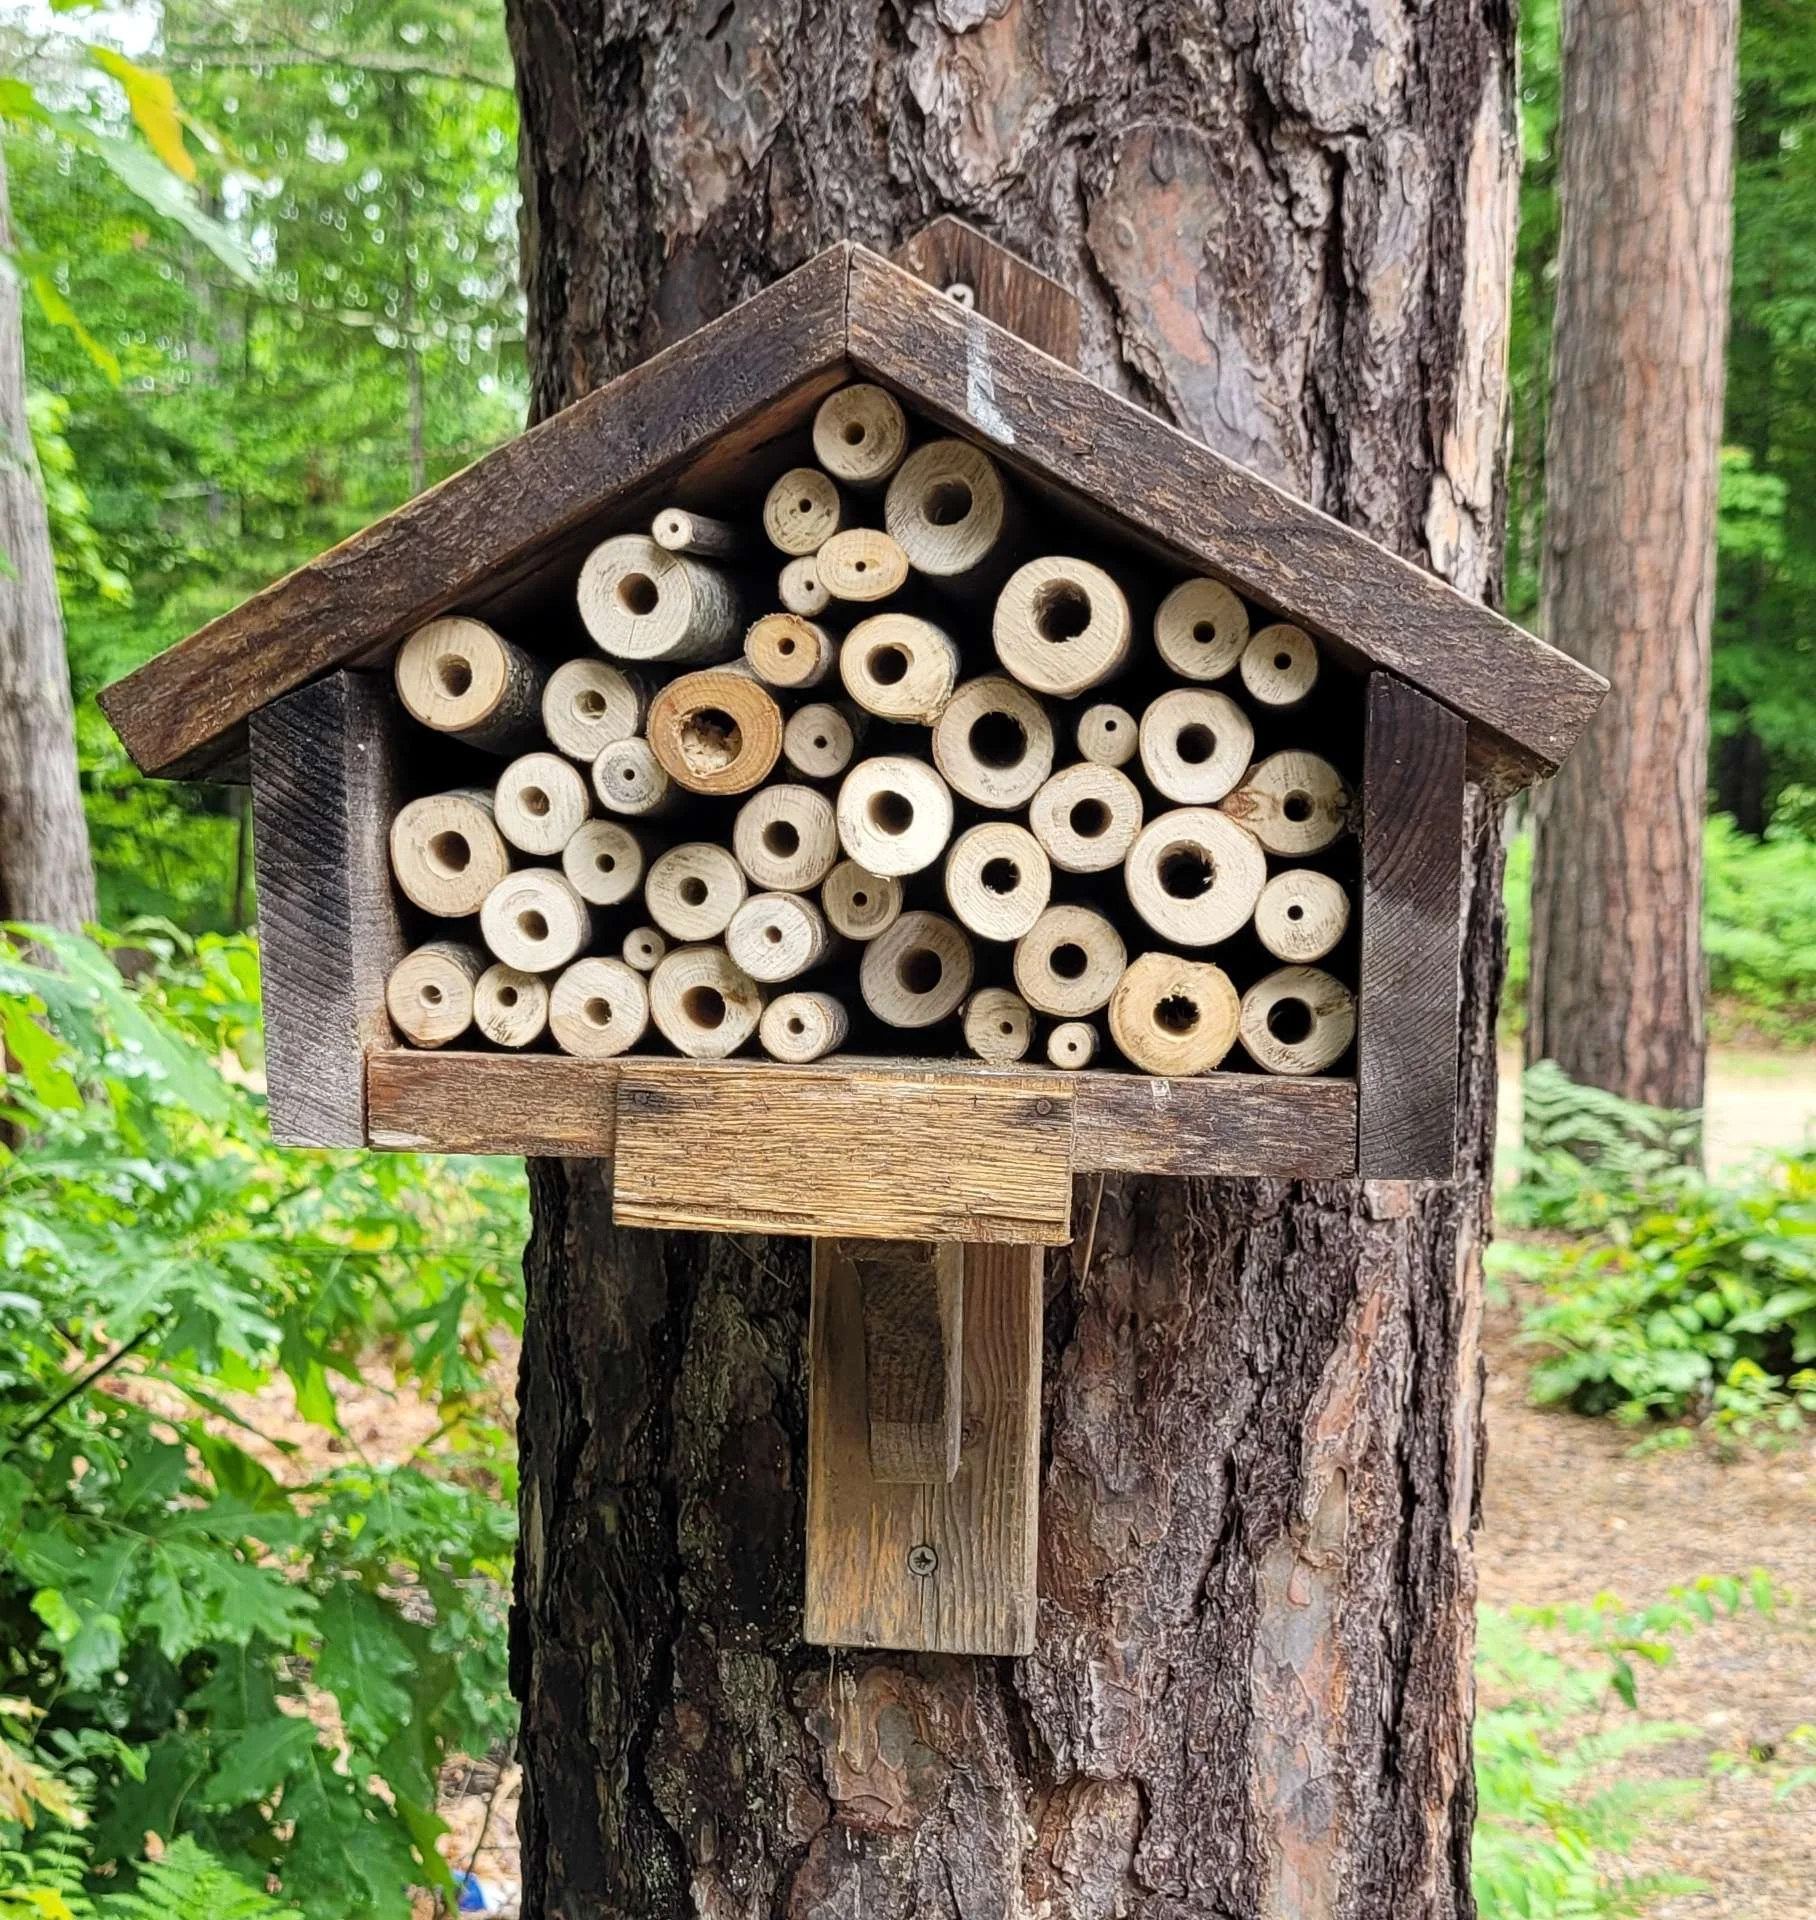
I think I'd call that move-in ready.
Awhile back I posted that one of my cyberpunk short stories got picked up by an anarchist fiction zine. I was excited because I had this related-but-sort-of-mutually-non-canonical photobash comic ready to go, which played with the same concept but in a different tone.
I don't want to spam this community with my comic weekly or anything, so I figured I'd just share a few still panels, spaced out whenever I get to them in the posting schedule. They're just quiet bits of art between the jokes.
Hopefully that's all okay, and if you do want to read this silly webcomic about a stolen secret service protoptype and the endangered deer it thinks is the president I'm posting it weekly here or here
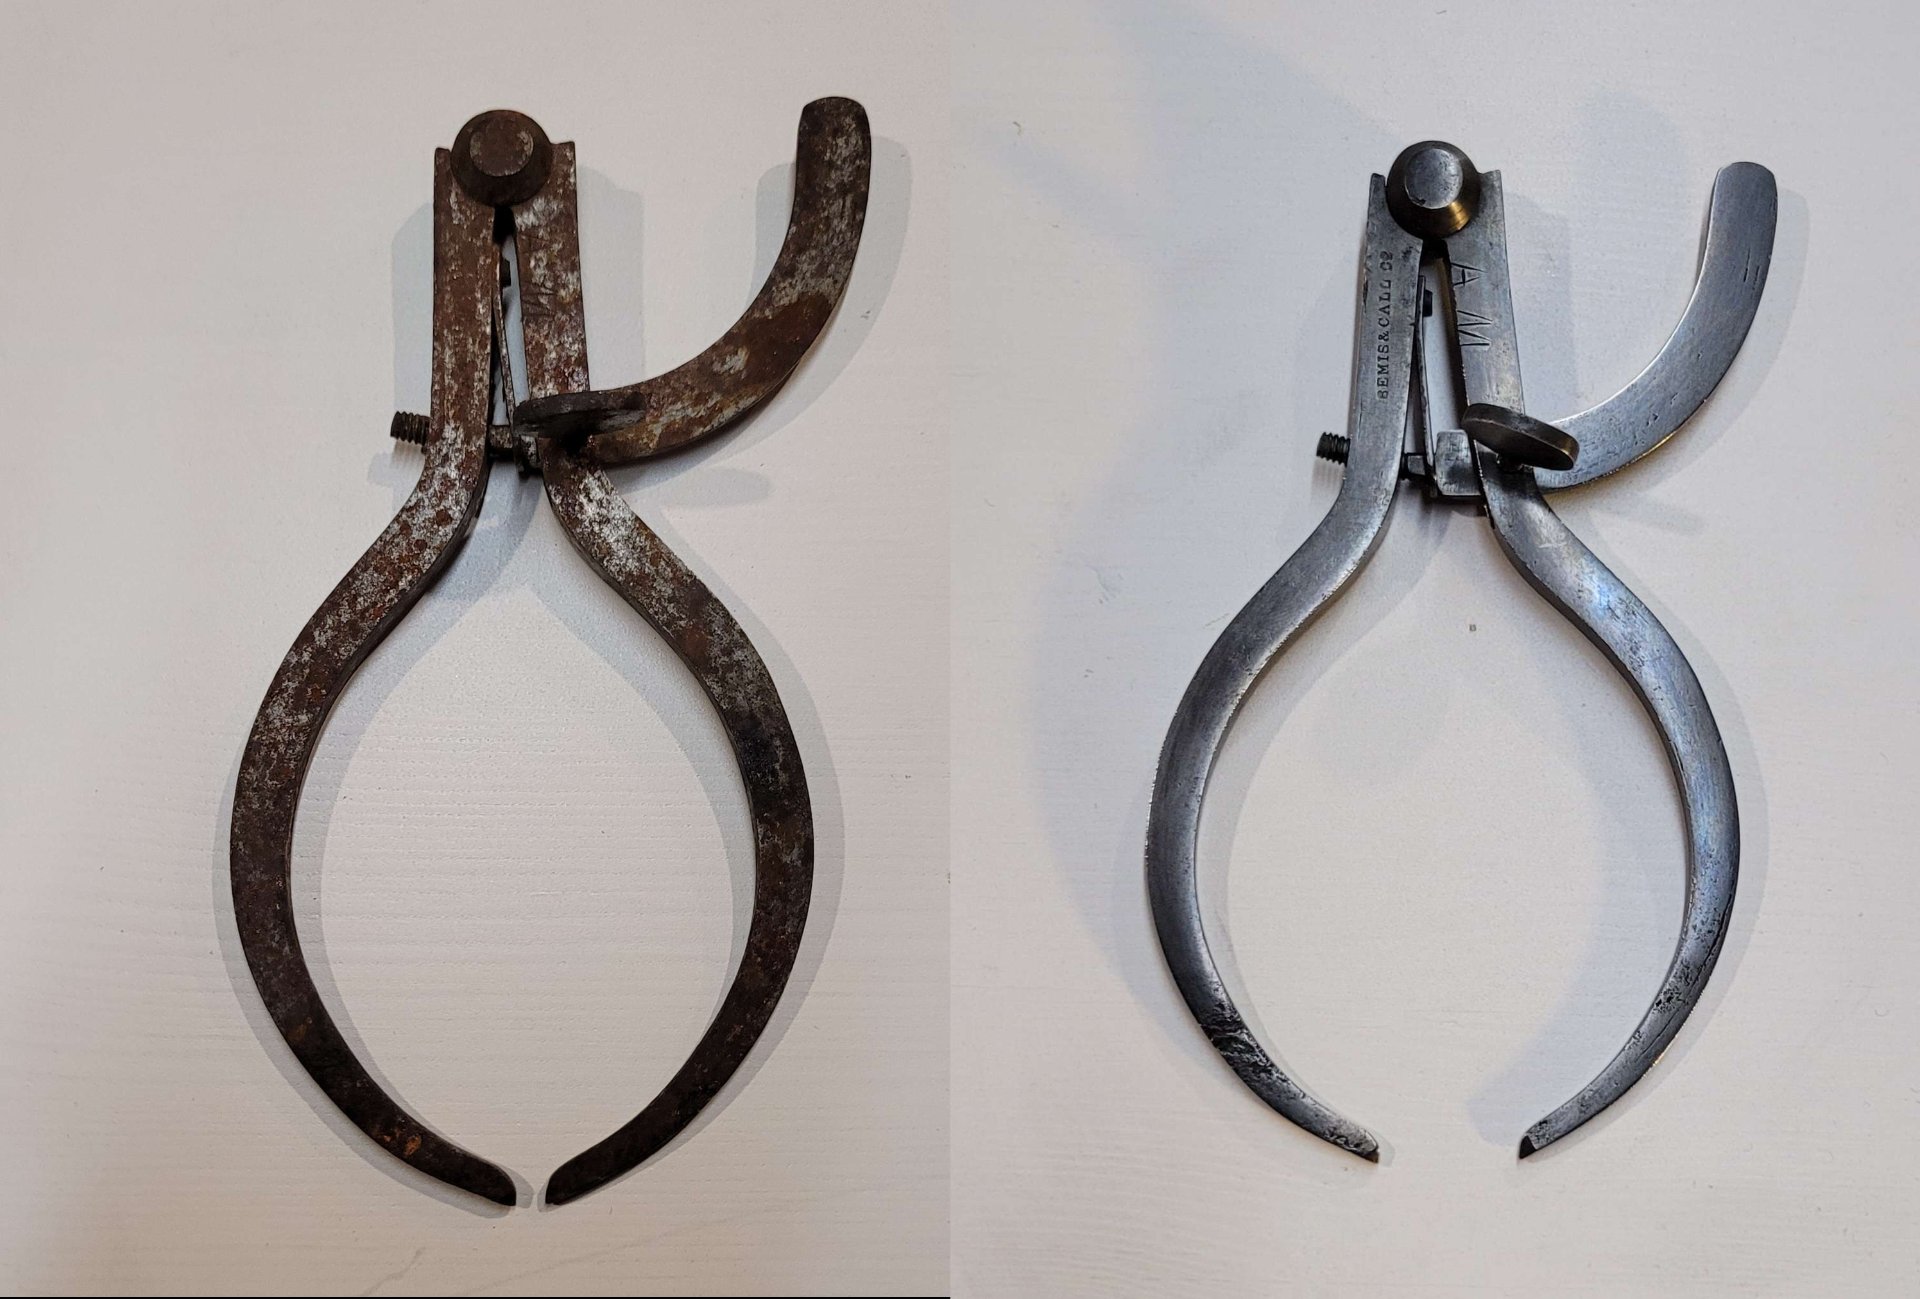
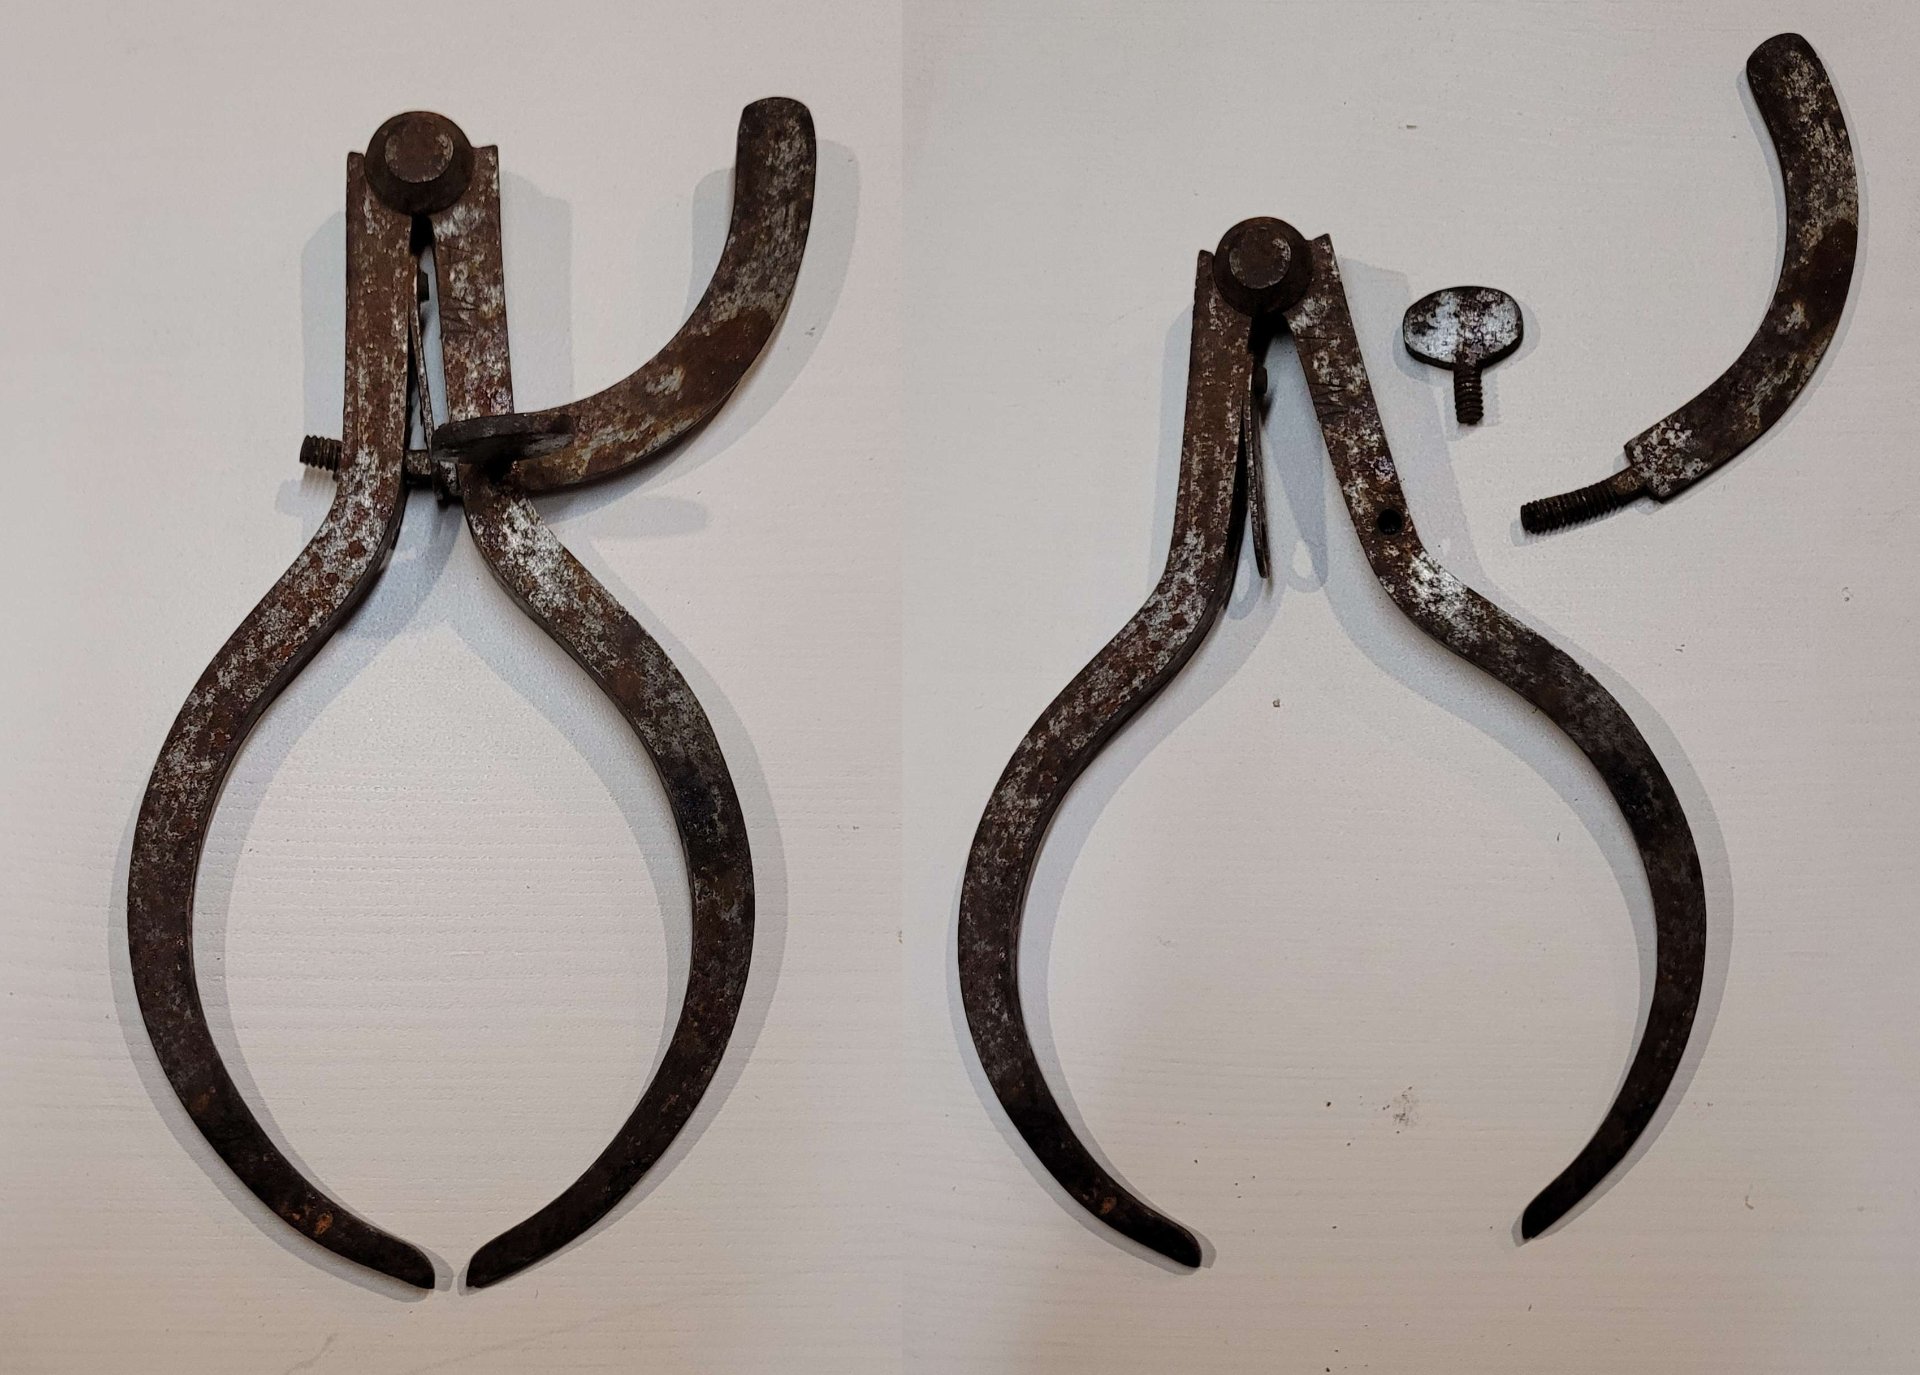
I bought this set of outside calipers at a junk store in my hometown (sort of a consignment, thrift store deal, with lots of old furniture, and the contents of like half a dozen garages right down to the old jars of mismatched screws. I sort of use it like a hardware store).
I like this design a lot, I like the lack of a spring on the jaws, and that you can fasten the little distance measuring arm to the side it measures on, so you can close the calipers around something, tighten that wing screw, then open the calipers to get them back.
They had some surface rust, so I decided to clean them up. The first step was to disassemble them. Not difficult when there's only three pieces involved.
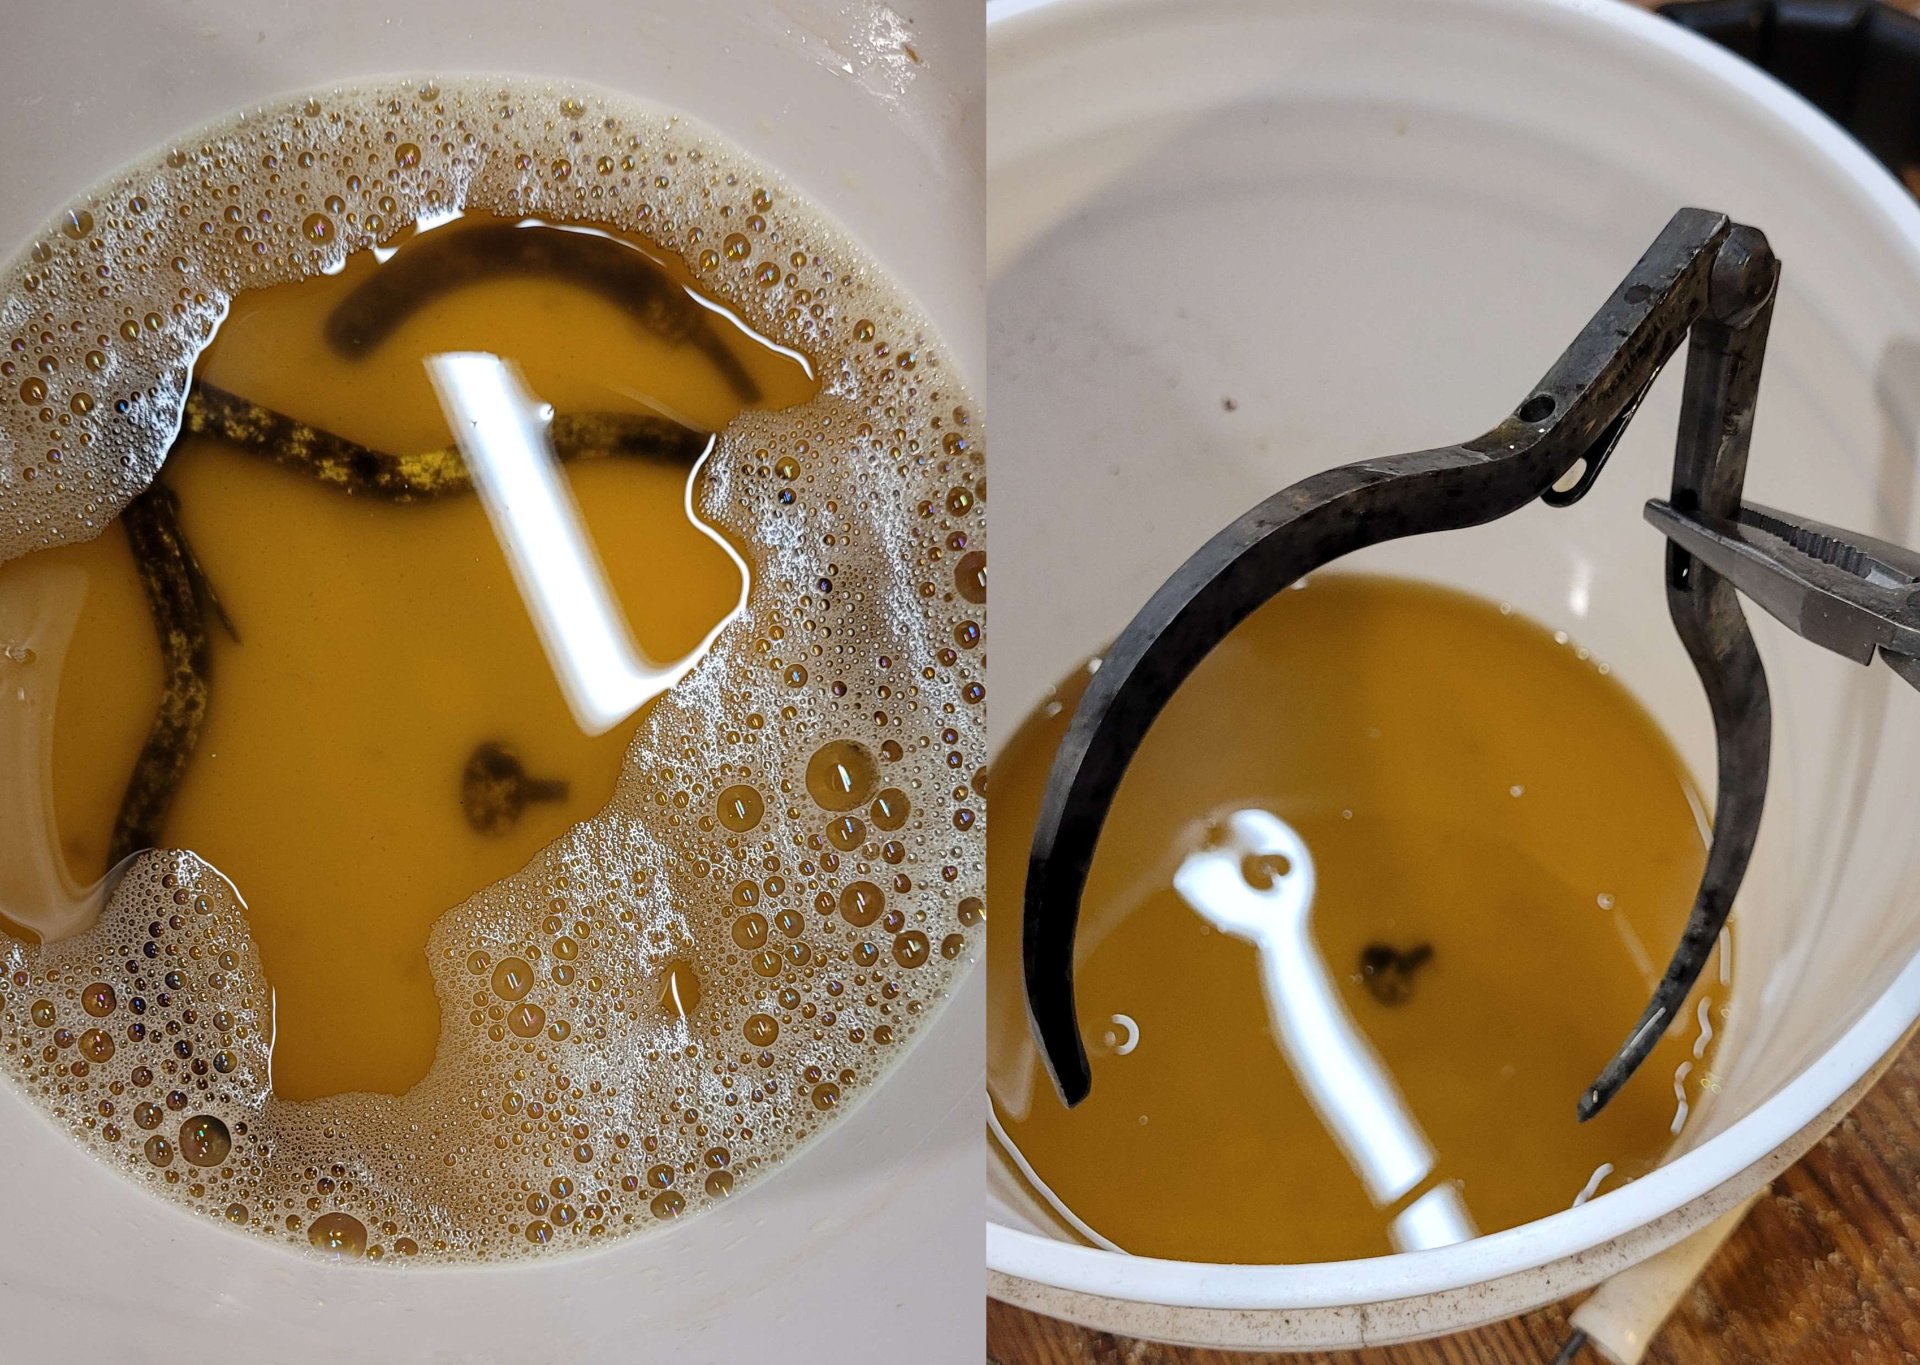
I let them soak in some evaporust for about 8 hours. I really like this stuff, it hits the sweet spot between very effective and not especially dangerous, and it's reusable! They do overestimate how effective it is in their instructions though, so it often takes longer.
! The calipers, straight out of the evaporust. You can already see some text which was hidden before, along with the initials AM from a previous owner.
Now that the worst of the rust had been dissolved, it was time to switch from chemical to mechanical cleaning. I sanded it down with 400 grit emery cloth.
! The calipers with only one side sanded.
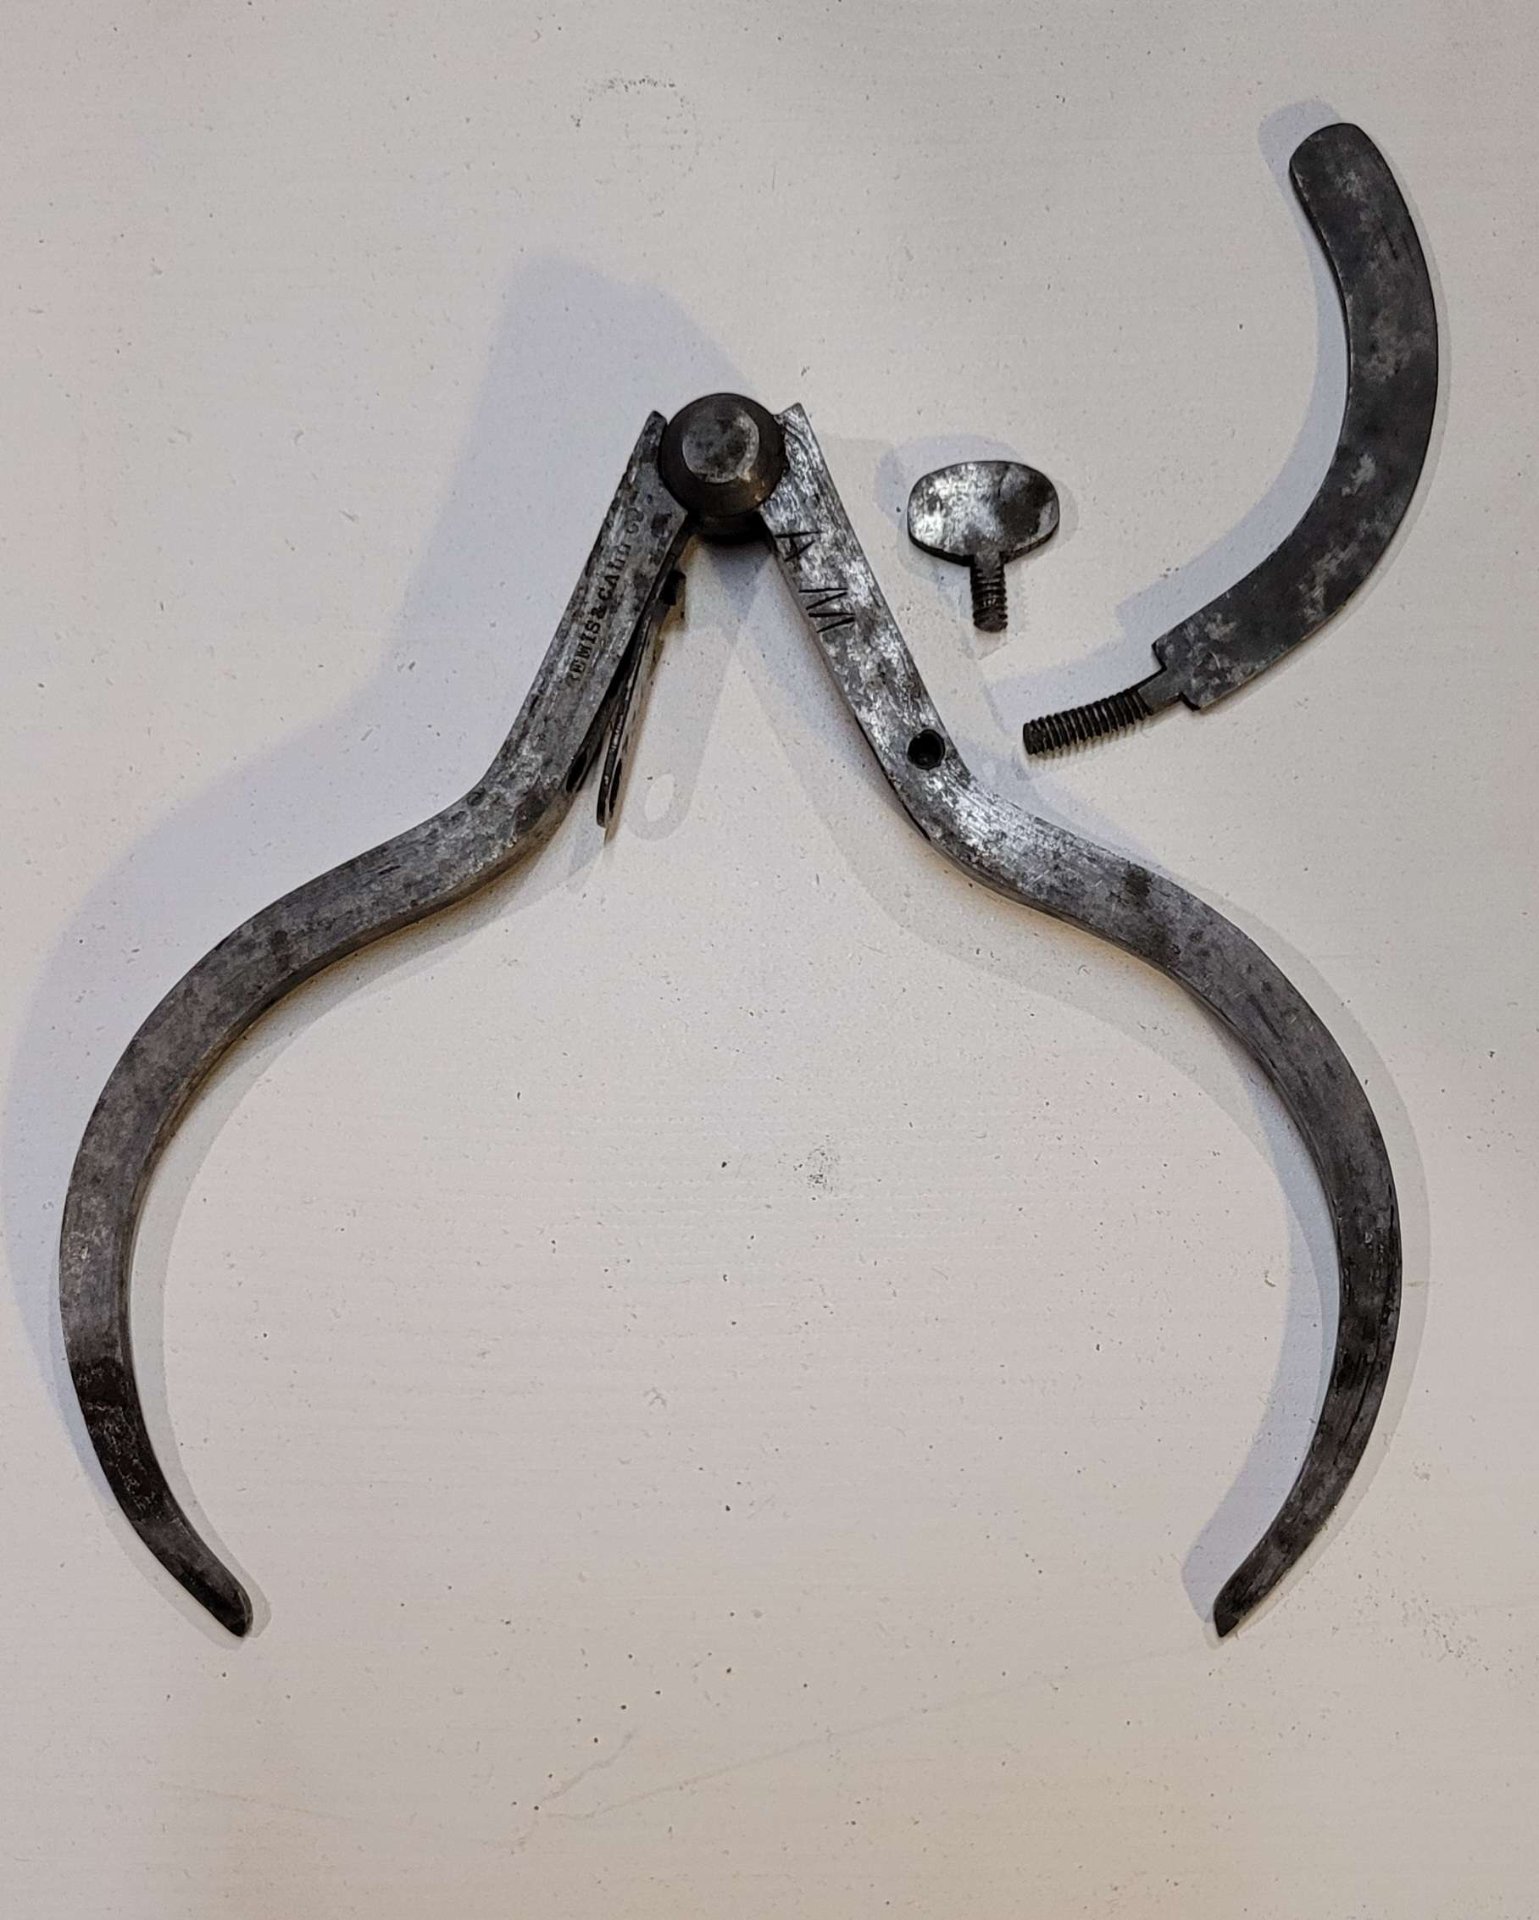
As I cleaned up the sides, I found a few neat bits of history:
! Here's some funny nicks up near the joint on one side. I wonder what caused them. And the previous owner's mark on the right side, AM. This is a big part of why I love old tools. I love the history they carry with them, even if I don't know all of it.
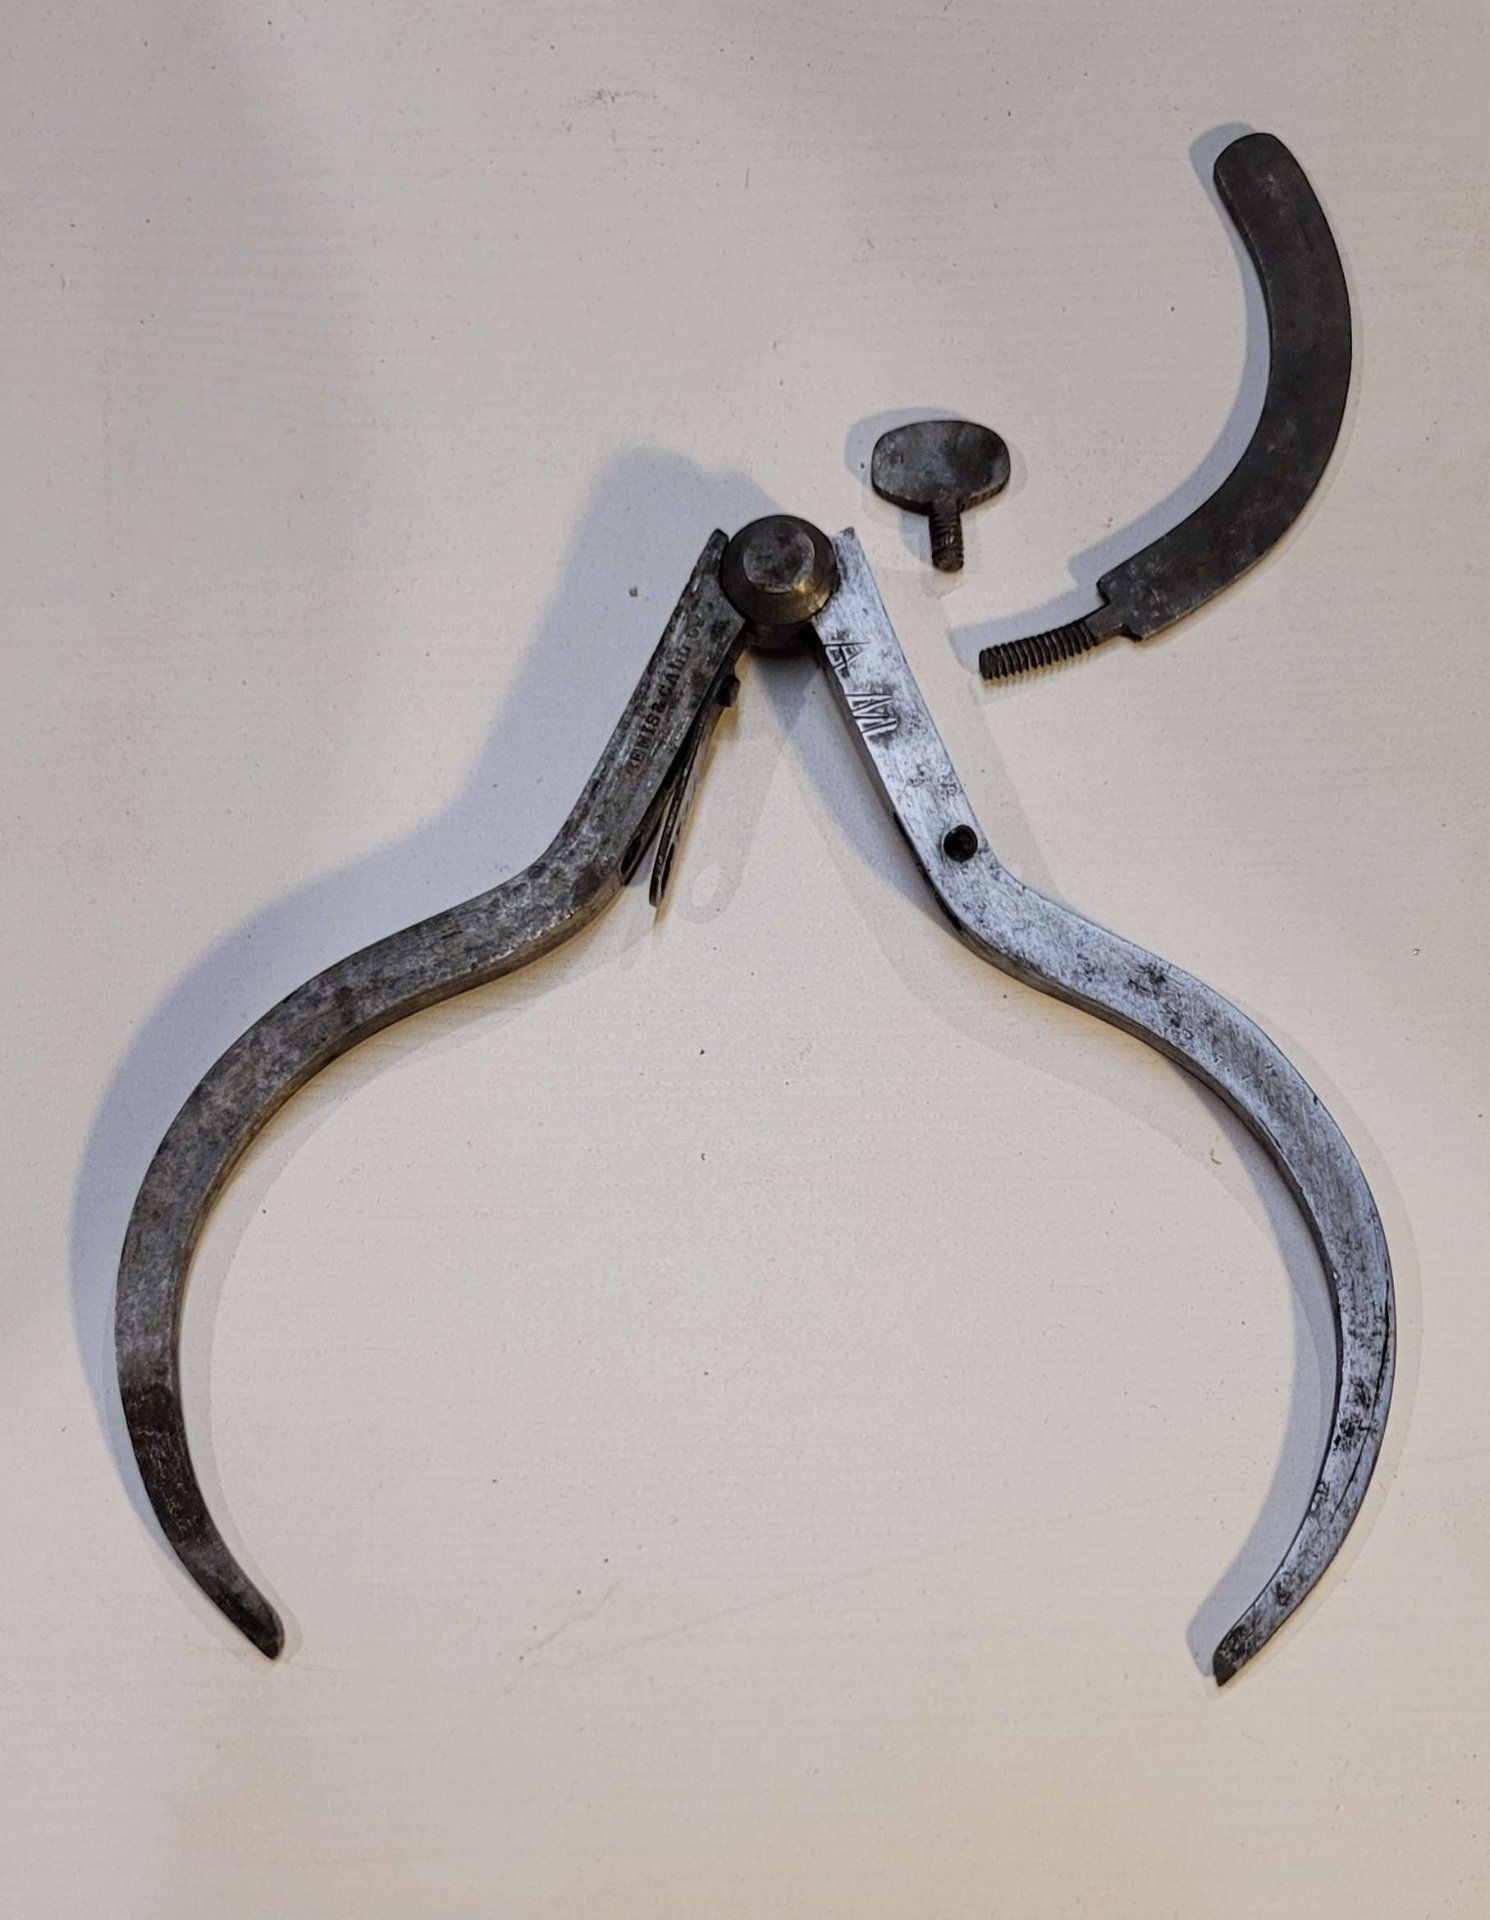
! Looking better, but still a ways to go. I was surprised to find that there weren't any markings on the little distance arm. I'd been expecting to find little angle tickmarks or something, maybe even printed numbers, but there weren't any to be seen after the evaporust, or once I started gently sanding off the remaining rust and the black crud evaporust leaves behind.
Once I had most of the rust gone, I switched to steel wool. I didn't want to take too much material off the surfaces, and I felt the more flexible steel wool would hit inside the pitting from the rust better.
The steel wool shined it up quite nicely. And here's a closeup of some of the surface pitting left over by the rust on the left side. The back of these calipers didn't have this kind of damage.
It was tempting to leave it here, but I didn't want the rust to return, so I decided to treat the calipers with cold blue, to provide some protection against oxidation. There are other ways to protect steel, but I like the look and it seems to hold up well enough.
Cold blue always looks a little rough when it first goes on (this stuff is a gel you don't want to get on your hands. You wipe it on, leave it to darken the metal for 60 seconds, and wipe it off again) but a little burnishing with 0000 steel wool will tidy it up:
There we go, still pretty shiny, but not as likely to rust again. Not bad considering how it looked in the beginning. Hope you'd approve, AM.
(I wrote this post for the making/fixing things blog I have on our local movim instance. If you're a slrpnk.net local, your credentials will work on movim automatically!)
I've been riding the same Gary Fisher Hoo Koo E Koo Mountain Bike since my uncle found it in a sandpit and gave it to me to ride while away on my first internship. It was in somewhat rough shape back then, and it's kind of the bicycle of Thesius at this point as parts failed and I found ways to replace them.
I was replacing the front tire and realized I'd like to make this thing into a cargo bike (I currently use it to scout for furniture to restore on trash days, but usually have to ride home and return on foot to grab anything I find, plus I could get groceries). I'm not sure what level of standardization this bike follows and I have no familiarity with cargo bike parts, but I was thinking I'd like to add a Rear Pannier Carrier Cargo Rack and perhaps a large basket on top of that - in fact, I happen to have this homemade welded steel basket I pulled out of a dumpster a couple years ago:
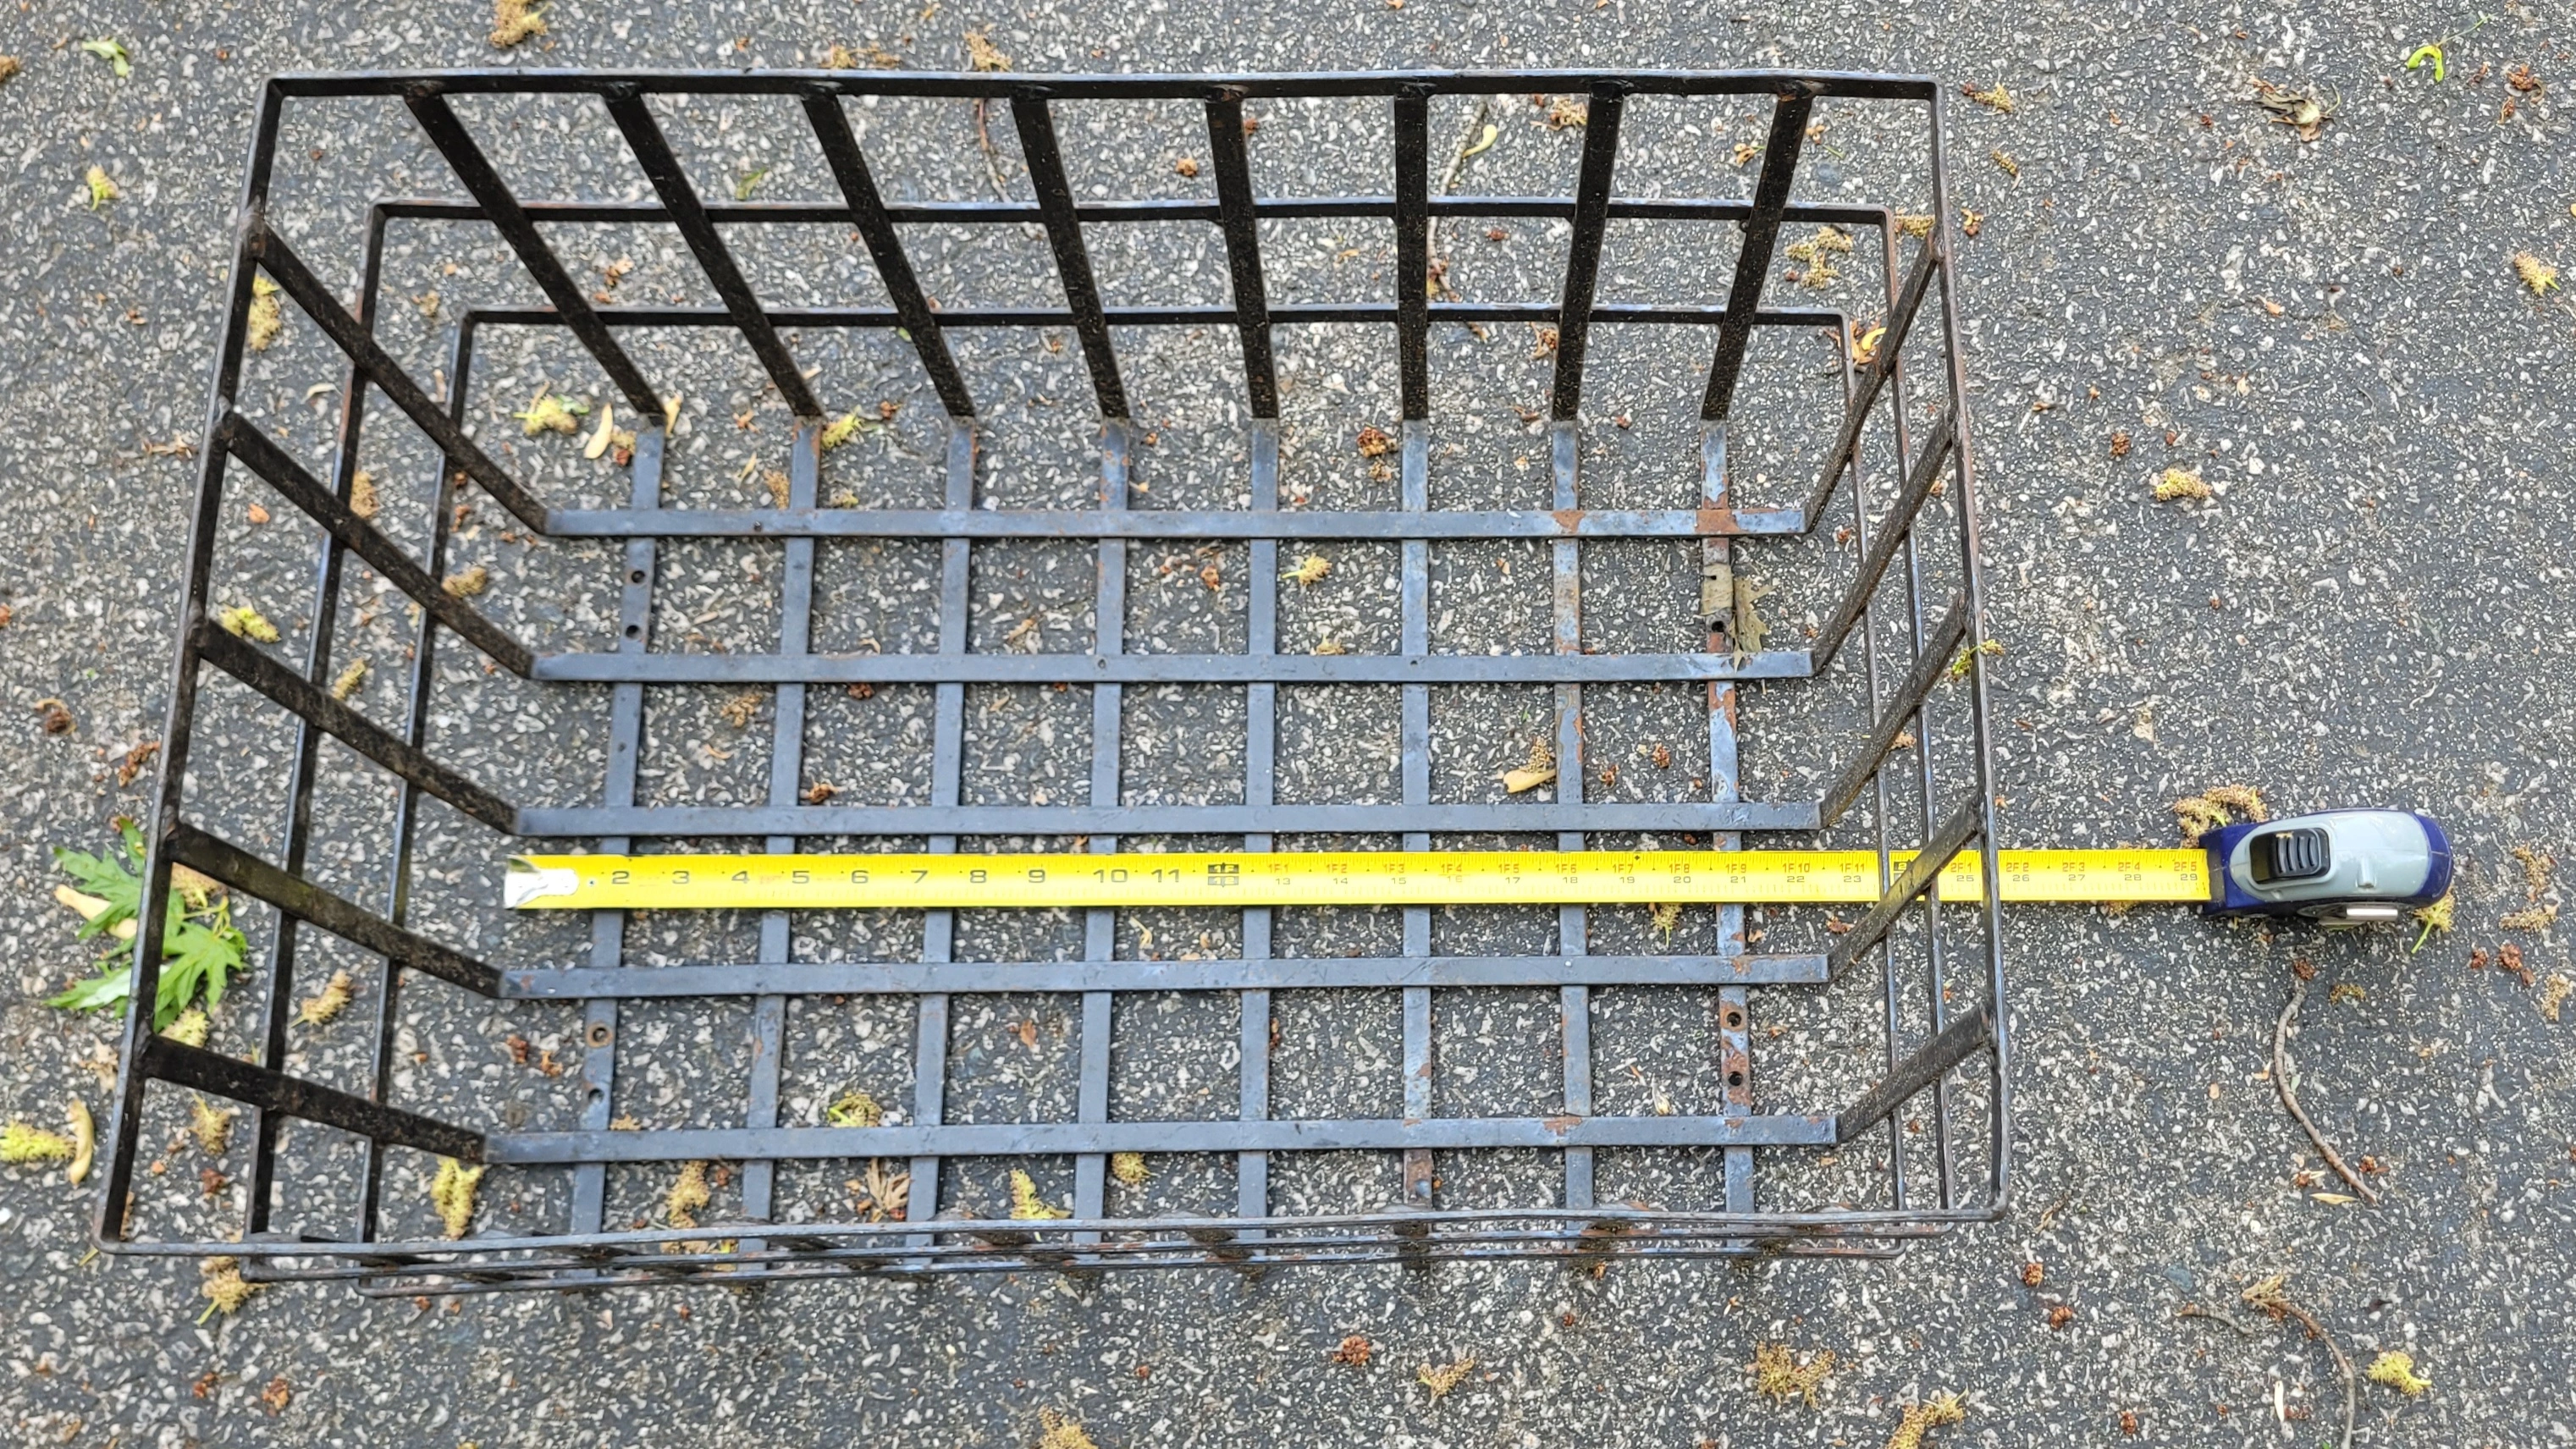
It's 23" long, 12" tall, and 16" wide. I could weld on whatever mounting hardware it needs.
So basically I'm looking for advice on layout and things to add, specific parts if you have any recommendations, is that basket a horrible idea, etc. What traits make for a useful cargo bike, what would work well with this old mountain bike? And thank you for any ideas!!