Go the other way and buy 3mm tubing and see what it does :)
Fair enough bowden has a lot of issues like filament compression (which can't be fixed with tubing) making it difficult to maintain a steady flow when conditions aren't steady (e.g. acceleration and so on).
With larger diameter tubes the issue of filament compressing gets worse. In a nutshell, a larger tube diameter for "rigid" materials somewhat is similar to the effect of a softer filament/material.
With direct drive, I would say it doesn't make a difference.
For bowden there is a benefit.
I also think that direct drive is superior to Bowden setups in nearly every situation. The current generation like the Orbiter v3 is a very light direct-drive extruder.
Don't buy anything you can't afford. Sounds like you already got that part right. :)
If so good 3D-printer are lower cost than ever. Sure you could pick up an used Ender 3 and the like for $50 and put in the elbow grease to learn like it was done in the old days. Alternative is spending $200 on an BambuLab A1 and skip most of the learning curve.
If you can handle frustration than a cheapo used printer could be a good option. Please ask before purchasing as not every $50 printer is a good deal/option and as a newbie you can't distinguish the good from the bad.
Use ASA. PETG will creep.
ASA will creep significantly less. If you have fibre-filled materials they also excel in this regard but are probably overkill here.
PETG will creep even at temperatures below 80°C and the higher the temperature is the faster the process is: https://en.wikipedia.org/wiki/Creep_(deformation)
I have a small collection of parts that all experienced creep (as a showcase). Structurally they where all fine in simulation and practice. Over time they all failed due this deformation.
For production parts look at other materials. Nylon might still be within the range of your 3D-printer.
For attaching: If you can't clamp then look at gluing it in place. If you need it detachable maybe drill a hole in the shaft and use a R-clip.
You can also tap and die the shaft on top. Make sure to use a left or right-handed thread depending on the rotation/load (thread is so that the rotation/force isn't unscrewing it).
What is the plastic of your choice?
PLA, PETG, ... behave like a very slowly flowing liquid as such the print will deform/expand (creep).
Interesting 3D printer design.
Using 3 linear rails to mount the bed. I suppose each linear carriage is one "corner"/point and all three of them to define a plane without overconstraining the buildplate but you keep all of the rigidity of the linear rails?
The issue I see is that the three linear rails in one plane are overconstrained so it is still is a pain to setup (especially on an ender 3 like frame construction).
What is the reasoning for using two motors instead of one powerful in the middle?
Heat set inserts are an interesting topic. You don't need them if the screw is only installed once. Sure enough you can drive a metric screw into a 3D-prind and form/cut the threads but better are self tapping plastic screws. For nut vs. insert: It depends. if you can get away with a square nut (e.g. DIN 557 | don't use hex nuts like DIN934) they are quicker to install. Make the cutout slightly undersized so the nut is fixed/wont move when the screw is installed.
If you use inserts consider the flange type to get a very nice aesthetic: e.g. https://de.aliexpress.com/item/1005006135129074.html
Removable plastic rivts are also a great fastening option. Push pins with integrated spring are equally briliant. Parts with snap fits are awsome but very diffuclt to design as the tab needs to flexible to be pushed in place but still strong enough to not break (layer adhesion).
Warping is indeed a big selling point for these materials. Major selling point/driving force I belive is still the esthetics of them as they provide a surface finish which can be sold (without post processing) without looking like a FDM 3D-print. Less warping, improved properties is more of a nice to have for most applications.
don’t seem to be, at least at the hobbyist level
This can be sad about a dozens of constructions. ISO1234 /DIN91/GB91-2000 splints are everywhere in the industry but nobody in the hobby space knows about them.
It’s pretty common to see cheap bearings in 3d printed parts, actually mildly interesting to me that bushings don’t seem to be
For bushing vs. bearing: It always depends on the application and industry.
. Do wonder though about the wear of 3d printed bushings, surfaces won’t be smooth,
Talked a while ago to somebody that run studies on FDM printed bushings. The verdict was that print orientation/layer adhesion was a limiting factor with their setup.
On the composite filaments, abrasive filament sure sounds like a great thing to make wear surfaces out of!
Most people are moving torwards glass- or carbonfibre filled materials for one reason or another (e.g. asthetics). If the 3D-printed part contains a bushing than it is the same material. Often it is enough to just stick a metal rod through it. No need to worry about sourcing and installing bushings.
Also for the Igus materials (e.g. Nylon with PTFE) it is a composite. Anyway. If you have a real need for a high endurance than you can't 3D-print. Injection molding is king and if this isn't possible at least use a hybrid manefacutring (additve + subtracte) to get the appropiate surface finish and tolerances.
You can't blame him.
Our education system doesn't train us on this. After high school, you might never heard IPA before or know what peroxide are. You don't even know enough to understand how to read these hazards/datasheets (assuming you know that these documents even exist).
From a technical standpoint it looks easy: heat it up, let it condense, done.
It is all over social media for a while now. Further suggesting it is good practice/safe to the viewer.
Most people never experience what power even a small volume of 1L of alcohol vapor can have. They also never experienced that they would fall in shock if it goes wrong. Unable to do anything for a minute or two. Recently did the math on a 30L IPA vapor tank to smooth "large" Polymaker Polysmooth prints (just the energy set free in an explosion). This was the moment I looked for alternative options as it was a scary number asking for serious engineering to keep it safe.
In my opinion resin manufacturers are to blame too. Downplaying the hazards of resin 3D-printing. In the previous paragraph, I mentioned how the education system doesn't prepare us and as such also the influencer/reviewer might not know. Even assuming best intentions they echo/amplify the message that resin printing is safe.
Providing a recent example how misinformation spreads involving an influencer I won't name and Prusa's response: https://old.reddit.com/r/prusa3d/comments/1ekn24x/are_cf_filled_filaments_dangerous_prusament_lab/
Toxicology is rocket science. Understanding (understanding isn't the same as accepting without questioning) what somebody says without being an expert is (near) impossible and even between experts there is often a discussion on what the results mean/what action shall be taken.
I don't question the results Prusa published but I highly disagree with the message:
TLDR - our Prusament filaments with carbon fibers and prints made of them are safe The National Institute of Public Health used two methods of measurement. The skin irritation (image 1) and cytotoxicity (image 2) tests involved 30 volunteers (aged between 29 and 70 years) wearing prints made of PCCF and PA11CF materials taped to their skin. The measurement results showed that none of the volunteers had the slightest irritation even after more than 72 hours of wearing the print on their skin. [...]
If you would test with loose asbestos fibers the test would likely also pass and I hope we all agree that asbestos is dangerous. So right from the start, we have an oversimplification (average Joe isn't interested in 5 pages of what was measured. He is looking for simple answers) or Mr. Prusa wasn't aware of the context of these results (context is critical for toxicology!).
What I believe has happened here: Prusa Research did the responsible and tested if their workplace conditions are safe for the employees. This means this data is likely specific to factory conditions and production steps. What then happened is that this unnamed influencer posted a sensational video and Prusa took this data and posted it as a response completely out of context.
As most people probably trust Prusa Research they now likely feel like it is certain that Carbon fiber-filled materials (in every application) are safe while the actual truth is nobody knows a good answer at the moment.
The next step is people printing parts like bushing out of these filaments. Bushings more or less grind themself which means we now might have fine carbon fiber dust and damaged fibres which might be a health risk (again: nobody knows exactly if there is a safe level and what this would be for these composite filaments).>
TL;DR No.
What you should do:
- buy fresh IPA. It is approx. $5/L. As such a 2L washing bin is approx. $10 + 10L waste disposal. In the broader picture of total costs and production value, this is manageable (resin cost, machine depreciation, PPE/gloves, ...)!
- use two or three stages of washing
- fill the washing containers with as little as necessary to get it done
- periodically expose the liquid to sunlight and let the particles settle down. Separate the "clean" liquid from the sump (you might add special chemicals to speed up this process).
- if the first stage needs replacement: 1.) responsible disposal of the liquid in compliance with local regulation 2.) move the liquids around: (the third stage is the new fresh liquid, the second is the prior third stage and the second washing station is now the first "dirty" stage).
- check for alternative chemicals that can be used with your particular resin
If you use water-washable resin: IT IS A DANGEROUS LIQUID! Dispose of dirty water responsibly as chemical waste.
Long answer:
To answer that, let's first look at what isopropanol (IPA) is: Its formal name is propan-2-ol and its CAS number is 67-63-0.
As a starting point, check a database like GESTIS (German) and NOT wikipedia: https://gestis.dguv.de/data?name=011190
At the top of the page we see that it has GHS-02 and GHS-07 warning labels. Looking further, it is a colourless liquid with a flash point of 12°C and an ignition point of 425°C. The explosive range is 2-13.4% vol. The signal word is DANGER.
Scrolling down:
> The substance forms explosive peroxides.
What does this mean?
There is no mechanism mentioned, but generally, if you expose these chemicals to sunlight they will react over time to form a peroxide, which is much more reactive and can explode at high concentrations (there are exceptions to this rule, but most of them go boom).
This means for distillation:
- avoid "old" IPA if possible
- check for peroxides (if necessary, treat the peroxides before distillation)
- don't distill dry (leave some liquid in the sump to avoid high concentrations of peroxides)
As I believe this shouldn't be done at home I won't tell you how it can be safely done (if this isn't enough to deter you: read scientific literature/books describing how it shall be done).
Instead, focus further on what advice is out there on the internet/YouTube:
- A water distiller is made for water and water isn't flammable and doesn't form explosive atmospheres. In other words they are unsafe for Isopropanol or Ethanol.
- Do you think a 2kg fire extinguisher is enough? Are you truly capable of thinking rationally when there is a fire or would you panic like most people?
- Don't even consider doing it indoors or in a garage.
- Don't work with large volumes. In a laboratory with proper fumehoods and equipment, there might be limits like 500mL batch sizes.
- If somebody isn't wearing eye protection or heating large amounts of liquid without stirring question his qualification to talk about this topic. Being an influencer or posting online, like this post, doesn't require any formal qualification as such even the big YouTubers/influencers post horrendous content that is dangerous or misleading.
The benefit of core XY is that you don't have a heavy motor riding on the X-axis allowing you to push higher speeds without increasing the rigidity of the y-axis. The downside is the long belt which will stretch a tiny bit meaning a lower accuracy.
With core XZ you don't gain anything as the z-axis is generally not high dynamic meaning the weight doesn't matter at all but still need to eat the downside of a long belt. In my opinion, it is just a stupid gimmick people fell for because is looks novel or cool.
Also core XZ is a bed slinger. With small objects, this is not an issue. The higher they are and the less rigid the print is the bigger the issue of the 3D print itself deflecting gets. With the usual 20cm height and the usual helmet and the like this aspect doesn't matter at all.
Do you have a big budget to buy parts? You can do work in CAD? Copy the Pantheon HS3 design approch. Always question design decisions. In the broader picture of 3D-printer is the HS3 still engineering porn: https://www.youtube.com/watch?v=ooE0Xc6jPBY
I can make reliable and accurate.
I’m thinking a core XY
Mark my words: CoreXY hype is slowing down. In the next years, we will see people avoiding it due to the accuracy challenge of long belts. Not sure what will be the next trend but maybe we are going back to shorter, separate belts with the motor riding on the gantry once more. I don't see ballscrews happening soon as all of the china, low cost, easy to source options are unsuitable at the moment (wrong pitch/mm per revolution).
With Prusa publicly talking about E3D Revo issues (and implementing a special slicer mode for them) we might see there too a new design.
If you want an new SBC: Intel N100 for as low as $60 with 4GB DDR5 RAM.
The raspberry pi isn't a hobby/consumer product anymore. 2020 has shown that the Pi Foundation sees itself as an industry-first product. Also don't forget that they went public a few months ago so who knows what will come out of this step.
Let's face it: Intel driver support is great maybe even better than it is on a Raspberry Pi and proprietary is both hardware.
Do the math.
Buying new might be cheaper than upgrading the ender 3:
hotend+extruder: orbiter v3 110€
stepper (not sure why you would want): 2x (5-phase 0.72° stepper and 5 phase stepper driver): 200€ [2 phase 0.9° would be significantly lower cost but even less of an upgrade]
cooling fan: larger 6023 blower: 13€
enclosure: Not great for a bed pusher. Core XY is compact. Regardless approx. 100€
Between those, you would already look at approx. 425€ in parts and still have the basic Ender 3 frame and electronic that if you haven't done might want to upgrade to.
I would still buy the fan upgrade (as a replacement part) and maybe the high-flow nozzle (keeping compatibility with premade profiles).
But- the market has left them behind. XL is a great idea but awfully expensive and maybe not perfectly implemented.
E3D toolchanger launch price in 2019 was 2700 GBP. Adjusted for inflation it is in today's money 3300 GBP (approx. 3900€). A Prusa XL is 3700€. For toolchangers the Prusa price isn't out of the ordinary.
The issue is the performance/reliability isn't there to back this price point. Having to worry about printed parts bending on a 3.7k€ machine is laughable. Having issues with a heatbed is laughable. Support having trouble resolving these issues/identifying what exactly is broken isn't a great overall picture.
Prusa video: https://www.youtube.com/watch?v=VO2MaQrUcqE
TL;DR For those who don't want to watch 10-minute video:
-
MK4 to MK4s uprade kit: 109€ + shipping (MK4 customer will receive a voucher (except shipping cost))
-
Larger cooling fan
-
Improved cooling duct
-
high flow nozzle
-
NFC for app
-
some parts upgraded from PETG to PC-CF
-
MK4s still ship without an accelerometer. Prusa claims this isn't needed.
-
No camera.
-
No upgrades for the Prusa XL in the near future!!!!
other stuff:
-
accelerometer board
-
GPIO board
Personal Opinion:
This should have been the MK4 to begin with and shows once more how blindsided Prusa was. BambuLab put so much pressure on them that they had to publish the MK4 in the state it is.
Regrading the Prusa XL the trouble continues. This launch/printer has been riddled by issues after issue and now the statement that the improved part cooling won't make it to the XL in the near future.... My guess it that they screwed up with the XL and didn't consider large toolheads at the design stage favoring a 5 toolhead design over a 4 head option and now run into the same issue I do with the E3D (it can fit those 6023 fans but not like they mount it on the MK4s). For example, with my E3D tool changer, a tool must fit within a 85mm(w) x 60mm(depth) surface area.
For the technical side?
The larger fan is great as it allows to use fans with decent pressure at the target airflow with a low noise. Those 4020 found on most printers aren't a great choice.
High flow nozzle? Yeah ... nothing groundbreaking or new.
NFC and app? A year ago was prusa connect at best a beta. Maybe a an alpha as I would need to restart the printer twice a day because it froze/crash. The value here depends on if they meanwhile fixed it or it is still a joke.
GPIO board? Depends. Might be held back by the firmware as those things require macros to be useful and Prusa firmware never was build around this idea. Still nice to see them publishing this.
Yes and if the part isn't hollow use the slicer to make it hollow.
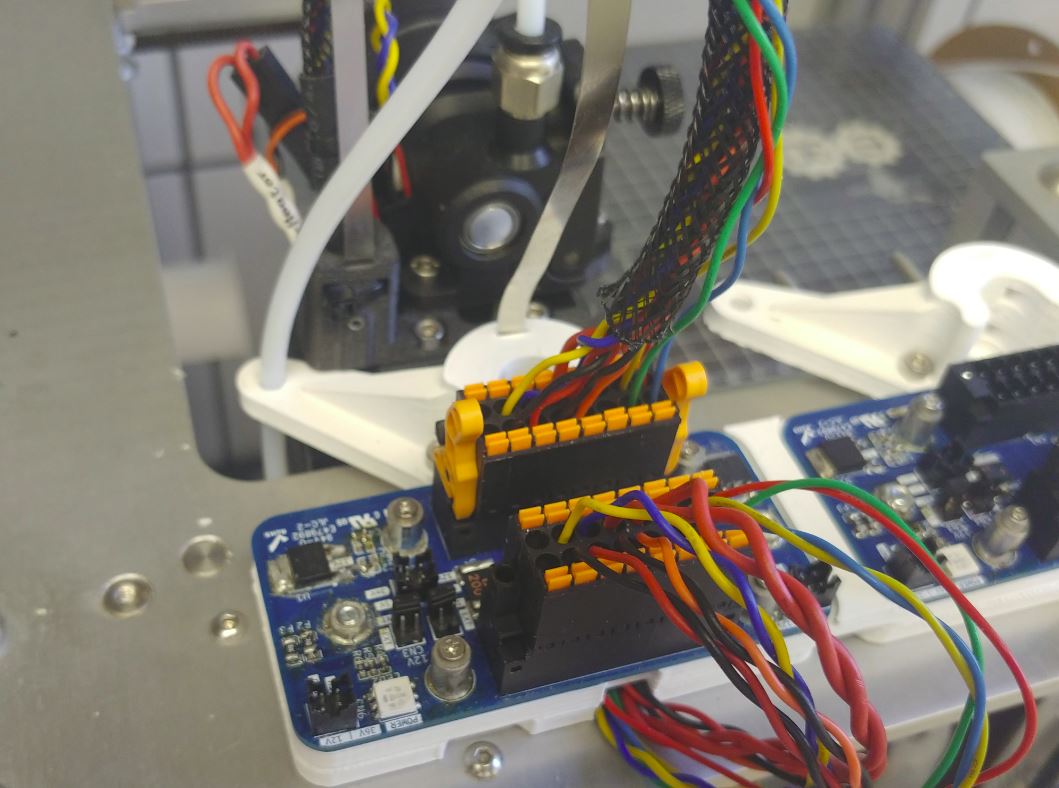
Quick upgrade for easy to plug and unplug end effectors/toolheads. Activity/status LED are also moved from the back of the printer to the top and some more voltage regulation to provide additional voltage rails.
While a nice connector adds significant cost it is also a big value add for certain 3D-printer. I think more manefacturer should consider tiny details like this when designing their product.
Strain relief isn't installed on this tool for reasons ...
Currently, Prusa is doing a terrible job with the Printables competition, to the point where they could be in legal trouble if someone were to push for it.
A few examples to prove this statement (5th is in my opinion the worst):
-
insect hotel -> canceled due to security concerns. Great work, but why not look into it before you start and provide a design guideline? https://www.printables.com/contest/436-insect-hotels
-
Bathtub toys -> Mentioned explicitly: "Safety is our top priority, so make sure your creations are child-friendly, [...]". As these are bath toys, one might assume that they mean safety standards for young children. https://www.printables.com/contest/428-bathtub-toys
Great. Safety is a top priority. So let's see how they moderate it. They haven't... If you scroll through the valid submissions, there are dozens that aren't safe for children. Prusa is EU, so I would expect them to be familiar with the basic EU regulations for children's toys when they say we want safety first. There are very strict test requirements that a toy has to meet. The simplest one is a bin/cylinder that a part cannot fit into (choking hazard). Does every design meet this very basic design rule? No. Next comes impact resistance and the like. Does the design meet these requirements? no.
You could say that it's just not feasible to review every submission, so let's take a look at the winning entries that they definitely looked at: Rubber Band Submarine. I'm not a toy designer, but I'm pretty sure that an exposed rubber band is not safe for small children, who are the target audience for bath toys.
-
fish tank tweaks: Recommending PLA for prints that are permanently submerged ("It is usually recommended to use ABS or specific food-safe PLA..."). Seriously???? These days they are PLA under these conditions is rubbish within a year. Discoloration and expansion destroy some PLA blends/filaments.
-
soldering aid: Seeing this design as a winning soldering aid raises serious questions as to whether the person involved has any practical experience in assembling electronics. Placing a PCB 2cm in the air with sharp objects around the mounting holes is the opposite of ergonomic and comfortable SMD soldering: https://www.printables.com/model/740818-parametric-stackable-pcb-standoffs-m2-m14-holes
****5. This contest had questionable practices and here's where things get wild. Now we're not just talking about knowledge gaps, we're talking about breaking your own rules, which could be a legal problem. One of the contest rules states: "A valid entry may change its slope, altitude or distance." Simple. Right? Not for Prusa: https://www.printables.com/model/837104-the-rig-r11-diy-helper-stand-for-testing-electroni
This is a winning entry that can't do any of those things, and would probably qualify as a generic holder (also not a valid entry).
Another winning entry that wouldn't be a valid entry if Prusa followed the contest rules: "Skip the organisers: We love a tidy workplace, but today we're focusing on ergonomic improvements": https://www.printables.com/model/808502-heat-insert-press
Want a third from the same competition? Here it is: https://www.printables.com/model/808502-heat-insert-press "Specific adaptability: Designs must provide flexibility in the user's interaction with the tool or aid (height, tilt, distance or orientation adjustments). Simply accommodating different sizes of objects doesn't quite fit the bill".
To recapitulate, Prusa broke the rules not once, not twice, but three times within this competition (which, being EU, has some legal requirements on how you can and can't run competitions) by awarding prizes with monetary value and talking them away from other competitions that followed the rules.
There is more wrong with how this was organized/done, but I think this is damning enough. Never assume evil, so I would kindly call it Prusa being utterly incompetent.****
- The current XPR challenge. Design a part for a robotics kit. Sounds exciting. First bummer, it's $115 + tax, but that wouldn't be noteworthy enough to write this:
6.1 To design for it a.) either buy it (providing a $35 discount if you do so) or b.) try to work with whatever this is: https://www.printables.com/model/576581-xrp-robot-part-of-the-experiential-consortia/files the picture shows a complete model with PCB and sensors (some connectors and wiring are missing) but would be workable. What do they actually deliver? The frame with no electronics or components. Good luck working with that.
6.2 While this may or may not go in the direction of predatory, there is more: "Photo quality - Well lit, in focus and clear photos will help showcase your work and help us choose the best designs." Quick questions: How do I take good and compelling photos without the $115 robot kit? | Prusa: "This also means that you don't need to own a 3D printer to enter". Question: "How do you make photos without a 3D print to show of? the wording is very clear that they mean photos and not computer 3d-Render. Just by looking at these two aspects, this thing has a $115 + tax ticket to improve the "chance" of winning.
6.3 Moral issues: This work is unpaid to begin with. Does Prusa really expect people to spend tens of manhours working on a good design, printing it, taking pictures, writing instructions and text, when they have absolutely no use for it themselves, since this kit has probably only been sold a handful of times to end users. There is only a small chance of wining something (remember exhibit 5 where they didn't even follow their own rules)?
Last but not least: "Popularity – Share your model to increase its popularity, and prove that users appreciate such a model." This is fairly common for some events and I always dislike it as this asking for free advertisement. Prusa at least limits it to the model itself while others use a broader approach where it is for the entire project/organization. Regardless such terms always have a negative impact. Just remember all the MakerWorld spam everywhere after they launched with high rewards.
I am curious how often do you service the linear rails on the 3D-printer:
- How often do you lubricate them (MGN9 or MGN12)?
- How do you lubricate them?
- What volume of lube do you use?
Explanation of how often you should do it (HIWIN Lubricating instructions for linear guideways and ballscrews)
Most 3D-printer use MGN12. Reading the HIWIN documentation they shall be lubricated every 20-50km (depends on a lot of factors).
How much is 50km in print time? Assuming an average speed of 300mm/s that would be approx. 46 hours!
In other words, the generic MGN12H carriage needs 1-2 times per week maintenance.
How much lube is suggested (horizontal mounting)? 70µL for MGN12H. For MGN9H it is 30µL!
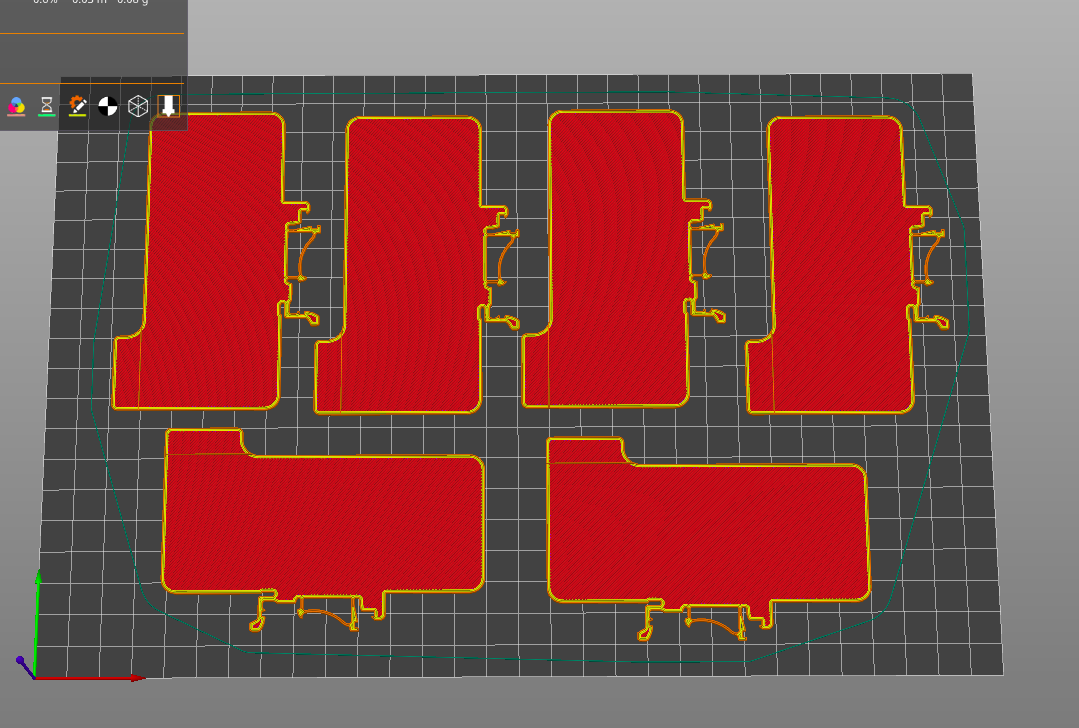
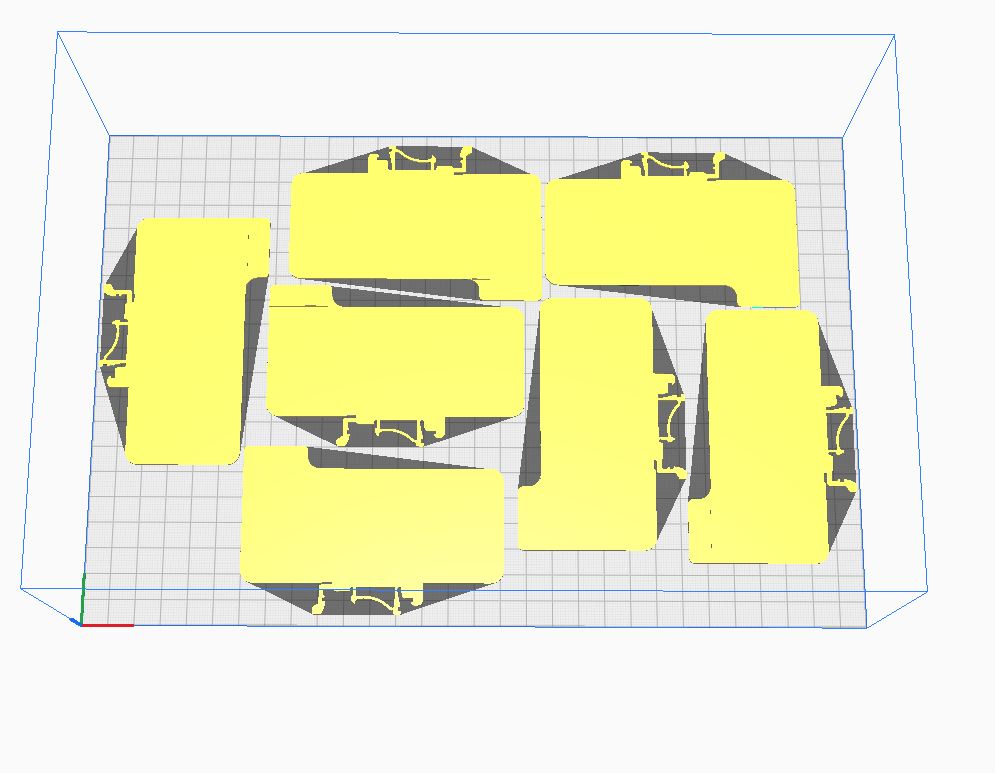
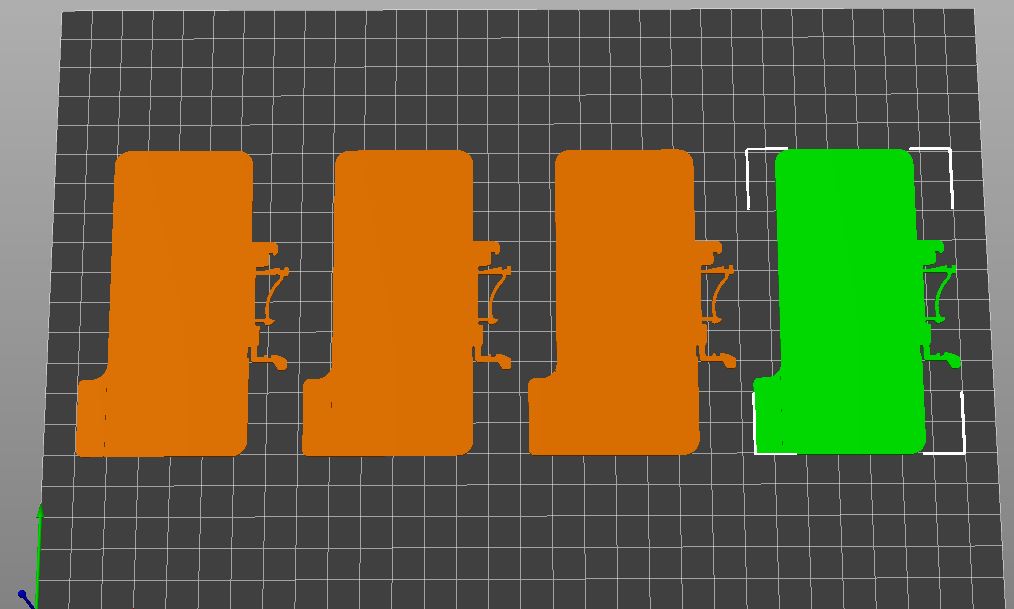
Short overview of how good the nesting capabilities of various 3D slicer are.
The task is simple: placing as many of these shapes on a 200x300mm printed as possible. Manual (quick and dirty for reference): 6 pcs.
Ranking:
- Ultimaker Cura: 7 pcs.
- human (me): 6 pcs.
- Orca slicer: 5 pcs.
- PrusaSlicer & BCN3D stratos: 4 pcs. By switching (for this particular part) from the worst (Prusa) to the best (Cura) slicer the nesting performance improved by a whopping 75%!
Ultimaker Cura:
Prusa:
BCN3D Stratos (forked from an old version of Cura):
OrcaSlicer:
After half a dozen iterations, this was the first reasonably working, acceptable feeling, and good-sounding ratchet mechanism.
allows clockwise rotation blocks counterclockwise rotation
design features:
- allows for a large inner bore (e.g. rotary encoder shaft or 5.2mm screwdriver bit)
- printable with 0.4mm nozzle
- 2cm diameter
- no assembly required. Print in place.
To get a full ratchet: mirror the assembly and add a mechanism/part that pushes one of the springs out. In neutral both leavers are engaged and the ratchet is completely locked.
Btw. Good luck copying it without going through half a dozen of iterations. Going from it barely works to this isn't easy. For my part: Version 5 was working and close to the final design. It took another 10 rounds to get it usable and from there some more to fine-tune it.
Quick and dirty 5 minutes craft: Draw a rough shape, define the contact surfaces & load, click run, and get the optimized shape. The last step is converting the output to a printable shape and running one more simulation to double-check it is strong enough.
This particular holder is a filament spool holder designed to be loaded with up to 5.5kg of filament (1x2.5kg, 3x1kg).
Building a 3D printer is easy. Getting the details right to build a great 3D printer is hard, as this is where most companies fail. Why?
For example, on this printer, the bed is a three-point mount (two wheels for adjustment at the front of the printbed) and the printer's bed levelling dialogue doesn't show the height difference that needs to be adjusted (which most 3D printers do). It does show how much it needs to be turned, and the bed levelling wheels have 1/8th turn indicators, making it easy to get it perfect.
In short, instead of an arbitrary number like 0.3mm that has no meaning to the user, they tell the user to turn this knob 1/4 of a turn. An instruction the user can follow.
** Why is this so outstanding? It doesn't cost much, but it improves the user experience. Are companies blind to these improvements because the engineers are experienced, or is there a lack of testing during development?**
By the way, years ago I did such a fix/modification myself on a Tronxy XY2 pro by adding indicators on the wheel for 0.2mm height difference so I could convert the number to rotation: https://www.printables.com/model/301670-replacement-bed-leveling-wheel
With 3D printers like the Open-5x or tool changers (e.g. Prusa XL) both, 5-axis simultaneous 3D-printing as well as hybrid manufacturing (additive followed up by subtractive), is more accessible than they ever were.
For those already venturing into this endeavor: What is your toolchain/software?
Currently, I finish the additive/3D print before running a second gcode for the subtractive part (contact surfaces, threads, ...). This is far from an efficient and powerful process.
The extruder of the 3Dgence P255 3d-printer features a brush to clean the extruder gear.
Needed as soon as possible a spool holder for larger spools so printing anything that is dozens of hours was out of the question.
Solution? Looked at the heavy shelves and had an idea.
One remix later, a 1-hour print and with some round wood that was lying around this spool holder was born.
I like the position of the spool so much that it is here to stay.
With this particular model, Prusaslicer is very optimistic about bridging and support generation:
- the right side (dark blue) has no support that could help with load-bearing
- the entire layer will be connected to those two lines
- more than 5cm long bridges
I don't think this gcode will successfully print.
How do fix adjust the cura setting to generate a printable output?
The model in question is: https://www.delta-fan.com/Download/3D/BUB0612HJ-00.stp
What cameras did you add to your 3D printer? What is your favorite camera angle?
For me, the nozzle cam watching the first layer is my personal favorite (OV9281 image sensor).
As you might be aware BambuLab issued a recall for the BambuLab A1 3d-printer. In particular, the issue is the mains-voltage (230V AC) heat bed cable.
As a resolution, they offer two solutions:
- Ship the entire printer back to them and receive a replacement printer.
- They mail a new cable and you install it.
What BambuLab doesn't mention at all is the test according to EN 50678 (Verification of the effectiveness of protective measures of electrical equipment after repair). Unless you can perform this test I would recommend choosing the printer replacement.
Right now looking into bang for the buck workhorses with a small footprint/build volume. A description that fit the Prusa mini+ perfectly in the past, but it feels like Prusa is a dinosaur that hasn’t moved with the times.
So who is still buying the Prusa mini+ and why?
Personally: While Prusa has outstanding support, good data protection, and does good things but there is now the Bambu Lab A1 mini.
Prusa mini is at the moment 500€ plus 20€ for a filament sensor (sic., it’s nearly 2024 and that’s an paid upgrade on half a grand printer) and another 7€ for WiFi.
Bambu Lab on the other hand is 320€.
Looking at the specifications, the A1 looks like a clear winner: For maintenance, there are three tasks: 1. cleaning and lubricating the mechanics (both are the same in this respect); 2. cleaning the build surface (both are the same); 3. maintaining the hotend and here Bambu Lab is clearly the better system as you can replace the nozzle in just a few seconds compared to Prusa’s E3D v6 hotend, which requires hot tightening.
The operation is not that different. Both support network, web interface, and automatic bed leveling probed at the nozzle. Bambu Lab has a camera built in, but this requires the printer to be connected to the BambuLab cloud, which may not be possible as the model data is shared with/uploaded to China. I would say this is still a strong point for Prusa as privacy is not an issue with their printers which means they can be easily deployed.
Performance should be close with input shaping enabled, but the A1 mini has the higher flow rate hotend, which means BambuLab is once again the winner (still no highflow at only 28 mm^3/s but twice the flow of a Prusa V6).
The build volume is identical and the footprint is also almost identical, so again no point where Prusa beats BambuLab.
Value? I have already mentioned it. 1.6 Bambulab for the price of 1 Prusa is a clear answer. If Prusa still had the 400€ original launch price and a filament runout sensor included, maybe the answer would be Prusa due to privacy/easier integration. The 200€/printer price difference is so significant that I don’t see who is still buying multiple Prusa mini+.
Btw. is there another printer on the market that just works paired with a small footprint and excellent value?
Today E3D launched their latest extruder. What's your thought on the Revo roto?
only/first Reviews: Made with layers (formally Thomas Sanladerer): https://www.youtube.com/watch?v=X5UpN0QaxGY E3D launch video: https://www.youtube.com/watch?v=W6GxPZUM0k4 product page: https://e3d-online.com/products/roto-extruder
155 GBP (without tax) for the sensor version. Equipped with a normal brass nozzle and a low-power heater core.
The pushing force isn't great as it can't do more than 6mm/s (14mm^3/s, approx. 60g/hour) limiting it to 0.15, 0.25 and 0.4mm nozzles. That's significantly short of the E3D Hemera XS Revo performance they claimed this extruder matches.
Is 14mm^3/s enough for 200 USD+ extruder for 2024 and beyond if you could trade approx. 20g more weight for 4x the max. flowrate?
3D-model collections like Printables or Thingiverse are awesome. Required (ASAP) a CPU socket cover to ship the motherboard. Found it online and 15 minutes later I had the part on hand.
Three years ago I looked into properly wiring hotends with quick toolhead swapes and came up with this: Combining the entire hotend wiring into 3x shielded 4-conductor cables (thin cables for small drag chains with tiny bending radius) and options to terminate the shield. The static side features an USB-port to retrofit Raspberry Pis and a step down to generate the 5V supply from a single 12 or 24V power input.
For the moving side/hot-end PCB it's a similar story:
- stepdown to 12V for fans and LED lights
- stepdown to 3.3V and 5V
- selectable logic voltage (3.3V, 5V)
- temperature and humidity sensor (feedback for heated chambers: adding a measurement point close to the print or being able to measure any point within the chamber to check for uniformity during development)
Why did it all fall apart? BOM cost.
Those connectors with locking lever for easy removal cost a fortune and the 3D-printing world moved on to CAN. For the active version of this, it's a different story. Never figured out how to make it plug-and-play/foolproof (active circuit for safety features (contact resistance, overtemperature, fan failure, etc.) as well as preemptive maintenance (heater wear, fan bearing degradation, and more).