3DPrinting
Hi, I've tried to print a model plane for my father. It's this model, using this LW-PLA right after purchase.
As you can see in the image of this post, the print is going well until it reaches a certain layer, where the filament does not get deposited properly for the entire layer, only intermittently. The following layers then, of course, have the same problem and I get this failed print with these "frayed ends". Additional attempts failed the same way at a similar layer count.
If someone has some experience with lightweight PLA (LW-PLA) and knows what can be done to solve this, I and my father would greatly appreciate the help.
Thanks in advance.
Edit: Additional info: I'm using the PrusaSlicer files from the linked page. Edit2: The printer is Prusa Mk4.
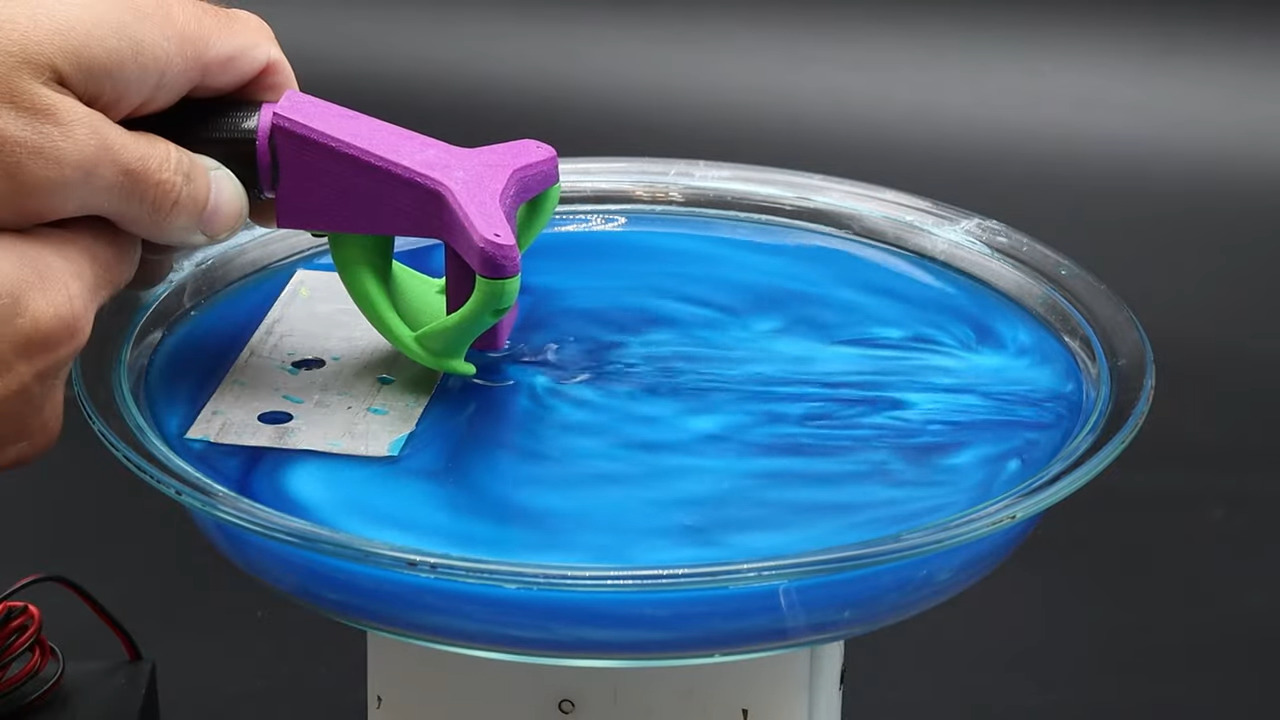
I have been trying for many hours now to print this circular model, but have been running into inconsistent extrusion and stringing. just before printing this, I successfully printed a set of Hextraction tiles, so I'm not really sure what the issue is. I also printed this model successfully in the past with the same settings.
I am using a Sovol SV06 with stock firmware, and PLA with the hotend at 195° C.
I also did a full calibration to see if that would fix the issue, and it did not.
I left the print over the weekend and I came back to spaghetti. It looks like something, caused the printer to push the print off its base like it was a poorly leveled bed?
I still have to watch the camera footage to see what failed, but I hope you guys get a chuckle out of the spaghetti monster like I did.
So I was attempting to install kevinakasam's belt mod and I'm fairly sure I stripped the thread that holds the M4 screw in the outer right side of the X axis profile (the side without the extruder attached to the tensioner). How screwed am I? Could I get away with trying Loctite red?
Edit: Thanks a ton everyone, I'll keep you all up to date when I try to finish the project this weekend!
I've been playing some gyroscope based racing games on my phone and thought it would be cool to have a physical steering wheel to hold.
Since I already have a magsafe ring stuck to the back of my OnePlus Open I designed it to use magnets.
Functionally it makes the games way easier to play since you can really precisely tilt the phone. You can even steer one-handed pretty easily too
The magnets I used are a little weak so I'll be replacing that with another stronger magnet ring I have
Designed in fusion 360, printed in pla+ on K1max
I'm thinking about buying a 3D printer for creating cosplay props like helmets and armor pieces (only once I figure things out, I'll start small of course) among other things and since there is a sale on the Ender 3 V3 series and they seem to be well received I figured that it would make sense to buy one. Having done some research, it seems like the regular V3 with it's 220x220x250mm build volume is too small for what I'm planning to do. Though splitting some parts will of course still be required, from what I could gather the V3 Plus better matches the recommended build volume having one of 300x300x330mm. The sale puts it at about the original price of the regular V3 which works for my budget.
I'd love to hear some thoughts on this, since my knowledge is limited as well as theoretical and the quality of internet sources varies quite heavily.
Edit: Thanks to everyone for the help! Just an update.
Thanks to @nate3d and @IMALlama comments below I calibrated the e-steps that were very under and it improved a lot.
I left the filament on the dryer for 8 hours and tested again with a 20mm /s speed and 220 C print temp and it was better (picture below)
Just to answer you all saying it's a clog or a hot end problem, it's not, the whole hot end, includong nozzle, heat block and everything else, even the PTFE tube are all brand new and I checked before.
This is still the best I could achieve and It took 3 hours to print this benchy lol !
‐-------- Hi everyone, I'm once again asking for your help lol Since I’ve tried to print with wood I totally wrecked my printer so I changed the hot end and am trying to set it all up again. Since my printer already came built and working I don’t have much experience with things like this so if you could help me I would be very thankful
What do I need to twerk to make it print better again?
I’m using Cura slicer and trying to print a benchy with the settings below:
Nozzle: 0.4
Layer: 0.2
Printing temp: 220 (it wont print with lower temp)
Speed: 60
Retraction distance: 7
Retraction speed: 70
Edit: PLA
Was having clogging issues so I thought I'd replace and get the mythically good capricorn tubes. This is a good sign that I needed to.
I need to print a discontinued part for my car, I have an .stl file for the part, I just don't have a 3D printer. It's a speaker mount.
What online print service have you used that you can recommend? Thank you!
Edit: located in the US.
I've been considering getting refills to reduce my plastic consumption, which means I would have to print master spools with PLA or PETG.
Because I don't consume my filament quickly enough, I got the Sunlu S2 filament dryer, which heats up the filament to 50-60C.
My question is: would it be OK to put a master spool in the dryer, or could it potentially deform?
I'm printing with PLA on a "PEO" print bed (really a textured PEI), on my heavily modified ender 3, and there's a pattern on the bottom of my first layer that I'm trying to get rid of. The top of the first layer looks fine, and changing the z offset in either direction doesn't help. I've also tried slowing down the print speed because I thought the extruder might be skipping, but I'm still seeing it at 10mm/s. Any idea what could be causing it, and how to get rid of it?
Pic: https://sh.itjust.works/pictrs/image/31cd6cef-16de-47b3-995f-197f7d0b432d.jpeg
Edit: the first layer went down from the bottom left to the top right, but the pattern I'm seeing is perpendicular to the extruder path
If a 0.4mm nozzle is 4x the area of a 0.2mm nozzle, should I print 4x faster with a 0.2mm nozzle?
Context - I think I'm having heat creep and printing too slow. (ender 3, pla 210c)
I foudn this program https://www.thearmoredgarage.com/ and just wondering if anyone has any experience with it and if it's worth buying or not?
Copying this from reddit. I am not OP.
Hello All! If you are planning on coming to 3DPrintopia in Bel Air, MD on September 28th and 29th this year, please consider printing, signing, and bringing along a blue tile for the "Layer Connections" Community Art Project. Spearheaded by stlDenise3D and 3DPrintBunny, the project has already collected roses at the Midwest RepRap Festival (MRRF) and the Rocky Mountain RepRap Festival (RMRRF). It'll be making a final stop at the Sanjay Memorial RepRap Festival (SMRRF) at the end of the year.
More details on the project and links to the STL files can be found here. The main stipulation is your tile be a shade of blue. Come 3D Print with us! A Community 3D Printed Art Project ⋆ stlDenise3D https://stldenise3d.com/come-3d-print-with-us-community-3d-printed-art-project/
Source https://www.reddit.com/r/3Dprinting/comments/1f5wk6p/layer_connections_community_art_project/
Source https://x.com/UncleJessy4Real/status/1829869388872159286
Full video https://www.youtube.com/watch?v=FKd9X-wl8Rg
This is the temp tower of my wood print experiment Cand even se much difference. It goes from 260 to 190. Below 225 gets really flimsy and above 240 melts. But even 230, the "best" one is really bad, and I'm not talking about retraction. Even the layers that melt are inconsistent.
Also it's not humidity since the filament was in a filament dryer for.16hours.
edit: The nozzle is 0.8
can someone think of anything else?
I have an indoor/outdoor thermometer to keep track of how hot the back of my Expedition gets. I drive pretty regularly with two dogs in the back, and over the summer and winter the temps can get a little extreme.
I need to be able to take it out to keep an eye on it remotely (it has about 1/4 mile range) but also have it not rolling around while I drive.
There was a coin holder there that I popped out, and used as a template for an insert to keep this mounted semi-permanently.
Printed with kinda crappy Amazon Basics PETG. If it holds up well, I'll reprint it with better quality black PETG so it matches the car better.
I was experimenting with bottom patterns in Orca and octagon spiral looked cool. I tried it with RGB filament and it came out amazing!
There is a depth to it and it changes with the angle
I haven't seen this before online so figured I'd share!
I want to mount a printed part to a standard 2mm motor axis which doesn't have any dents or profile. Its just round. If I print at exactly 2mm, it fits for the first few times until it gets too lose and the spinning part sometimes falls off.
Is there software that will automatically cut large STLs based on the printer you have or is cutting something you just have to do manually?
TL;DR No.
What you should do:
- buy fresh IPA. It is approx. $5/L. As such a 2L washing bin is approx. $10 + 10L waste disposal. In the broader picture of total costs and production value, this is manageable (resin cost, machine depreciation, PPE/gloves, ...)!
- use two or three stages of washing
- fill the washing containers with as little as necessary to get it done
- periodically expose the liquid to sunlight and let the particles settle down. Separate the "clean" liquid from the sump (you might add special chemicals to speed up this process).
- if the first stage needs replacement: 1.) responsible disposal of the liquid in compliance with local regulation 2.) move the liquids around: (the third stage is the new fresh liquid, the second is the prior third stage and the second washing station is now the first "dirty" stage).
- check for alternative chemicals that can be used with your particular resin
If you use water-washable resin: IT IS A DANGEROUS LIQUID! Dispose of dirty water responsibly as chemical waste.
Long answer:
To answer that, let's first look at what isopropanol (IPA) is: Its formal name is propan-2-ol and its CAS number is 67-63-0.
As a starting point, check a database like GESTIS (German) and NOT wikipedia: https://gestis.dguv.de/data?name=011190
At the top of the page we see that it has GHS-02 and GHS-07 warning labels. Looking further, it is a colourless liquid with a flash point of 12°C and an ignition point of 425°C. The explosive range is 2-13.4% vol. The signal word is DANGER.
Scrolling down:
> The substance forms explosive peroxides.
What does this mean?
There is no mechanism mentioned, but generally, if you expose these chemicals to sunlight they will react over time to form a peroxide, which is much more reactive and can explode at high concentrations (there are exceptions to this rule, but most of them go boom).
This means for distillation:
- avoid "old" IPA if possible
- check for peroxides (if necessary, treat the peroxides before distillation)
- don't distill dry (leave some liquid in the sump to avoid high concentrations of peroxides)
As I believe this shouldn't be done at home I won't tell you how it can be safely done (if this isn't enough to deter you: read scientific literature/books describing how it shall be done).
Instead, focus further on what advice is out there on the internet/YouTube:
- A water distiller is made for water and water isn't flammable and doesn't form explosive atmospheres. In other words they are unsafe for Isopropanol or Ethanol.
- Do you think a 2kg fire extinguisher is enough? Are you truly capable of thinking rationally when there is a fire or would you panic like most people?
- Don't even consider doing it indoors or in a garage.
- Don't work with large volumes. In a laboratory with proper fumehoods and equipment, there might be limits like 500mL batch sizes.
- If somebody isn't wearing eye protection or heating large amounts of liquid without stirring question his qualification to talk about this topic. Being an influencer or posting online, like this post, doesn't require any formal qualification as such even the big YouTubers/influencers post horrendous content that is dangerous or misleading.
Has anyone here changed the Biqu B1 SKR v1.4 mainboard to SKR MINI E3 V3?
So I set this text to change the bottom layer to concentric only for the text and I got this. I had this large flat area in my print and decided to spice it up a bit for fun without doing multicolor which would be 1, too annoying to do manually and 2, too visible for this part that needs to be all black. So here I have a nice DON’T PANIC on the back of it.
Edit: Deleting this post. It's starting to get controversial, but that's OK. Not what I planned on, but whatevers.
I'd like to get a Bambu Labs A1 with the AMS but I'll want a sturdy surface to put it on. I'm shopping around for tables with drawers and I'd like to know how big it needs to be. There are dimensions for the printer itself but it's hard to know how much more space I need to accommodate the AMS.
I am looking to get a new 3d printer. I've had an ender 3 V2 for a few years. While I've been able to get many excellent prints out of it, I'm looking for a printer for my new apartment that will require a little less tinkering and troubleshooting. I'm pretty experienced with the nuances of 3d printing, and don't mind taking things apart and fixing things(but not every time I wanna use the thing). Realistically I'll be printing mostly PLA and PETG, but it would be nice to have the option of trying out other higher strength filaments, and I'd like to have an enclosure to play with ABS eventually.
I prefer to spend around $500. I've been eying up the Bambu P1S with the AMS but I really don't think I can afford almost $1000 right now. If it's really worth it, I can pull it off. The Bambu a1 is also interesting, but id prefer to have a core-xy with an enclosure.
I've been looking at the flashforge 5m or 5m pro, as well as creality k1c. Those prices are way more attractive. Or perhaps qidi?
All the choices and different technologies on the market now are a little bit overwhelming, and I don't want to be disappointed in my purchase. I'll mostly be using it to print random things for around the house and for electronics projects.
Any thoughts or recommendations are welcome, thank you!
- hackaday.com Simulating Air Flow For 3D Printing
You’ve probably heard that a 3D printer is capable of producing its own replacement parts. Sometimes, that even includes upgraded or improved versions of the parts it was originally built wit…
I don't print any abrasive materials at all. Pretty much only normal PLA and PETG.
I noticed, that my print quality gradually went down quite a bit, especially in the last few prints. I had a lot of stringing, weird blobs, and scarred surfaces.
Now, the print quality is as good as it should be!
They are dirt cheap. You can get a set of 10-15 generic ones, in different sizes, for only a few bucks. Don't forget that they are consumables.
I am using the Creality ender 3 v3 SE with eSuns PLA+ in black. The recommended printing temperature is 205-220 and I am printing at 210. The bed is set to 65°. When I print somewhat flat parts. The edges warp off the plate, while the printer is running and the plate is still hot. Until a few days ago it worked perfectly and I don't know what I am doing different.
It is always only the first few layers, and the print never moves, so that the printer would make spaghetti, its just the edges that lift of a few millimeters.
Sorry, this is not really 3d printing related. But as we have some cool folks here OS wise. I hopped you could help or point me the correct way.
As I have mentioned before my brother and I own a tiny narrow boat we are doing up.
The engine room is a nightmare. 4ft high with no top access. We are disabled (visual and flexibility basically old can't bend and classed as blind but some vision. ) So we have difficulty measuring exact space in a room we have to crawl through. Well it's very like Star Trek Jeffries tubes but greasy. ;)
We need to plan and mount electronics in there to support our use. (I sought advice on printing to help with this a while back and got fantastic help)
I am now starting to think having a 3d model of the engine room would make working out the layout much easier. So here is where advice is needed.
We are skint (poor for the US) so spending 1000s ain't an option. And likely not worth it anyway.
I have heard of android apps that use photographs. And that level of accuracy is likely fine for our planning needs.
But I'm a Linux 100% user. Since the late 90s So need some way to do this that can be done on Linux and fed into FreeCAD and or Blender.
Does anyone know much about tools in this space. And what the process for doing this with photographs is?
- www.thingiverse.com Sony E-Mount Microscope Head Adapter by nik282000
Many adapters re-use the head and prisms of the microscope which leads to loss of light and aberrations, this direct mount projects the microscope's image directly onto the sensor giving the best picture possible. The dovetail on the microscope side is "standard" sized for Olympus heads, ~42mm wide ...
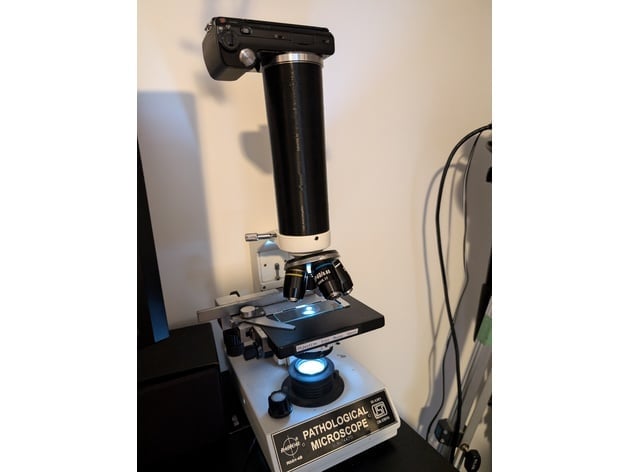
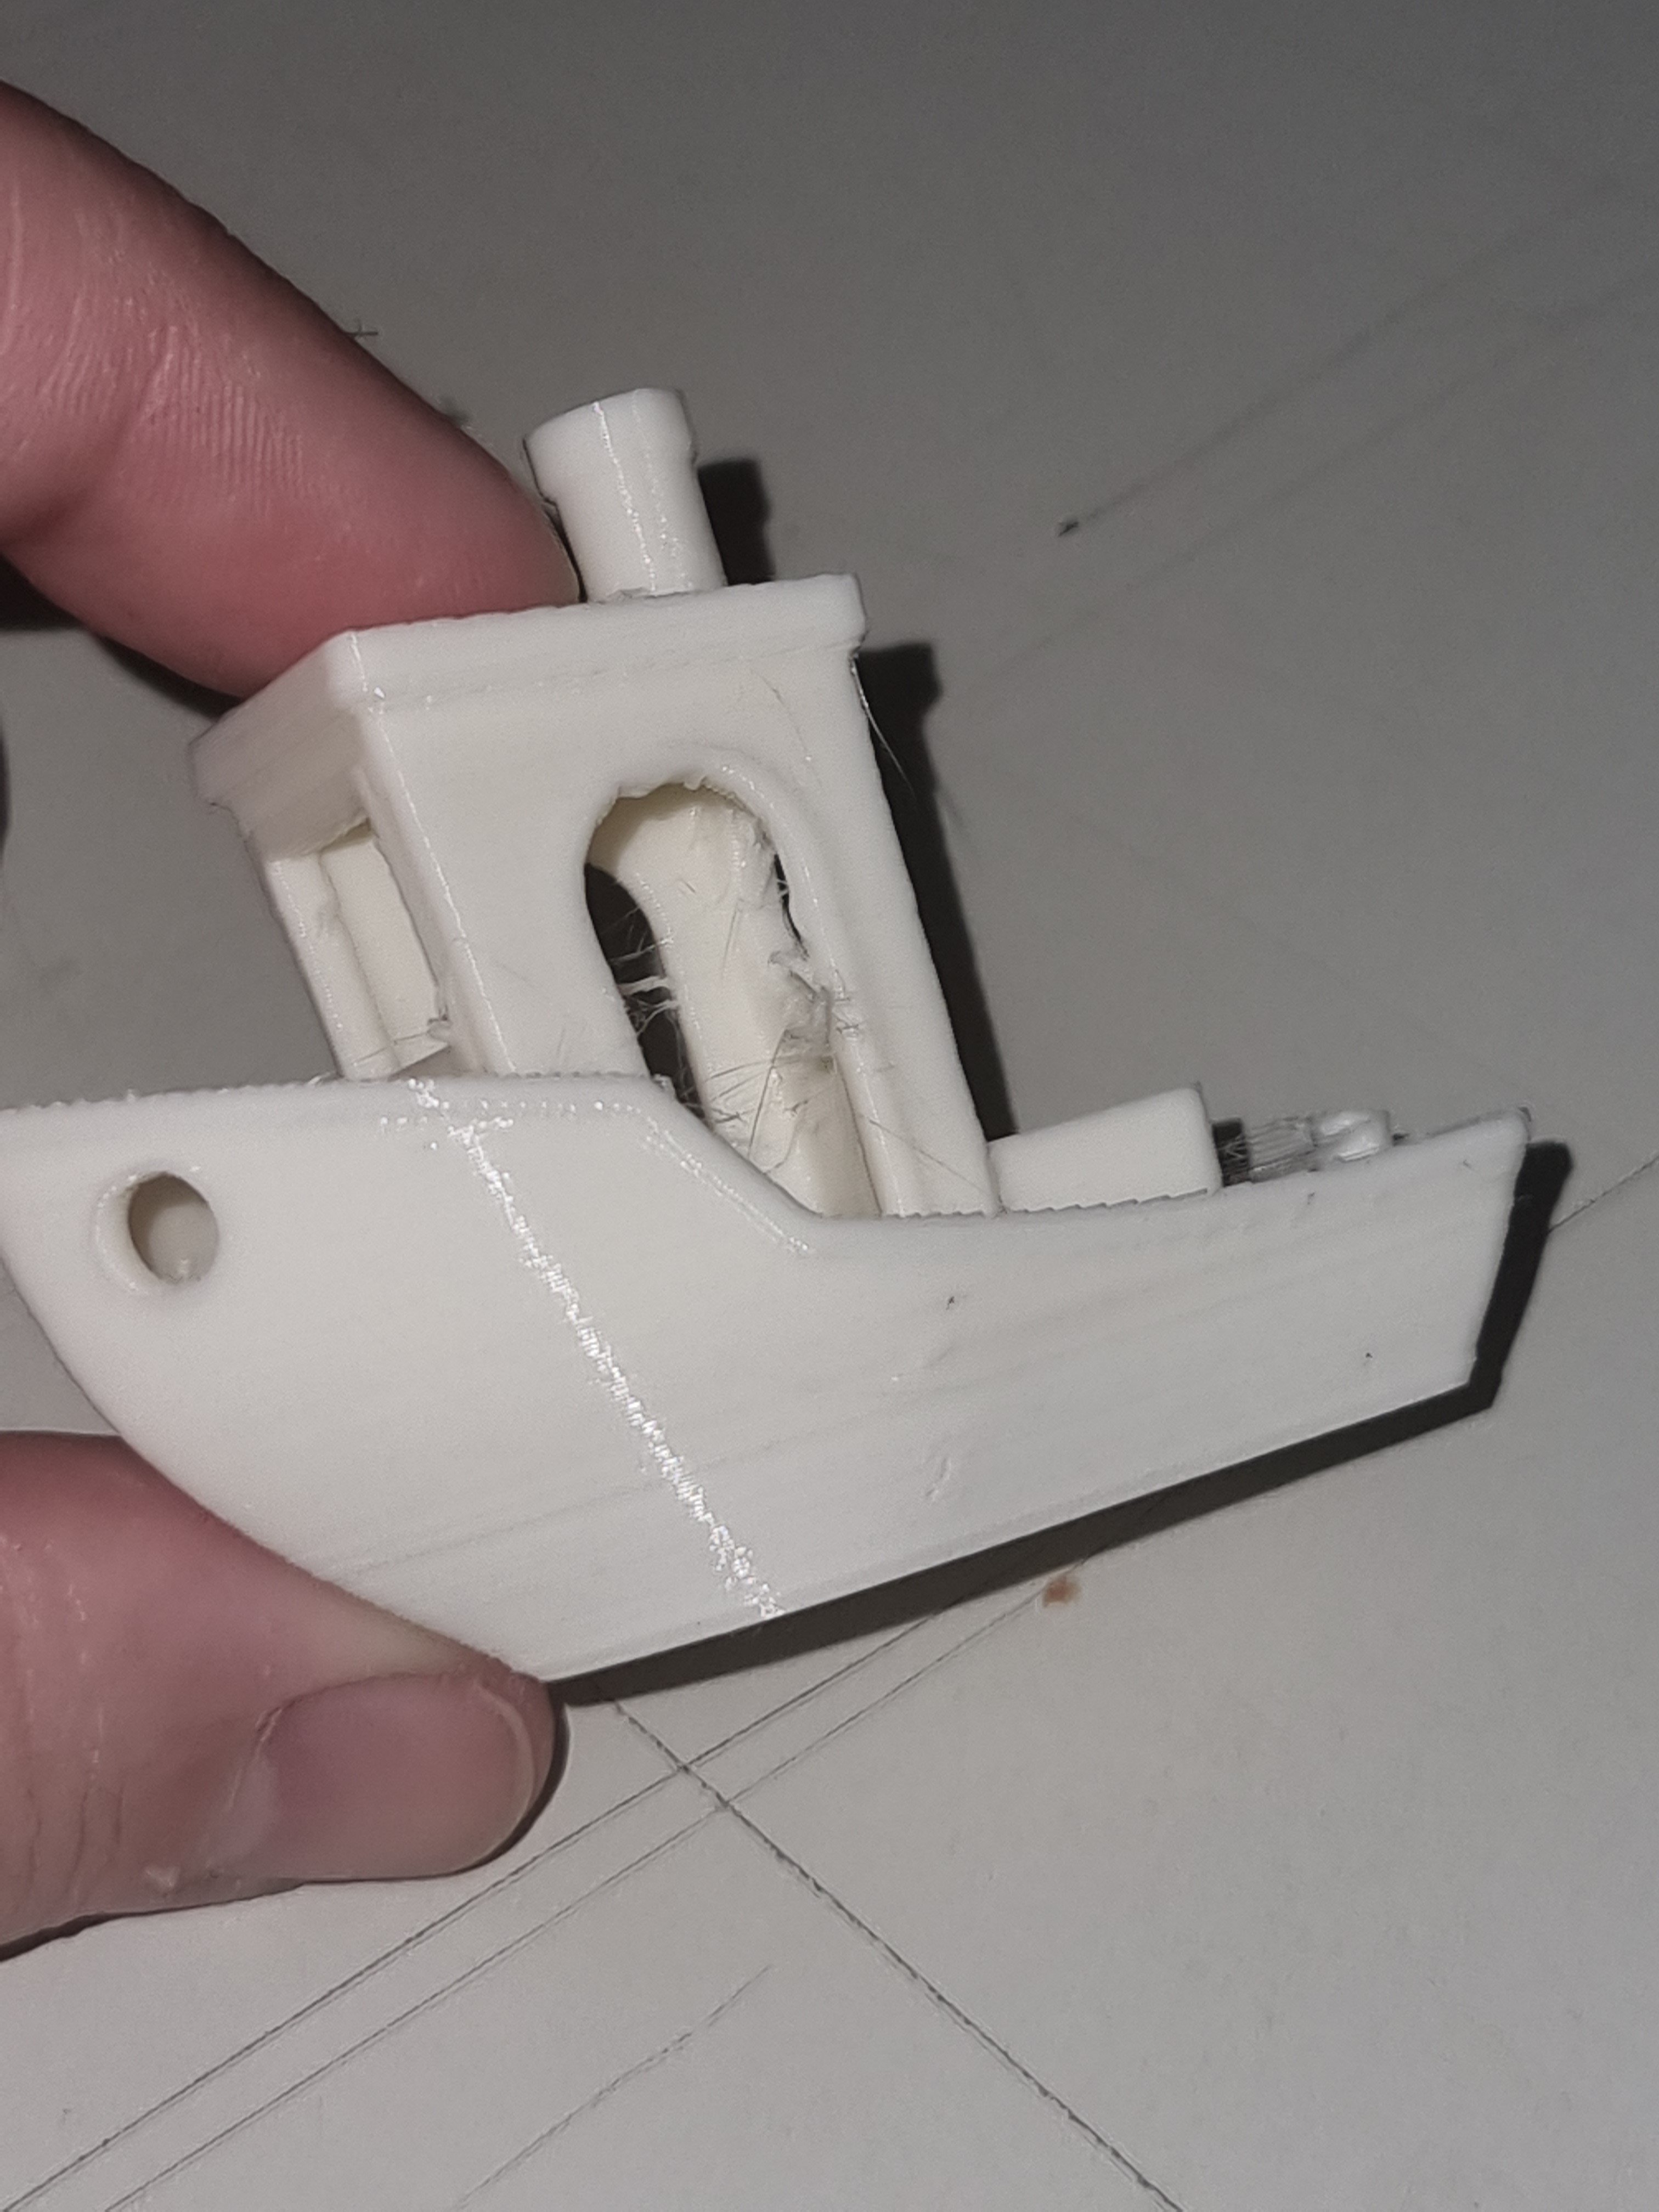
I was gifted an unused Ender 3 Pro two weeks ago and managed to model and print an adapter to connect Sony E-Mount cameras onto a 42mm dovetail used by microscopes.
Bed adhesion, leveling, stringing, clearance issues, blobs and permanently welded supports, I got to battle it all but thanks to the massive volume of community support I worked my way though.
Thinking about getting my first printer to print some organization stuff around the house, some nerf parts, as well as some small toys and fidget for friends/kids. The Bambu Lab A1 seems to be notable for being beginner friendly without a lot of fiddling.
Read recently about the lawsuit and I'm wondering if I should wait until that's resolved before pulling the trigger. I'm worried that some outcome there will eliminate important features or worst case make it obsolete entirely. Any thoughts?
There's a number of options and I was a bit overwhelmed, is there a comprehensive write up, copypasta, or something of the like?
- nowsci.com Twystlock | nowsci.com
100% 3D printable gaming accessories that require no printed supports or additional parts.

cross-posted from: https://lemmy.nowsci.com/post/9782596
> Hi all, > > I've finally gotten around to releasing these formally after much testing of prints and usage. > > The Twystlock system is a set of 100% 3D printable gaming accessories that require no printed supports or additional parts. This means no springs to buy and no metal elements to melt in, just access to a 3D printer and a bit of super glue. Originally designed for the Steam Deck, these accessories can be applied to the case of any mobile gaming device. > > The Twystlock connector itself is designed as a quick-connect that secures parts together with a simple twist motion, can be fully recreated with affordable home-based 3D printers, and doesn't require complicated supports to print. The first use of this connector has been for the Steam Deck, specifically to supply an alternative accessory platform that is more accessible to the everyday 3D printing hobbyist, however it could be utilized as a connector in almost any environment. > > Feel free to download what you like, and if you would like to request a new accessory design, or vote on the next accessory to be created, please visit our Lemmy community at https://lemmy.world/c/twystlock@lemmy.nowsci.com.
I'm looking at making a new printer. I'm thinking a core XY similar to a Voron, but I would be making it from scratch. I'm looking for something I can make reliable and accurate. I want to print PLA, ABS, TPU and more. I have a bunch of parts now that I would stick to.
235mm heated bed Revo hot end Nema 17 motors. BTT E3 mini, although I could use my SKR3 instead.
The easiest would be a bed slinger, but I am open to a Trident style. I like unique and challenging things.
What new features should I include? What should I avoid?
I am (slowly) working on mounting ACM panels to my Voron 2.4 to try to get my chamber temps up to reduce/eliminate warping on big ASA prints. I only needed 12 of these parts, so I chose to print them sequentially.
Want to know how slow my progress has been? Well, this photo proceeded this post and I made that post weeks ago... I'll crack open the cable chain and get this ball rolling again soon. Or maybe I'll ditch the chains and go to a USB toolhead. But that will require me to print some parts, so I guess I have to fix this. And if I'm doing that it's going to probably be 'good enough' for quite some time... 🙃
There's nothing major in the print queue, but I do want to make sure the printer is ready to go when something does turn up.